Introduction
In this guide of the Center for Microscopy and Image Analysis we show how to start up the microscope and software, mount a sample and find the focus on the Zeiss LSM 980 Airyscan microscope.
With the AI Sample Finder you quickly find your sample, easily acquire an overview image for navigation and define potential regions of interest. While using ZEN Connect along all subsequent images will automatically be displayed in context. Further, one can easily use ZEN Connect to align and overlay images from any other microscope source.
This guide is valid for both modalities, LSM mode as well as Airyscan mode.
Please find more information about the system here.
-
-
Turn ON the "Main Switch"
-
Switch the laser key to "ON".
-
Switch ON the "Components" (on the table).
-
-
-
Switch ON the fluorescence lamp.
-
Once turned on, the lamp should remain on for a minimum of 30 min.
-
Turn ON the computer.
-
-
-
Sign-in with your ZMB core credentials.
-
In case you forgot your password please follow this link.
-
-
-
Start the "ZEN 3.x (blue edition)" software.
-
The system will automatically initialize the hardware.
-
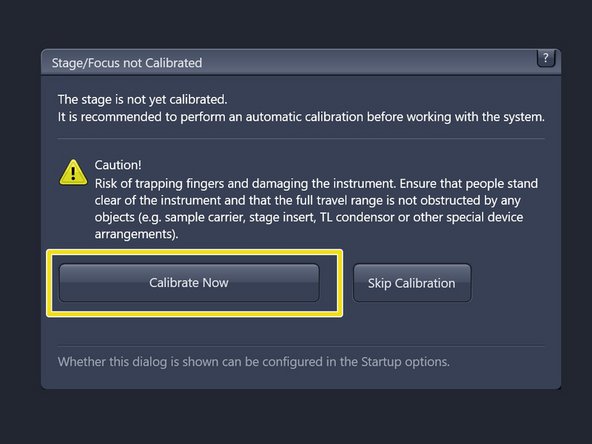
Make sure there is no sample on the microscope stage and calibrate the stage by clicking "Calibrate Now".
-
-
-
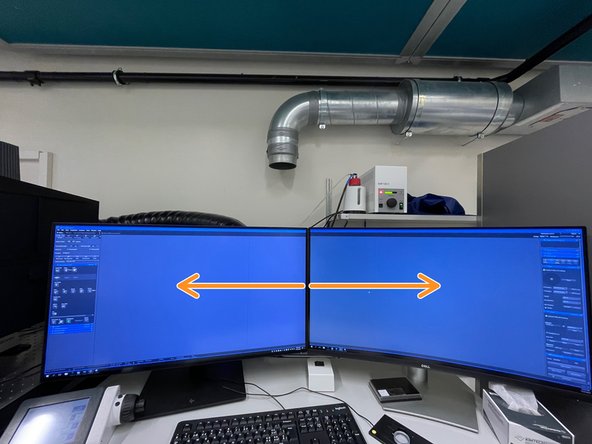
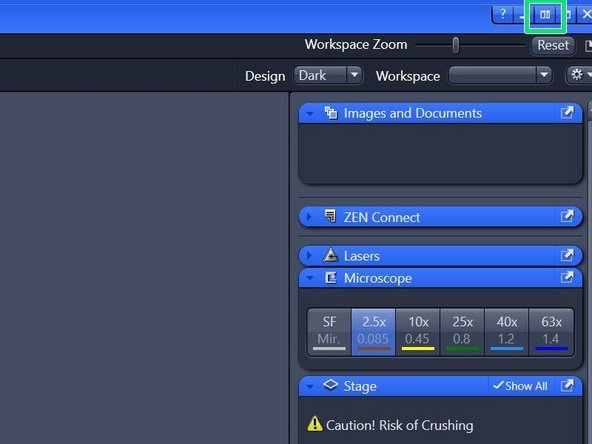
Make sure that ZEN Software expands over the two screens.
-
Otherwise, expand ZEN software by clicking on the "Dual Screen" button.
-
This setting is saved in your profile and should be retained even after logging out or restarting the microscope.
-
-
-
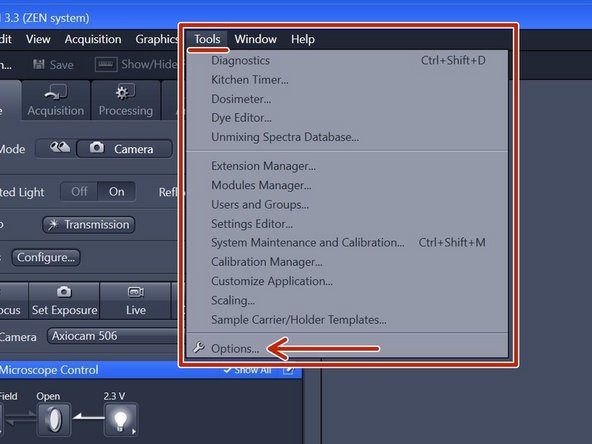
In the "ZEN" software go to Tools > Options.
-
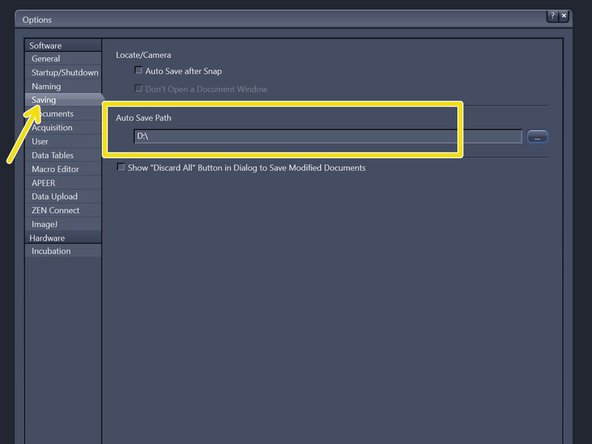
Choose "Saving" and check that the "Auto Save Path" is set to the local Data (D:) drive. If not, please change accordingly.
-
Please generate a new folder with with your username. D:\ ZMB-USERNAME e.g. D:\m.mustermann.
-
This path setting is saved in your profile and should be retained even after logging out or restarting the microscope.
-
-
-
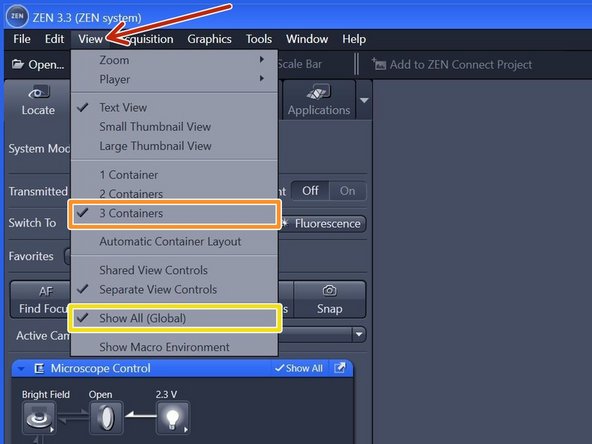
Within the tab "View",
-
make sure you have selected "3 Containers".
-
make sure you have selected "Show All (Global)".
-
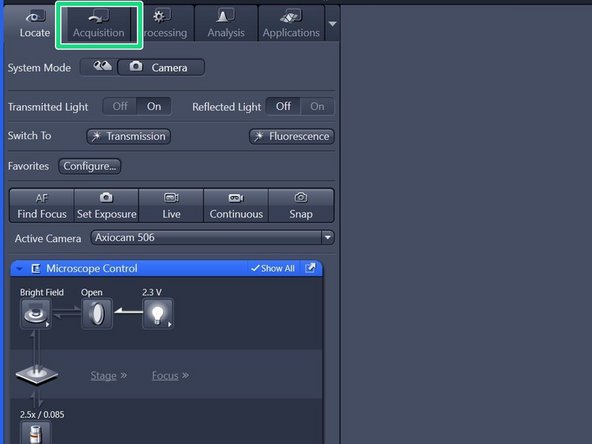
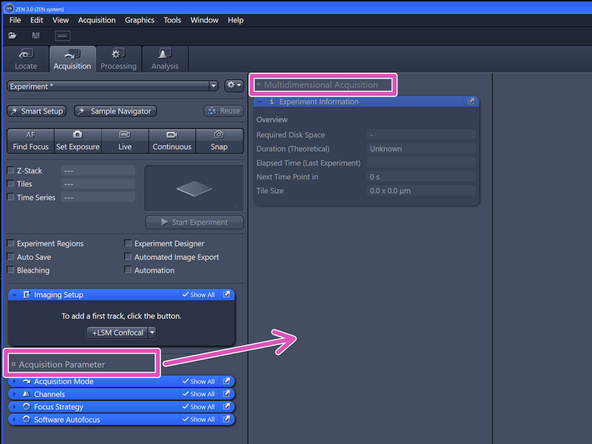
Switch to the "Acquisition" tab.
-
By clicking and holding the menu titles you can move around the menu boxes and also extend the menu to two columns for easier menu navigation.
-
These settings are saved in your profile and should be retained even after logging out or restarting the microscope.
-
-
-
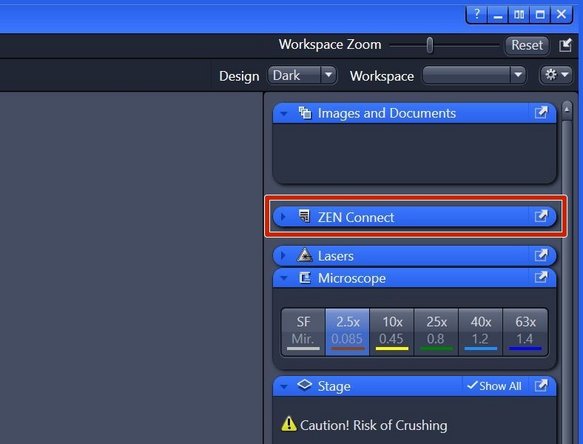
"ZEN Connect" correlates all data associated with your sample. It allows you to map high-resolution images on the larger overviews, maintaining the context and simplifying your file organization.
-
Open the "ZEN Connect" tab (right hand side in "ZEN" software).
-
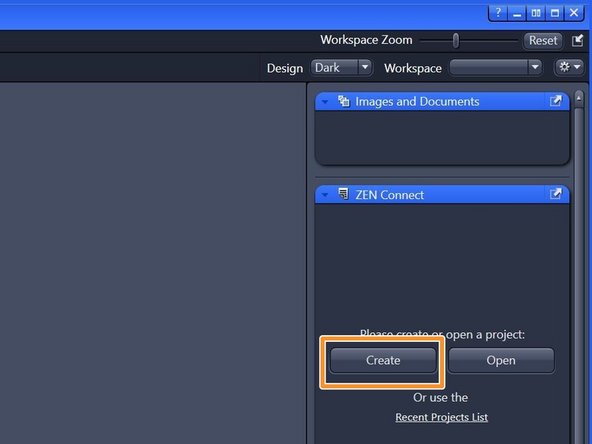
Choose "Create".
-
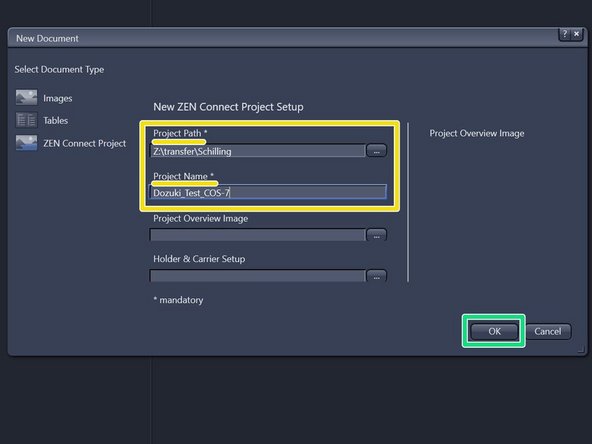
Define "Project Path" and "Project Name".
-
Click "OK".
-
-
-
Drag and drop "ZEN Connect.a5proj" file to the 3rd container (outmost container right hand side).
-
You need to grab the tab by the text in order to move it.
-
-
-
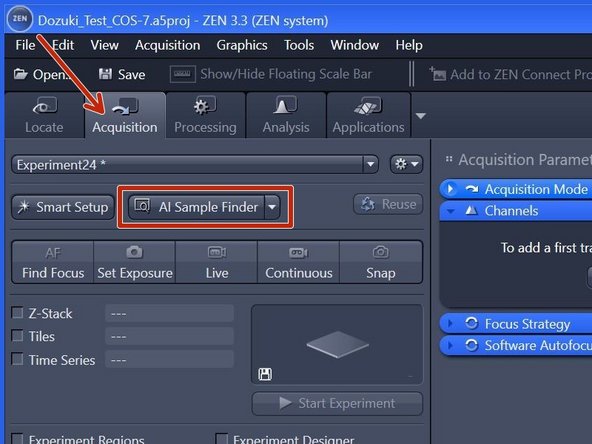
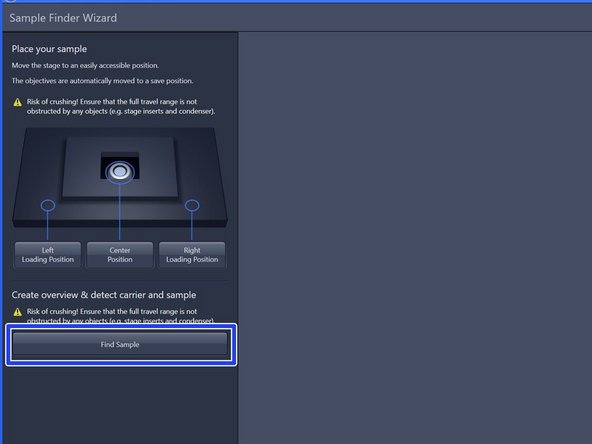
The "AI Sample Finder" allows you to place your sample, capture an overview image, identify & align your sample carrier and adjust the focus for each region. ''
-
The "AI Sample Finder" is currently compatible with slides 76 x 26 mm, 35 or 50 mm dishes, chamber slides (1x, 2x, 4x, 8x, 10x), Multiwell plates round (6x, 12x, 24x, 48x, 96x) Multiwell plates (96x angular).
-
Click "AI Sample Finder" in the "Acquisition" tab.
-
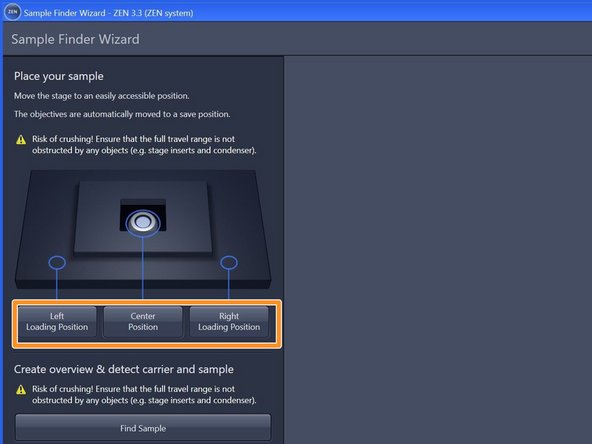
Select an appropriate "Loading Position" within the "Sample Finder Wizard". ➔ The motorized stage moves to the selected position for sample loading.
-
-
-
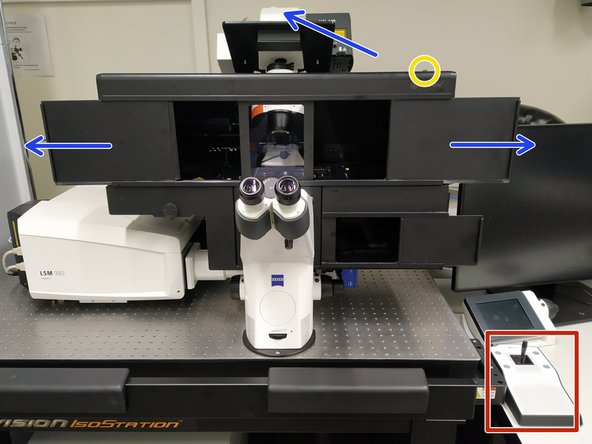
Push back the condenser arm and open the upper doors.
-
Turn ON the incubation box light.
-
In the wall mounted drawer, multiple stage inserts are available.
-
Place your sample with the coverslip facing down.
-
How to insert your different samples (slides, dishes or well plates) please watch the following steps (Step 12-15).
-
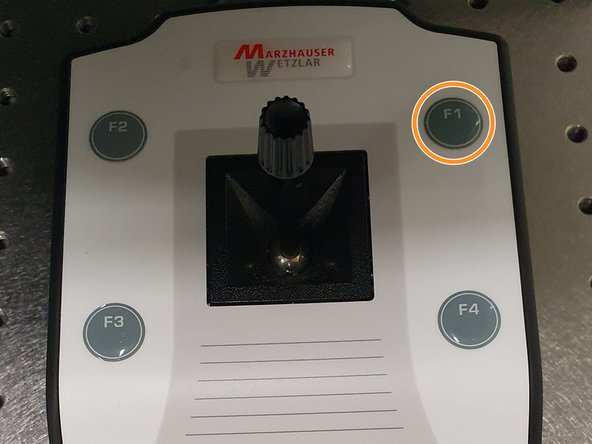
Navigate your sample in x and y using the joystick.
-
Toggle between coarse and slow movement by pressing "F1".
-
Bring back condenser arm to its straight position.
-
-
-
Place your sample with the corresponding "Click-In" insert (for slides and dishes) or directly into the universal mounting frame (multi-well plates).
-
Make sure the "universal mounting frame" locks securely into the stage completely flat.
-
Make sure the round marker points are facing the same corner.
-
As a rule, the universal mounting frame is always mounted and does not need to be removed. Simply replace the click-in inserts.
-
-
-
Insert the "Click-In" slide insert into the universal mounting frame.
-
As a rule, the universal mounting frame is always mounted and does not need to be removed. Simply replace the click-in inserts.
-
The "Click-In" slide insert is compatible with the following formats:
-
µ-Slides by Ibidi
-
Nunc Lab-Tek™ Slides
-
Chambers by Thermo Scientific
-
Object Slides
-
PDMS Chips based on 25x75mm slides
-
-
-
Insert the "Click-in" 35 mm petri dish insert into the universal mounting frame.
-
As a rule, the universal mounting frame is always mounted and does not need to be removed. Simply replace the click-in inserts.
-
-
-
Multiwell plates can be directly mounted into the universal mounting frame.
-
As a rule, the universal mounting frame is always mounted and does not need to be removed.
-
Compatible with all kind of well plate formats.
-
-
-
After mounting your sample click "Find Sample".
-
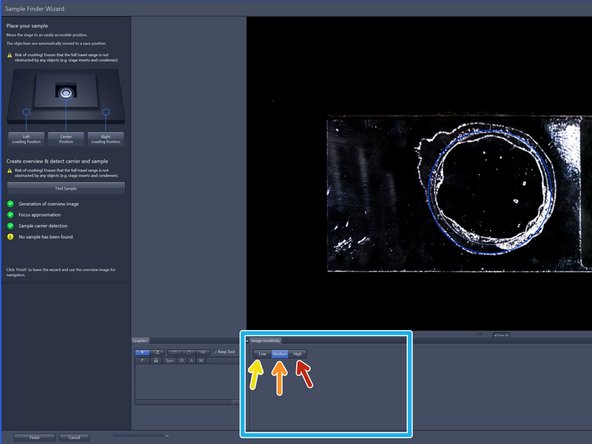
➔ The button changes to "Stop" ➔ When sample recognition is complete all process steps up to "Sample carrier detection" are highlighted with a green checkmark.
-
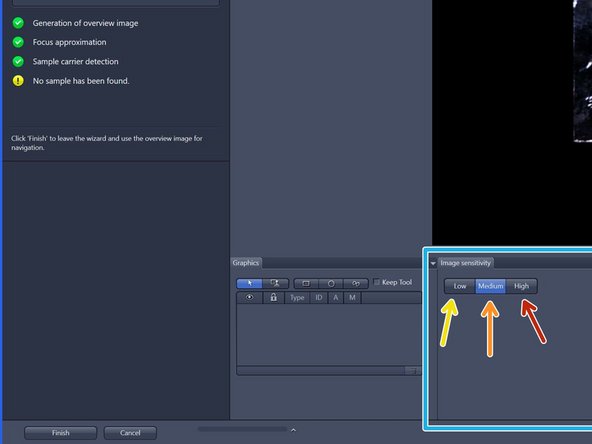
To better visualize sample, choose from three contrast levels within the image sensitivity tab:
-
Low (very high-contrast, thick samples)
-
Medium (normal samples)
-
High (very low-contrast, thin samples)
-
-
-
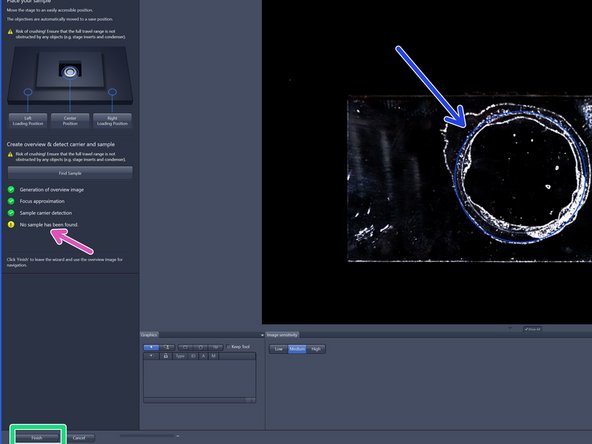
If no sample has been identified (e.g. adherent cells) no sample area is outlined (yellow attention sign).
-
Please note: The blue sample holder areas can not be edited.
-
Click "Finish".
-
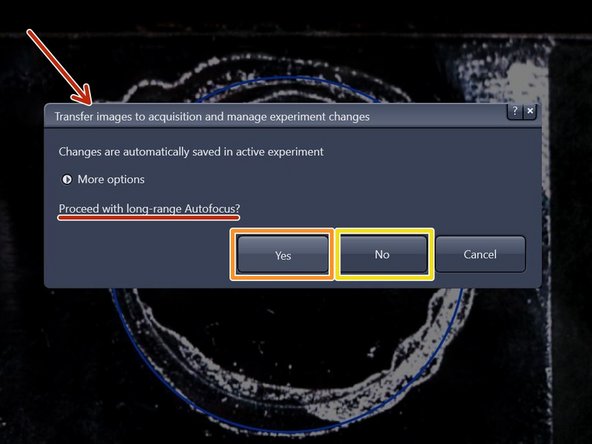
"long-range Autofocus":
-
for tissue sections click "Yes",
-
for cells click "No".
-
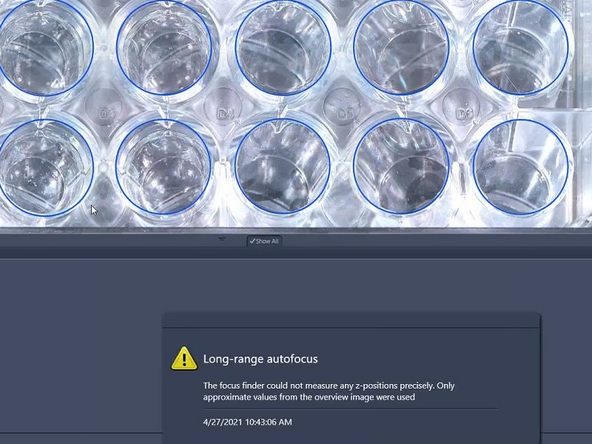
Please note that especially for low contrast samples (e.g. adherent cells) the focus finder will only approximate the values in order to generate a sample carrier wide global focus.
-
-
-
Drag and drop the "Navigation & Tiles" tab to the middle container.
-
You need to grab the tab by the text in order to move it.
-
-
-
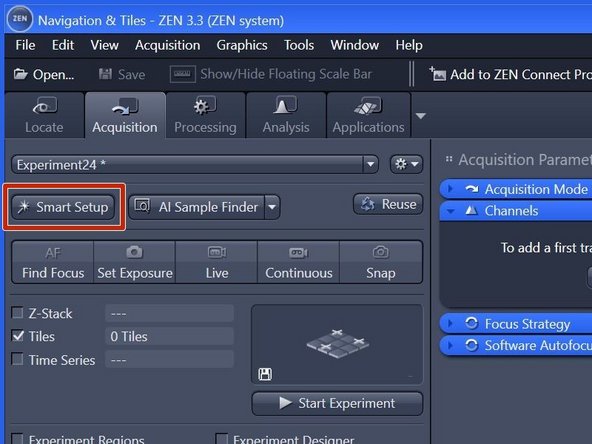
Click "Smart Setup" to open the "Smart Setup" wizard.
-
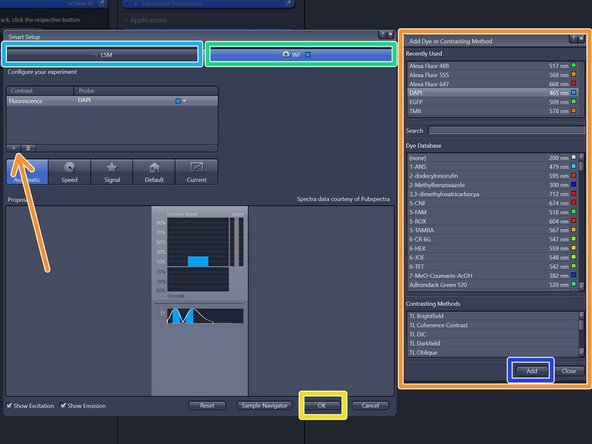
Select your prefered modality for the overview generation:
-
"CLSM" (confocal laser scanning microscopy)
-
"WF" (widefield, recommended).
-
Click "+" to add dyes/channels to your experiment.
-
Choose your appropriate dye for the overview and click "Add". One can also choose more than a single dye.
-
Click "OK".
-
The software automatically sets all the needed tracks and corresponding wavelength settings. Lasers are getting switched on automatically.
-
-
-
Overview will be automatically taken with 2.5x/air objective.
-
Click "Live" .
-
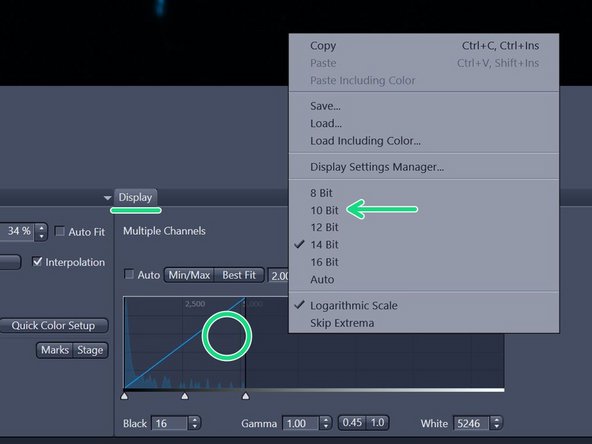
When clicked on Live a new tab with the live view will pop up. In case you don't see much, you need to adjust the histogram.
-
In the "Display" tab underneath the live image adjust the histogram by simply right-clicking on the histogram and choose e.g. 10 bit display.
-
Adjust focus either by focus wheel or with CTRL + mouse wheel.
-
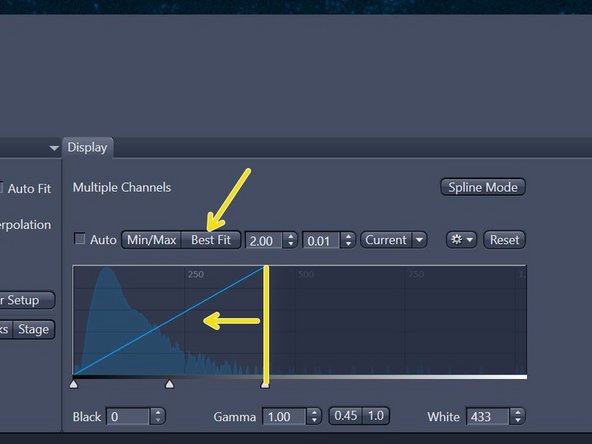
For better visualization click "Best Fit". If not sufficient move the right boarder of the histogram closer to the peak for better display.
-
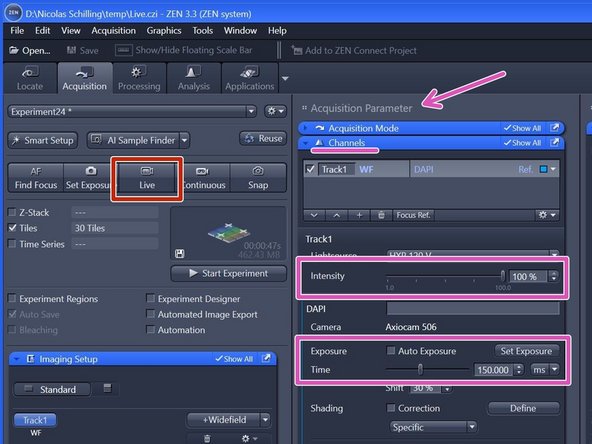
Adjust "Intensity" and "Exposure time" in the "Channels" tab (within "Acquisition Parameters").
-
-
-
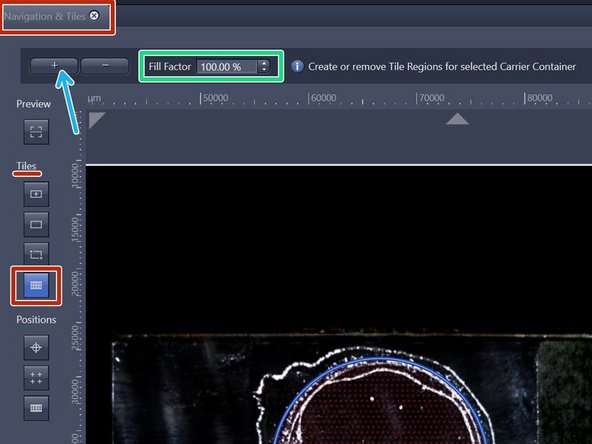
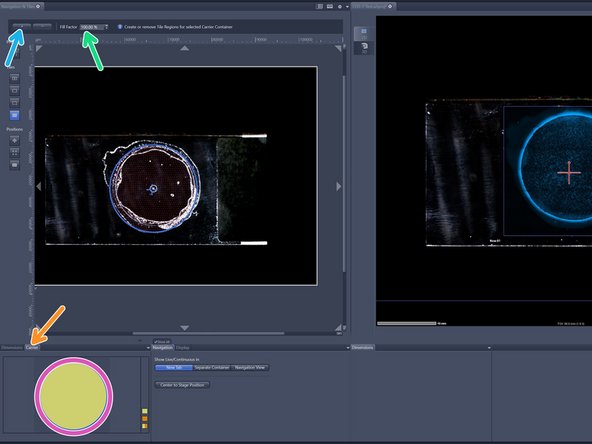
Within the "Navigation & Tiles" tab select "Sample carrier" option.
-
Click "Carrier".
-
Select the region of interest of an overview - activated ROI will have yellow fill.
-
Provide your desired "Fill factor" for the overview.
-
Click "+" to add the tile region to the job list.
-
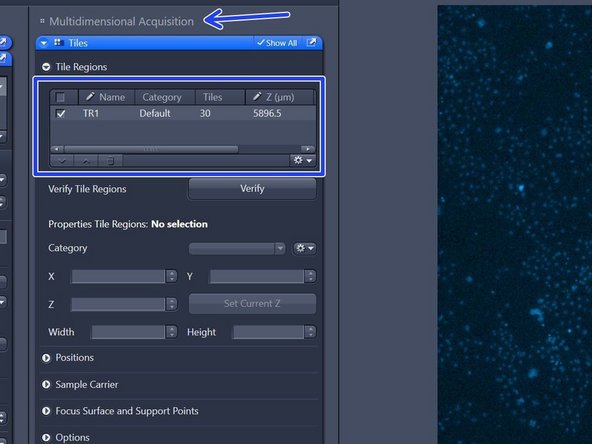
The created tile region will be indicated in the "Tiles" tab under "Tile Regions" (within "Multidimensional Acquisition").
-
-
-
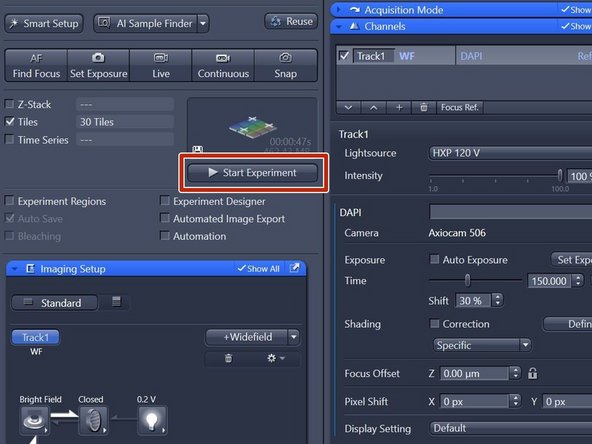
Click "Start Experiment" when satisfied with selected region and focus.
-
-
-
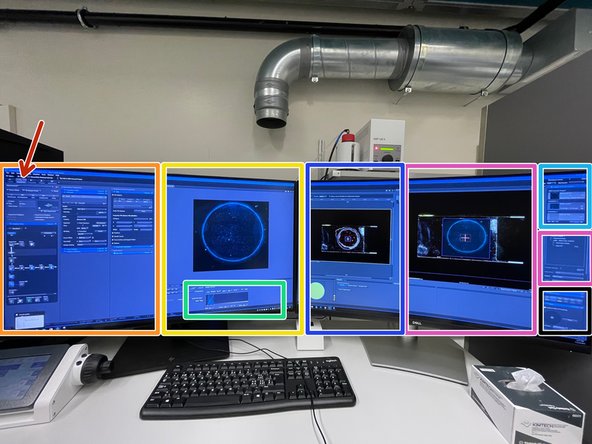
Identify the following sections in the "Acquisition" panel:
-
Control panel including beam path and acquisition parameters.
-
Live image display.
-
"Display" adjustments.
-
Gallery of acquired images.
-
Hardware controls as objectives, lasers, stage e.g. .
-
"ZEN Connect" overview and "ZEN Connect" Menus.
-
"Navigation & Tiles".
-
-
-
After overview is completed one can continue with a high-NA immersion objective to visualize more details if needed.
-
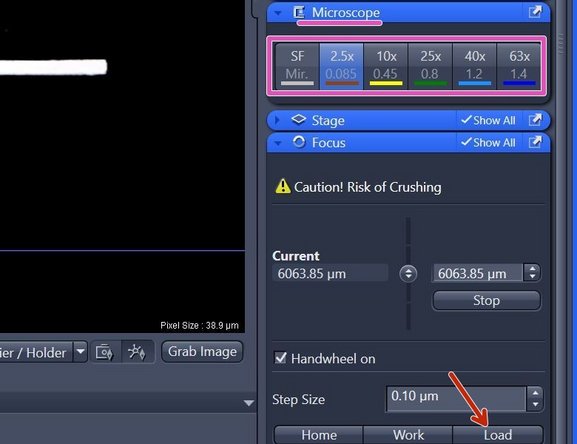
Click "Load" within the "Focus" tab (right hand side in software) to lower the objective turret.
-
This increases the distance between objective and stage and allows you to exchange sample, adding immersion or switching objectives.
-
Make sure to not move stage up or down after moving into the load position. Otherwise your current focus position is lost.
-
Select the objective of choice via the "ZEN" software (within "Microscope" tab right hand side).
-
-
-
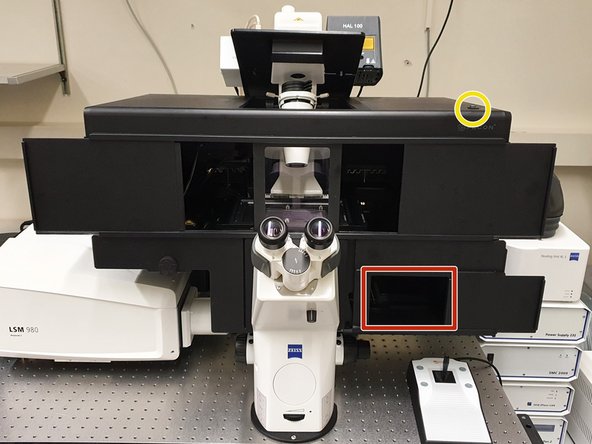
Open the doors of the incubation box and push back the condenser arm (needs a bit of force) to get access to the stage.
-
Remove "Click-in" insert from universal mounting frame.
-
Make sure not to touch your sample within the sample click-in carrier as this may negatively affect your overview alignment.
-
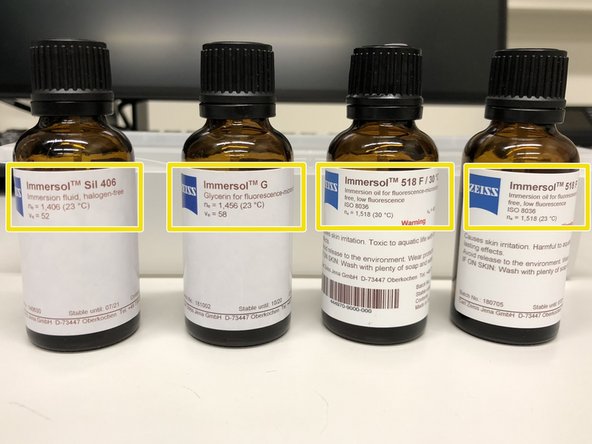
Carefully add appropriate immersion liquid considering the following points:
-
For optimal imaging performance on some objectives the correction collar has to be adjusted (see Step 26).
-
Depending on the objective, different immersion media have to be used (see Step 27). We advise you to wear suitable gloves when handling immersion liquids.
-
Apply immersion either on the sample or directly on to the objective.
-
Re-Insert "Click-in" insert with your sample into universal mounting frame.
-
-
-
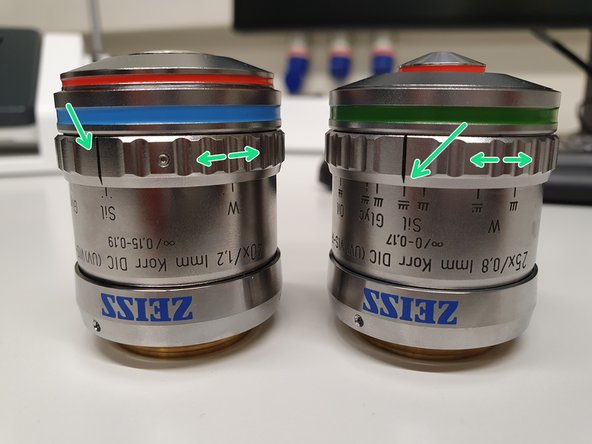
For optimal imaging performance on some objectives the correction collar has to be adjusted:
-
The 25x (water, oil, glycerin, silicon-oil) and the 40x (water, glycerin, silicon-oil) objectives are multi-immersion objectives and need to be set to the correct immersion media, by setting the black marker line accordingly.
-
Do not remove the objectives for adjustments.
-
Turn ON the incubation box light.
-
Check that the correction collar of your objective is set to the desired immersion media. Best access to the objective turret from the side.
-
To avoid contamination from other immersion media and therefore reduced image quality, always clean these objectives with ethanol and KIMTECH wipes before use.
-
-
-
Explore the available immersion media and be sure to select the appropriate one for your objective, collar setting as well as incubation temperature.
-
Consider your sample medium as well as your imaging needs while choosing an appropriate objective for your application.
-
-
-
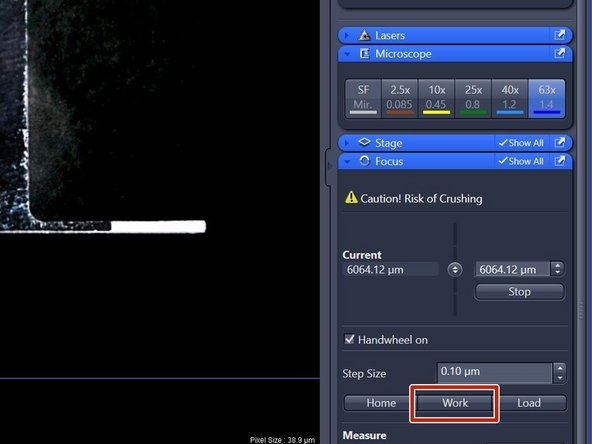
After sample has been inserted again, click "Work" within the "Focus" tab (right hand side in software).
-
"Work" moves the objective back to the previous focus position.
-
Re-focus your sample in wide-field (WF) mode as described earlier (Step 20).
-
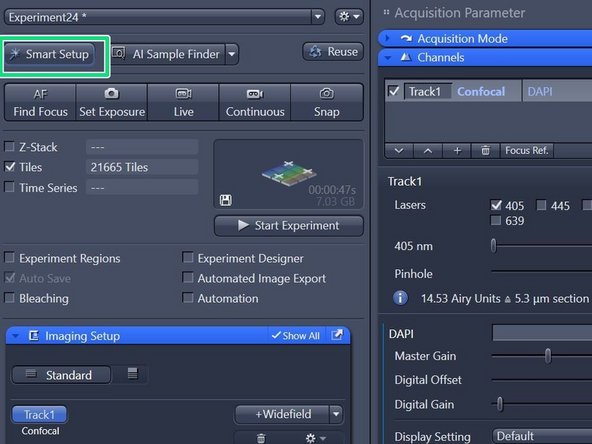
When back in focus, click on "Smart Setup" to open the "Smart Setup Wizard".
-
-
-
Continue with one of the following guides:
-
-
-