
Introduction
In this guide of the Center for Microscopy and Image Analysis we describe the acquisition of fluorescence lifetime imaging microscopy (FLIM) images on the CLSM Leica SP8 Falcon.
The fluorescence lifetime can provide additional information (e.g. on the microenvironment of the fluorophore) or also be a a more robust method to measure FRET (i.e. FLIM-FRET) compared to standard intensity measurements.
For starting the microscope and general settings for image acquisition, please refer to the start-up guide for Falcon and to the image acquisition guide.
-
-
Go to "Configuration".
-
Select "Laser Config" and check if the necessary lasers are "ON".
-
For FLIM, a pulsed laser is needed. The WLL allows for the selection from the broadest spectrum of wavelengts. If you need <470nm, use the "440pulsed" laser (in this case, please check the appropriate guide or ask the ZMB staff).
-
Go to the "Hardware" tab.
-
Check the option "Line Average during Live Acquisition".
-
Choose the appropriate "Bit Depth".
-
Deactivate the option "Maximum Integration Time" to allow for photon counting mode (using HyDs).
-
-
-
For setting up the lasers and detectors, please go to "Leica SP8: Acquire an image in xy and z".
-
Acquire a multichannel image with your favorite excitation and emission settings.
-
For an overview, go to the Navigator and also to check for the presence of donor and acceptor fluorescence in the case of FLIM-FRET.
-
-
-
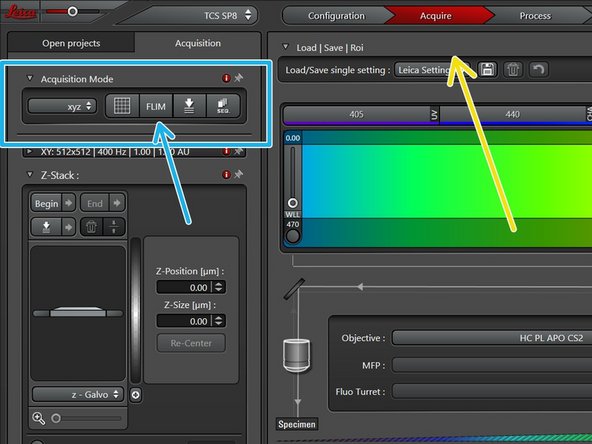
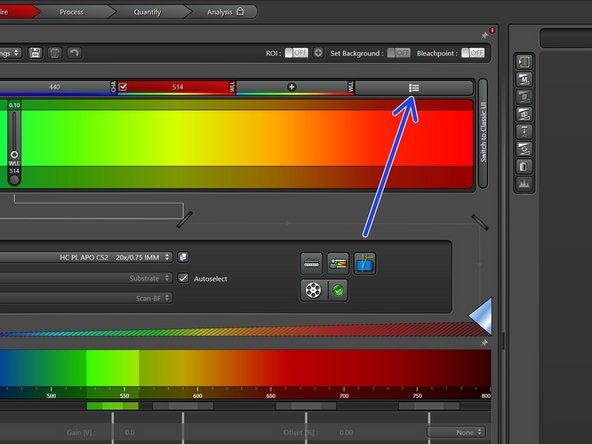
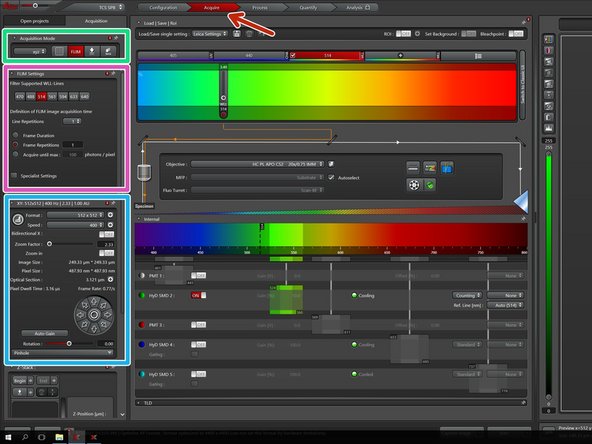
Go to "Acquire".
-
Start the FLIM software within LAS X by cklicking "FLIM". A second window on the right screen will appear.
-
-
-
Select an appropriate excitation laser wavelength.
-
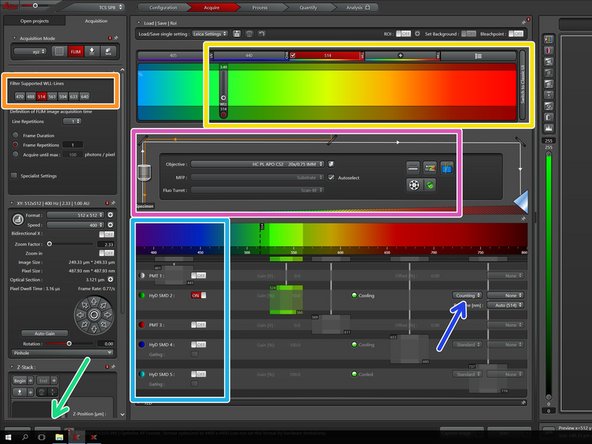
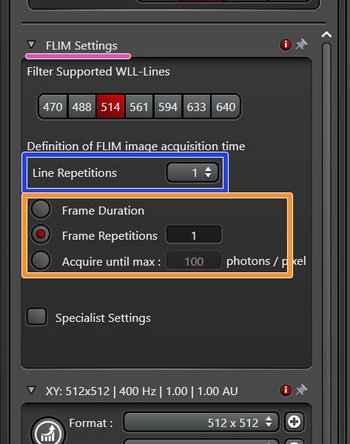
You can also chose directly a "Filter Supported WLL-Line" in the "FLIM Settings".
-
Check that the appropriate "Objective" is selected.
-
Set up your detector by chosing a HyD with an appropriate range to avoid contributions from other fluorophores present.
-
Only HyDs provide information about the photon arrival time, which is essential for FLIM.
-
Make sure you are in "Counting Mode".
-
Go "Live".
-
-
-
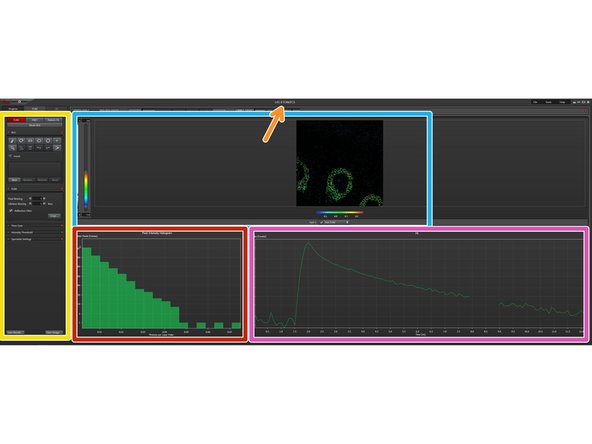
After pressing "Live", the LAS X FLIM/FCS window appears on the right screen.
-
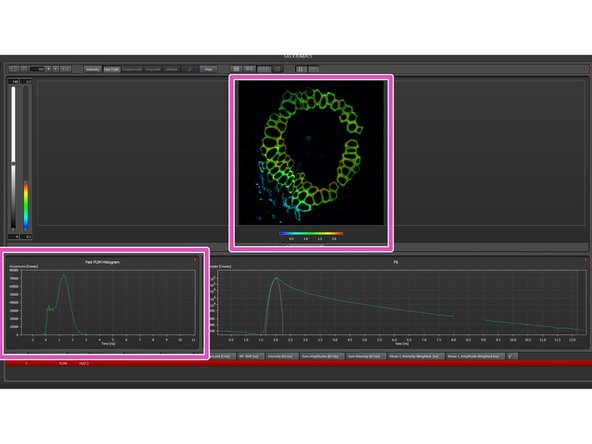
Identify the following sections in the LAS X FLIM/FCS window.
-
General FLIM acquisition settings.
-
Fast FLIM preview.
-
In contrast to proper FLIM, fast FLIM just provides the mean arrival time of photons in a pixel without any fitting.
-
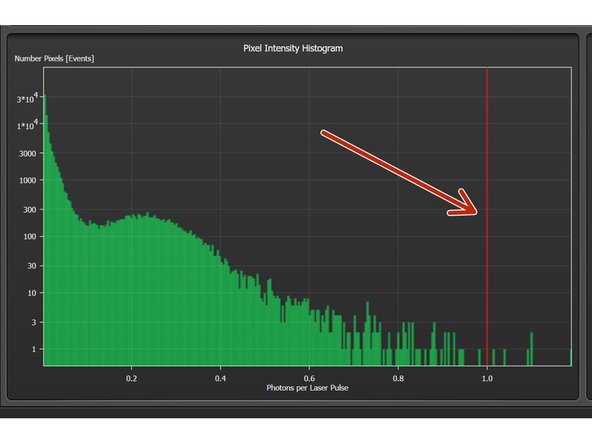
Pixel intensity histogram.
-
Time-correlated single photon counting (TCSPC) histogram ("Fit") showing the fluorescence decay.
-
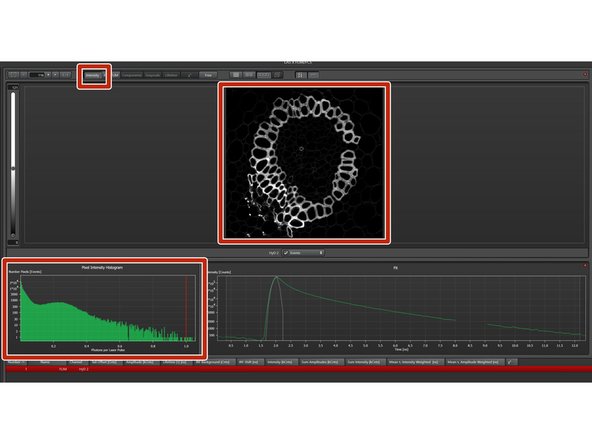
Slowly increase laser power until the photon numbers are just below one in the "Pixel Intensity Histogram" (indicated by the red line).
-
-
-
For the correct setup of the laser repetition rate, please have a look at the TCSPC ("Fit"). If you see a systematic decrease, it means that the tail of the decay is added to the beginning.
-
As a rule of thumb, the pulse interval should be 4-5x longer than the expected fluorescence lifetime.
-
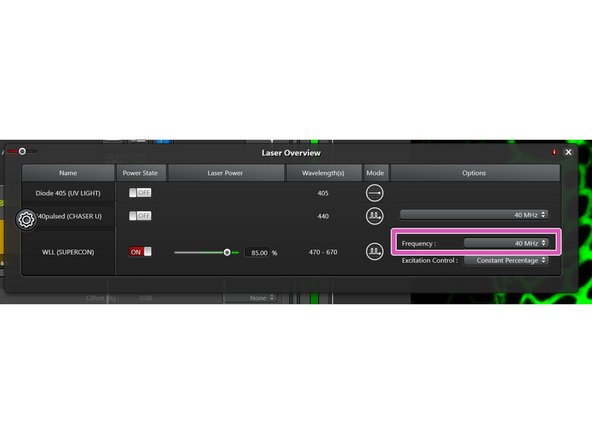
In such case, go to "Laser Overview".
-
For the WLL, reduce the Frequency to "40MHz".
-
The standard configuration for the WLL is 80MHz, for the 440nm pulsed laser it is 40MHz. Both frequencies can be reduced.
-
At the end of your session, make sure you set the frequency again to 80MHz for the WLL and 40MHz for the 440nm pulsed laser, as these settings will be automatically loaded by the next user!
-
If you change the frequency, the time scale in the TCSPC ("Fit") will automatically adjust.
-
-
-
Go back to the "Acquire" tab.
-
In "Acquisition Mode" you can select either z-stacks ("xyz"), time series ("xyt") or lambda-scans ("xyL").
-
In FLIM settings you can increase the imaging repetition (remember that the laser power is limited to on average <1 photon/pulse).
-
Think about what quality of statistics you need beforehand and adjust the repetitions accordingly! (Rule of thumb: 100 photons/pixel for 1 lifetime, but the more the better).
-
Select "Line Repetition" if you work with live cells.
-
Otherwise, you can also select a "Frame Repetition" mode according to your needs.
-
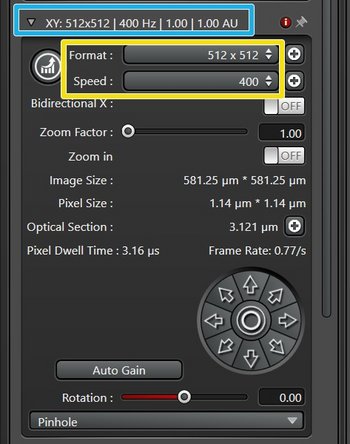
Set the general settings in the XY-tab.
-
For FLIM, a "Format" of "512x512" and "Speed" of "400" is recommended.
-
-
-
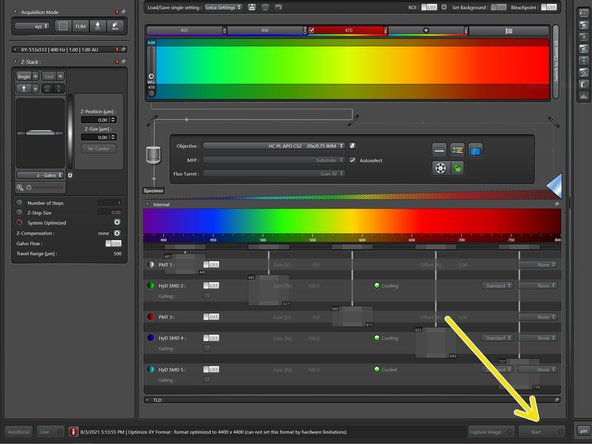
Once all the correct settings are set, press "Start".
-
On the right screen, the Fast FLIM image and histogram will automatically appear.
-
To go back to the Intensity picture and histogram, press "Intensity".
-
Data evaluation can be either done directly on the software on the microscope or on a Special VM together with the corresponding "FALCON" license (needs to be booked!).
-
For further information, please refer to the guide "Export Leica Falcon LAS X FLIM Image Data" here.
-


In this guide you should have learned how to acquire a single-channel FLIM image. You may think about acquiring multiple channels either beforehand or in parallel in order to demonstrate e.g. the presence of an acceptor, but the absence of FRET.
In this guide you should have learned how to acquire a single-channel FLIM image. You may think about acquiring multiple channels either beforehand or in parallel in order to demonstrate e.g. the presence of an acceptor, but the absence of FRET.
