-
-
Turn on the HXP lamp.
-
Turn ON the "Main Switch" and also switch the laser key to "ON".
-
Switch ON the "Components" on the table.
-
-
-
Turn "ON "the computer.
-
Sign-in with your ZMB core credentials.
-
In case you forgot your password please follow this link.
-
-
-
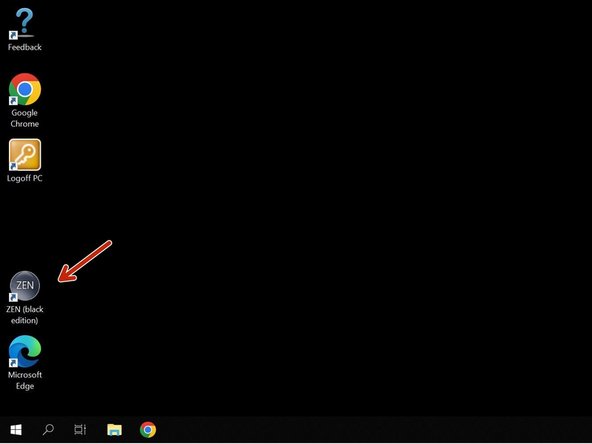
Start the "ZEN (black edition)" software.
-
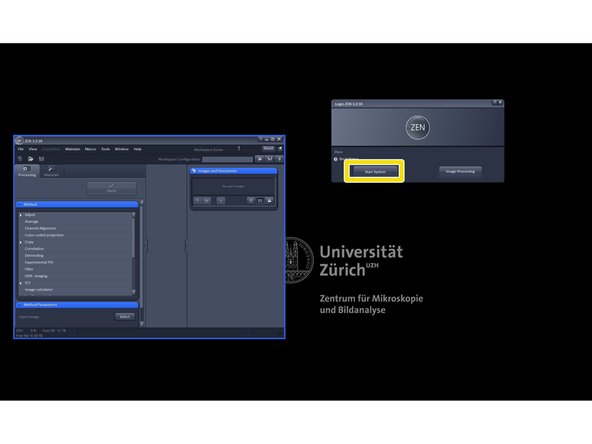
Click "Start System".
-
The system will automatically initialize the hardware.
-
-
-
Add fresh milliQ water to the humidifyer bottle. You will find milli Q dispensing unit in Y42-H-88.
-
Open the "Incubation tab".
-
Activate the "H Unit XL" and "H Dev Humid" and set your desired temperature according to your needs.
-
We advise you to start heating up the temperature at least 40 minutes in advance. Make sure that the incubation box is fully closed while heating.
-
Open up the main valve and outlet valve of the CO2 bottle.
-
Do not adjust the reducing valve as it should be pre-set to 1 bar.
-
Open the blue gas channel for the ELYRA. (Note: In image currently closed).
-
Activate CO2 and set your desired concentration according to your needs.
-
-
-
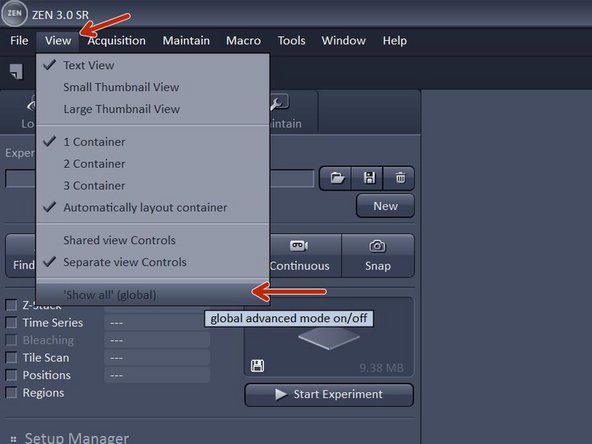
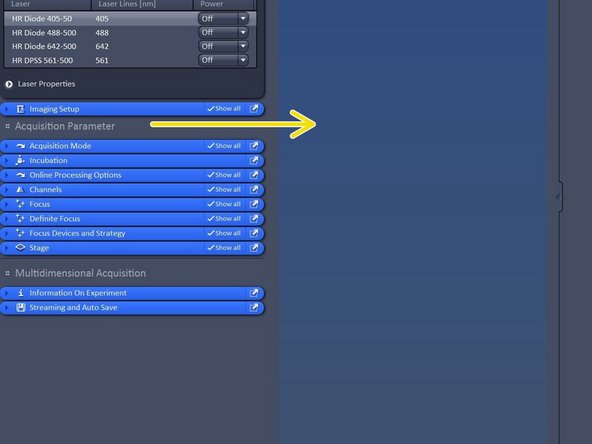
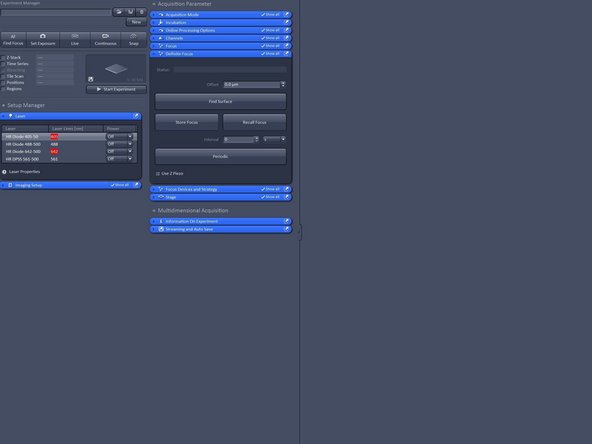
In acquisition tab: Click "View" - Show all global.
-
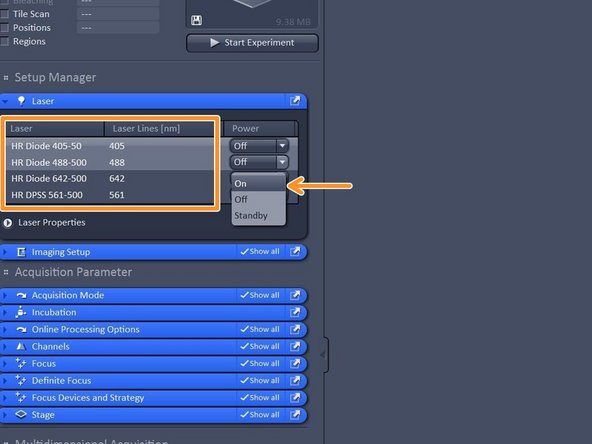
Switch on all lasers needed for your experiment.
-
Note: Red highliting indicates that lasers are still in warm up phase.
-
Drag and drop the Acquisition parameters to the right in order to get more organized.
-
-
-
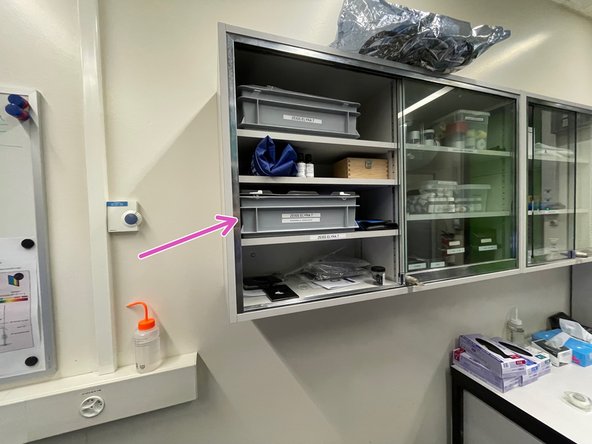
As soon as incubation units have reached their set values get your sample from the incubator.
-
Place you sample with the correspondin Click-In insert.
-
Make sure the frame locks securely into the stage completely flat.
-
-
-
The slide insert is compatible with the following formats:
-
µ-Slides by Ibidi
-
Nunc Lab-Tek™ Slides
-
Chambers by Thermo Scientific
-
Object Slides
-
PDMS Chips based on 25x75mm slides
-
-
-
Make sure you cover your sample with the CO2 lid which is usually stored within the incubator.
-
The white rubber sealing has to face the sample.
-
-
-
Insert the 35 mm Petri dish into the KM Frame.
-
-
-
Compatible with all kind of well plate formats.
-
-
-
Make sure you have mounted your sample and the 10X objective lense is bellow your sample.
-
Not that the following feature is not available for the 2.5X objective.
-
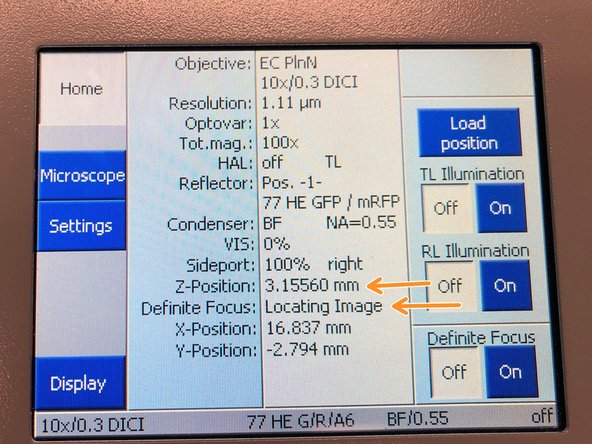
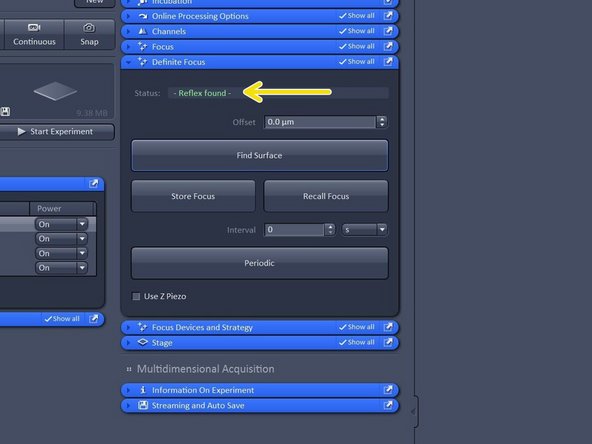
Open "Definite Focus tab" and click "Find Surface".
-
The microscope will perform a full range Z-scan and the Definite Focus will look for the strongest reflection signal.
-
On the touch panel you can monitor that the system automatically trys to find the covergalss reflection while moving through Z.
-
Once reflex is found the system will repoft "Reflex found in green letters"
-
If the refractive index mismatch between the immersion medium and glass is low, a reflextion might be too weak to be detected.
-
-
-
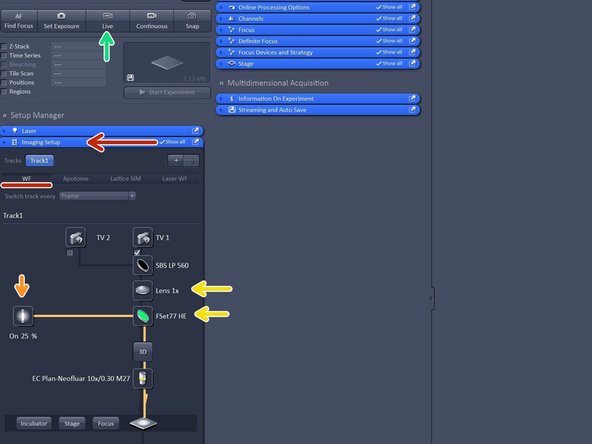
Open the "Imaging Setup tab" and define a classic wide-field track by clicking "WF".
-
Switch on the fluorescent lamp.
-
Make sure that FSe77HE filter is selected and the 1X tube lense.
-
FSet77HE is a triple band filter (Green-Red-FarRed) is the only filter for visual inspection.
-
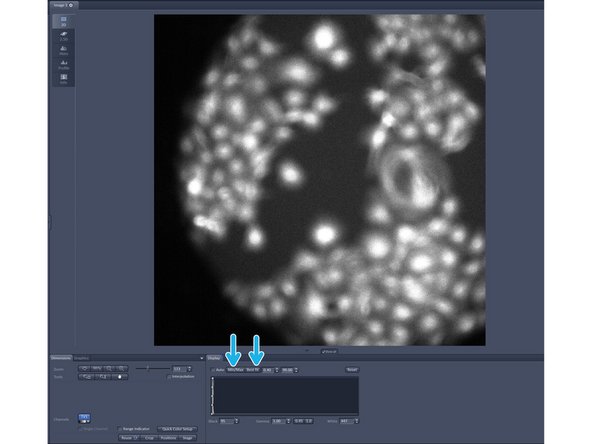
Click on "live".
-
In case you have a black image click on "Min/Max" or "Best fit" in order to adjust the display of your image
-
When a reflex is found, this does not necessarily mean that the sample is in focus. Therefore, fine tune your focus with the coarse hand wheel by turning towards you.
-
-
-
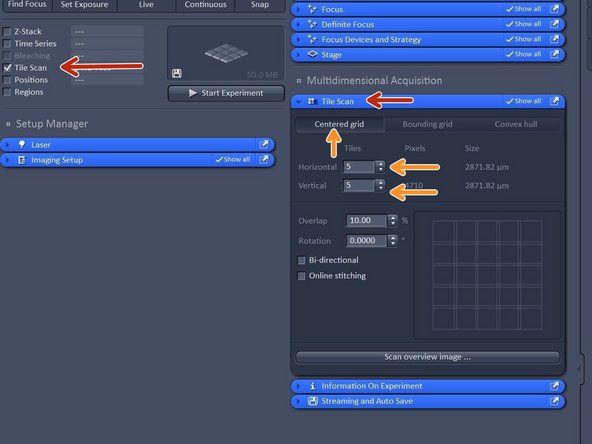
In order to create an overview - activate the "Tile Scan" option.
-
For a coverslip or 35 mm petri dish choose "Centered grid" and adjust the tiles in horizontal and vertical direction (13x13 is usually enough for a 18 mm coverslip).
-
Make sure your objective lense is roughly in bellow the center of your sample.
-
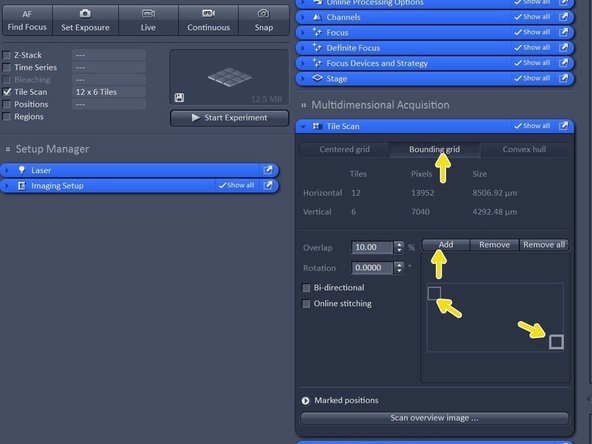
For a chamber slide or a well plate choose "Bounding grid"
-
Here you manually move the stage via the joystick to the very top left corner of your sample carrier and then click "add" then you move to the very right bottom corner of your sample carrier and click "add".
-
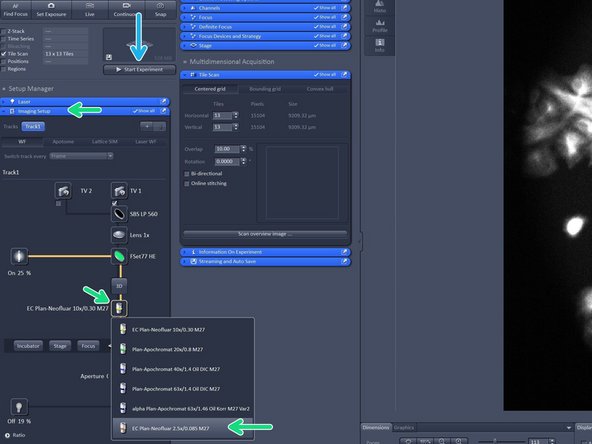
In "Imaging Setup tab" change the objective lense to the 2.5X lense as it has a larger field of view in order to create a quick overview.
-
In order to start your overview click "Start Experiment".
-
Make sure that the fluoresence lamp is switched on be fore starting the overview.
-
-
-
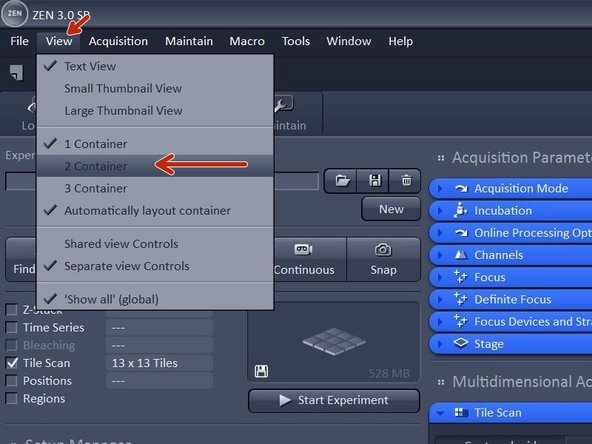
In order to make use of your overview click "View" and then click " 2 containers"
-
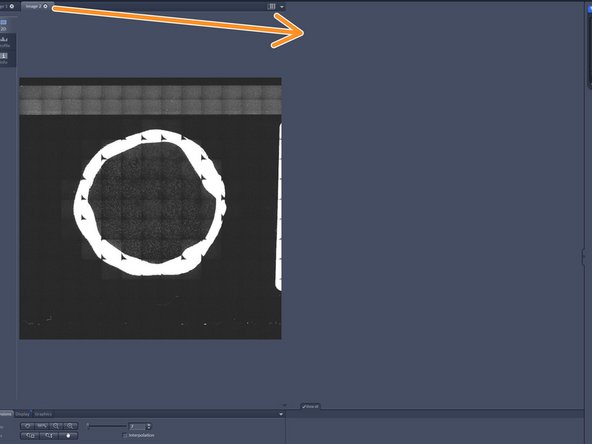
Drag and drop the overview image to the second container.
-
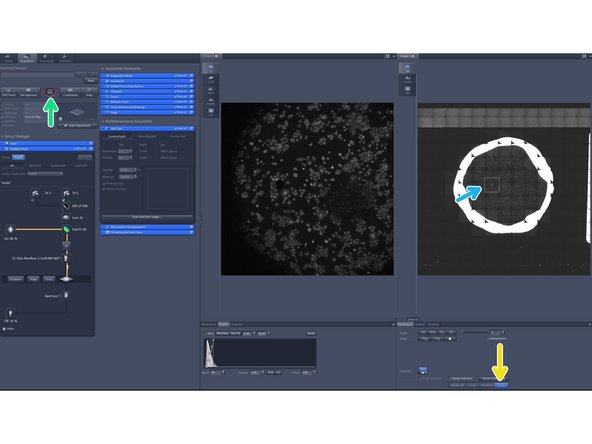
Activate the "Stage tool".
-
Click "Live".
-
You can now move the stage by clicking in your overview image. The stage position is indicated by the white rectangle.
-
You can create these overviews even with higher magnification in order to see more details.
-
You can create these overviews even with transmitted light, SIM, Apotome or laser WF.
-
When done with the overview do not forget to deactivate the "Tile Scan" option.
-
-
-
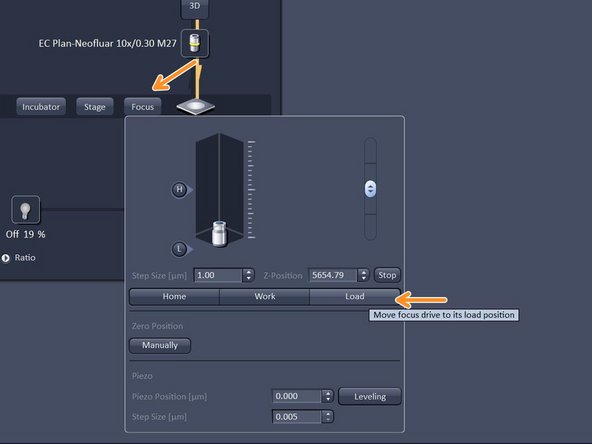
Switch to the 10x objective and check that you are in focus.
-
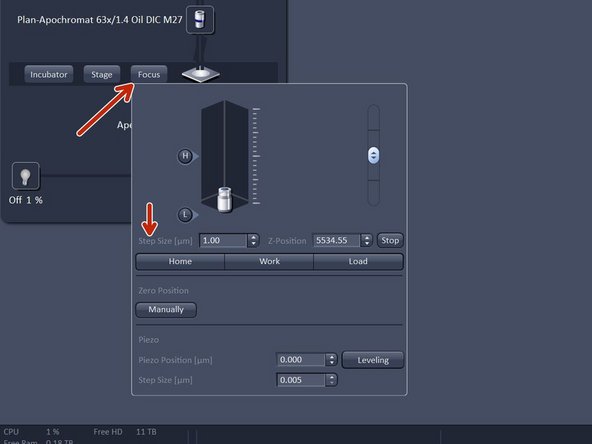
In "Imaging Setup tab" click "Focus" and click "Load" - in order to lower the objective.
-
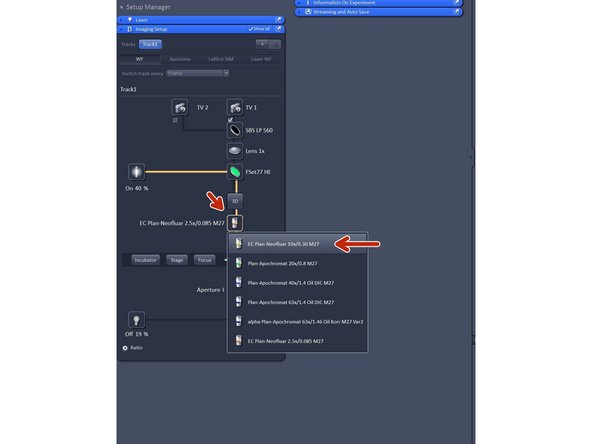
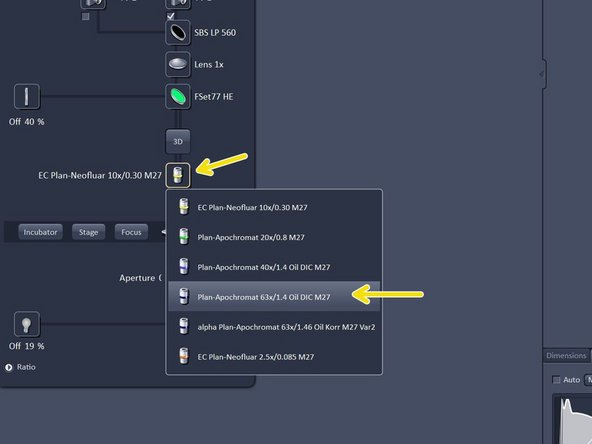
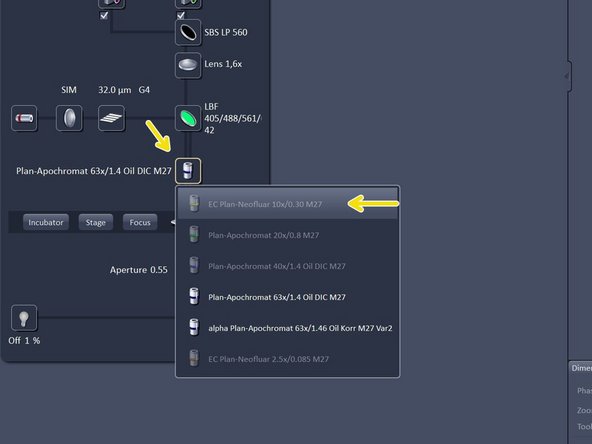
Change to the desired objective via the drop down menu.
-
Objectives suited for a certain imaging mode will be highlighted, but every objective can be selected.
-
Note that for SIM the Plan-Apochromat 63X 1.4 oil and for TIRF/SMLM the alpha Plan-Apochromat 63X 1.46 oil are the objectives of choice due to their optimized optics.
-
-
-
Remove the sample carrier plate.
-
Do not touch your sample within the carrier plate as this will disalign the overview.
-
Add a drop of immersion oil onto the objective lense.
-
Note that for live-cell experiments you must use 30°C optimized immersion oil. Bottle is usually stored in incubator box.
-
Place the sample carrier plate again back in the frame and close the incubator box of the microscope.
-
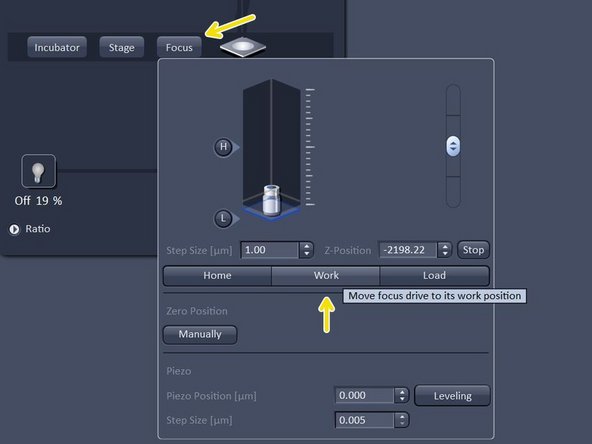
Bring sample in focus by clicking on "work".
-
Click "live" and fine-tune your focus with the hand-wheel.
-
Try to use the coarse hand-wheel and turn it slowly in your direction.
-
-
-
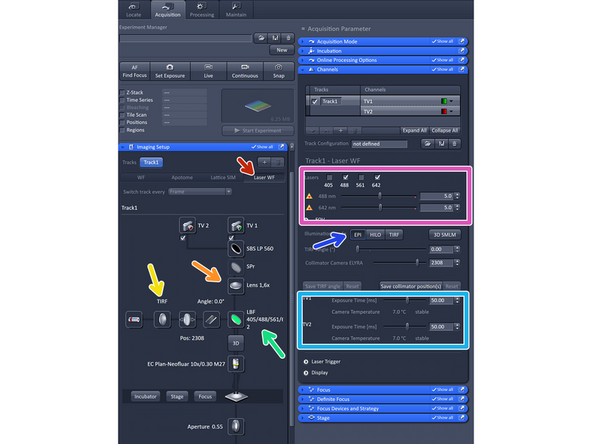
Select "Laser WF".
-
Choose the camera (TV2 or TV1) depending on your fluorophores used.
-
Make sure 1.6 X is selected.
-
For WF imaging mode, Lens 1x is appropriate, for Laser WF, SIM Apotome and SIM imaging modes Lens 1.6x should be used.
-
Make sure you have "TIRF" mode activated.
-
Select via the reflector button the "LBF" filter.
-
Activate and adjust your laser lines.
-
Adjust your required exposure time.
-
-
-
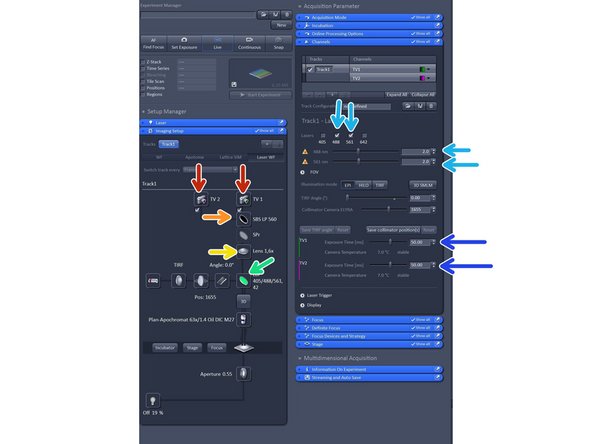
Activate both cameras.
-
Choose your SBS configuration.
-
Make sure tube lense is 1.6X.
-
Select your filter of choice. We recommend the LBF.
-
Activate two compatible laser lines based on SBS configuration.
-
Adjust exposure time. Note that when using dual link that exposure time is the same for both cameras.
-
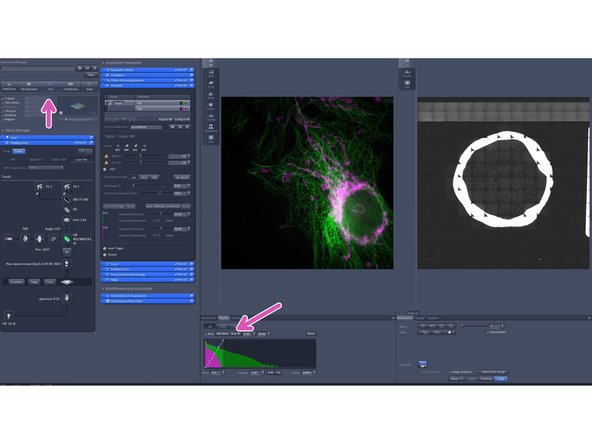
Click live and and adjust the display by adjusting the histogram.
-
-
-
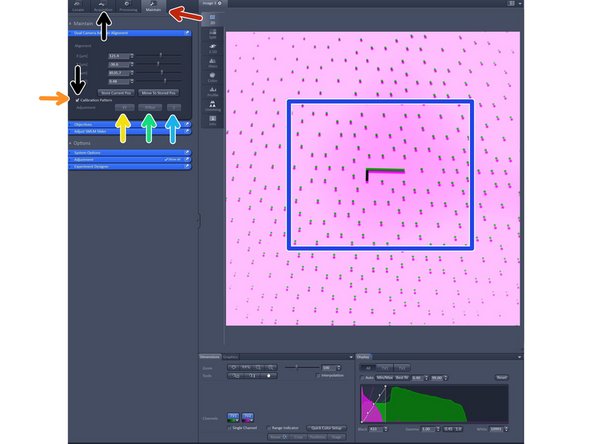
Change to the "maintain tab".
-
Insert "Callibration pattern" by activating it.
-
Click "XY" and wait for finishing.
-
Click "XRot" and wait for finishing.
-
Click "Z" and wait for finishing.
-
Note that the alighnment should only be judged in the center as at the edges it will be off due to lense distortion.
-
When done with the alignment remove the callibration pattern by deactivating it. And go back to the "Acquisition tab".
-
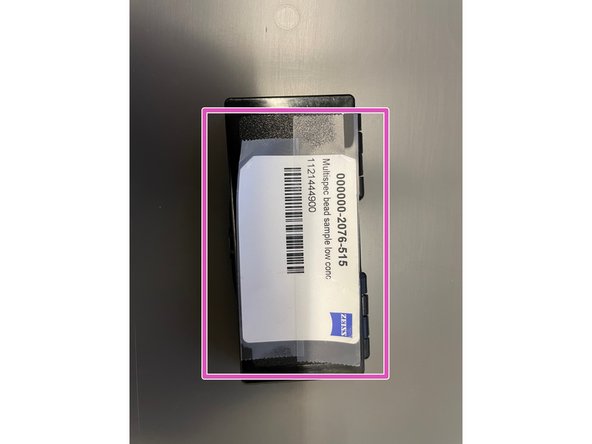
Please note that the alignment via the calibration pattern is only rough, in case you need a precise alignment please it manually with multi-spec beads.
-
-
-
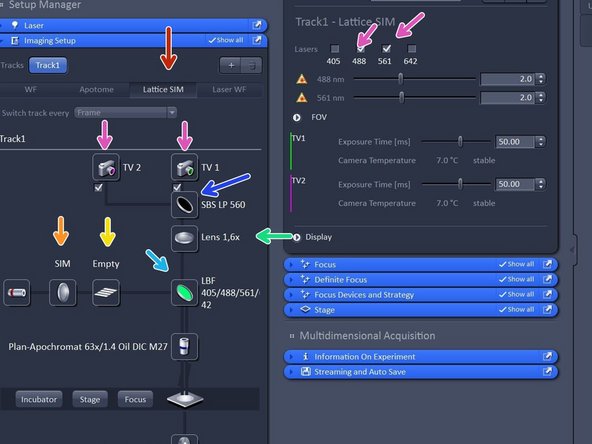
Activate "Lattice SIM".
-
Check that "SIM" is selected.
-
Check that tube lense is 1.6X.
-
Choose your filter of choice.
-
Choose your SBS configuration based on your experiment.
-
Choose cameras and lasers accordingly.
-
Click "Grating" button to open the Grating selection. The system should automatically load the grating for optimal resolution enhancement, if this is not the case switch on and off lasers.
-
You can choose between an Empty position and 5 grid (G1-G5) with increasing spacing. The grating depends on laser line and objective used. Not that the SIM grid pattern will always be adjusted to the higher wavelength when using dual camera.
-
-
-
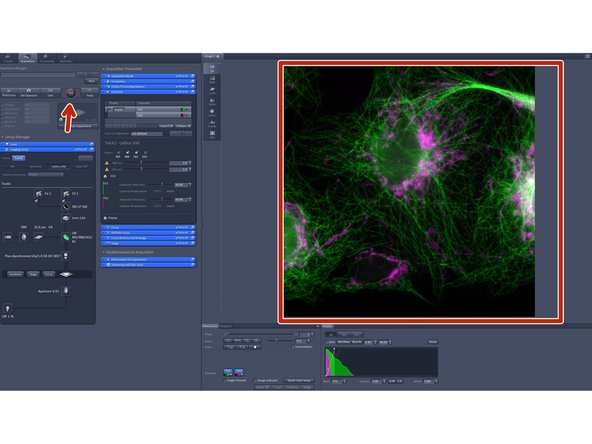
Click "Continous" in order to apply all imaging parameters to see SIM modulation contrast on your sample.
-
In "Acquisition Mode":
-
You can adjust your frame size.
-
You can adjust your grating. More phases will result in more modulation information meaning and better resolution.
-
For highest temporal resolution in order to capture ultra-dynamic events we advise you to use 9 phases for live-cell experiments.
-
-
-
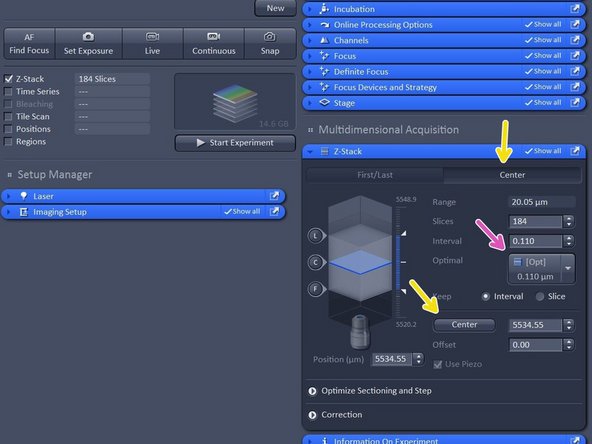
Activate "Z-stack".
-
In case "First/Last" option is selected, move to the start of your Z-stack with the hand-wheel and click "Set First", then move to the end of your Z-stack and click "Set Last".
-
In case "Center" option is selected, move to the center of your Z-stack with the hand-wheel and click "Center".
-
Click "Optimized" to have ideal sampling for your Z-dimension.
-
Optimal sets interval to match the Nyquist criteria (2 fold over sampling) and accordingly adjusts the slices to keep the range within the limits defined.
-
Leap sets the spacing 3 fold broader than Nyquist.
-
Note: For SIM it is important to define your Z-stack in the range of the modulation contrast otherwise SIM processing will be less effective.
-
An alternative to "Optimized" is "Leap" especially for live-cell in order to acquire 3X faster Z-stacks as only every 3rd plane is acquired and the missing ones are artifically calculated.
-
-
-
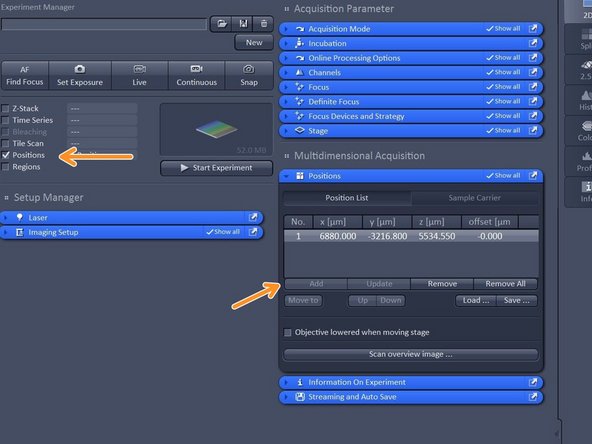
Activate "Positions".
-
Select ROI by navigating in your overview and click "add" to add a position.
-
Note: Multipositioning can be combined with Time Series and/ or Z-Stacks.
-
-
-
Open "Time Series tab".
-
Define your "Cycles" according to your experiment needs.
-
Define an "Interval" according to your experiment needs.
-
Note that Burst mode post-processing is only available if NO-Interval is set and 2D data is acquired.
-
Open the "Information on Experiment tab" in order to see what the duration of 1 frame is.
-
-
-
Note that you can combine Time Series with Z-stacks, Tile-scans or multi-Positioning.
-
-
-
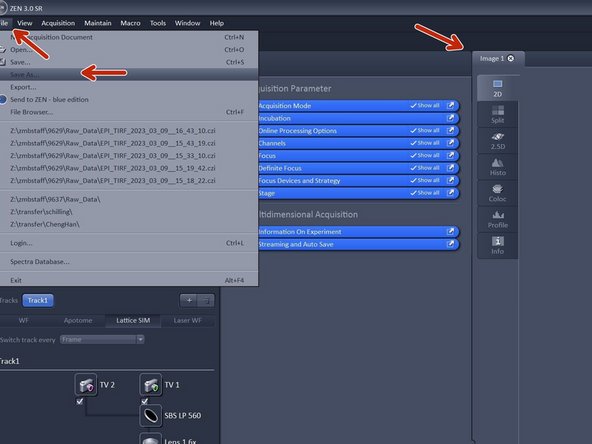
There are serveral way in order to save your data.
-
Manually: Activate your image of choice Click "File" - "Save As...
-
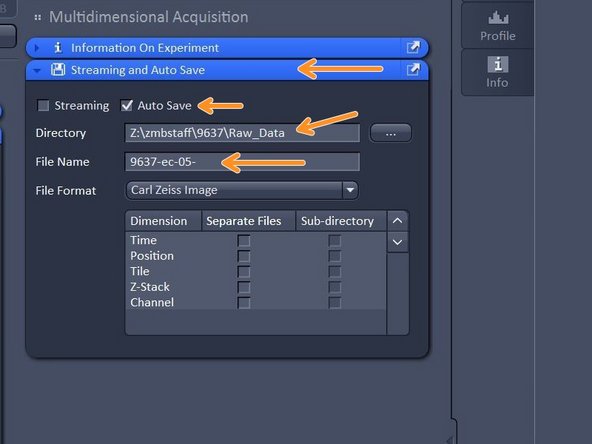
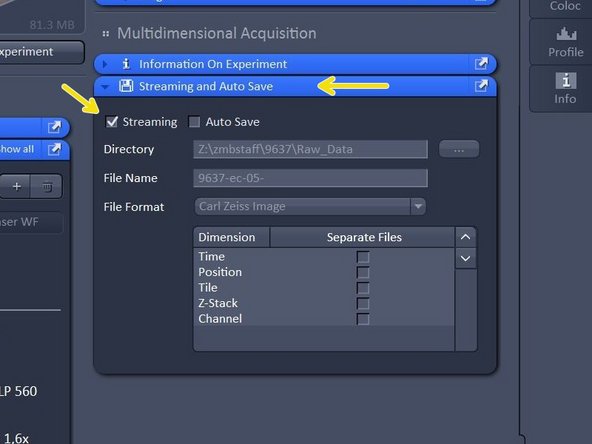
Open "Streaming and Auto Save" and activate "Auto Save" - define Directory and define your file name.
-
Your file will be saved as soon as the acquisition is completed. Note that Auto Save might slow down performance.
-
Open "Streaming and Auto Save" and activate "Streaming". When Streaming is activated, pressing "Start Experiment" will open a Windows Explorer window - Here the file name and location can be defined as to where the experiment will be saved during the acquisition.
-
Streaming will activate the function that data is saved and automatically written to the hard drive druing the acquisition process, so when image acquisition is disrupted the data up to this point will be available.
-
-
-
Click "Focus" and click "Home".
-
Remove your sample.
-
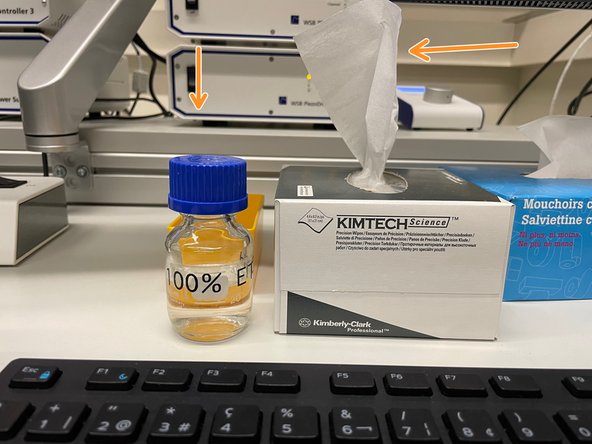
Clean immersion-objective with lens paper and 100% EtOH.
-
Change to the 10X air objective.
-
Make sure your data is saved.
-
Check booking system if anyone booked the system within the next 2 hours:
-
If yes just log off.
-
If not shut down the computer, then switch OFF the "Components" on the table, then turn OFF the "Main Switch" and finally turn OFF the HXP lamp.
-
-
-
Close the oulet-valve and the main valve of the CO2 bottle.
-
Only if no one is doing live-cell experiments at the LSM980 Airyscan.
-
Close the gas supply channel to the ELYRA.
-
Empty the milliQ water in the humidifyer bottle and clean with 70% EtOH.
-
Fix the CO2 cover with tape to the side of the incubator.
-