
-
-
Chose a suitable objective and place your sample on the microscope.
-
The 30x, 60x and 100x objectives use silicon oil that you will find on the table next to the microscope.
-
Choose one of the available observation methods on "My functions" to find and focus your sample through the microscope (e.g. "BF open").
-
Additionally to the microscope wheels you can also use the keyboard to navigate and focus your sample:
-
Keep "Ctrl" key pressed and click on the Live image to move the stage and center your image.
-
Keep "Ctrl" key pressed and use the mouse wheel on the live image to focus.
-
-
-
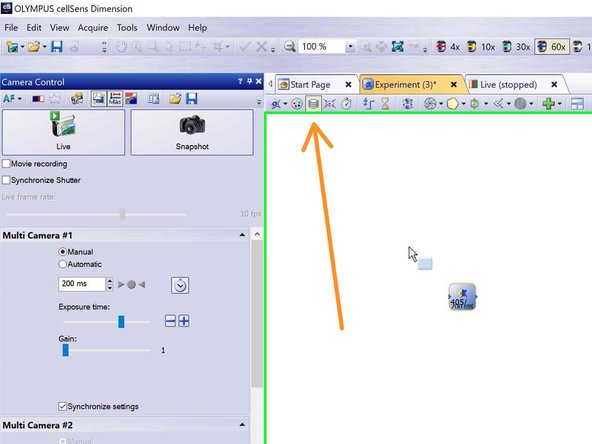
Start a new experiment by clicking on the "New" button in the "Experiment Manager" (tab on the bottom right).
-
Add a new "Image Acquisition" object by clicking on the respective icon.
-
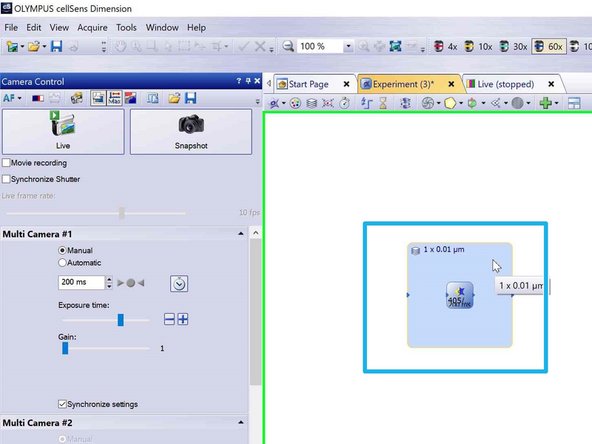
Chose your acquisition settings from the drop down menu.
-
Add it to your experiment by clicking on the white area.
-
-
-
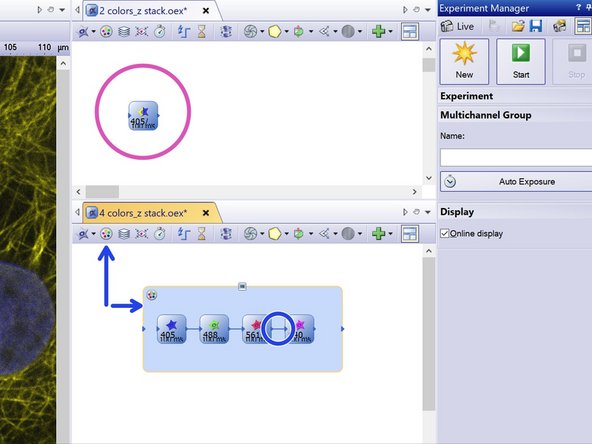
Example 1 - dual camera simultaneous acquisition - 405/561
-
Example 2 - sequential acquisition - 405/488/561/640
-
When using more than two "Image Acquisition" objects, connect them and add a multichannel group around them.
-
-
-
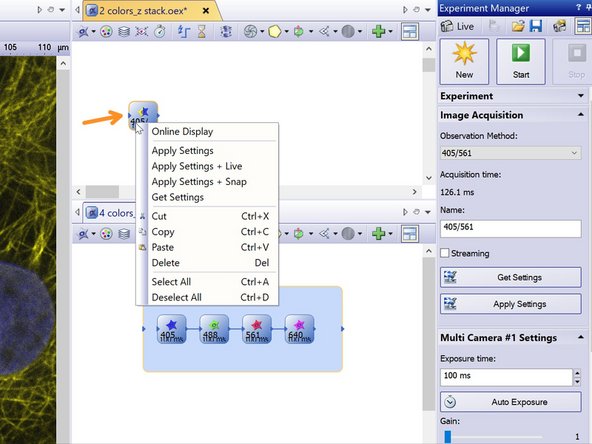
Right click on your acquisition object (e.g. 405/561) and choose "Apply settings + Live".
-
Alternatively you go to "Live" and then double click on the observation method.
-
-
-
The Camera can be run at 8 bit, 12 bit as well as 16 bit (recommended).
-
Toggle here the bit depth ON = 16 bit, OFF = 8bit.
-
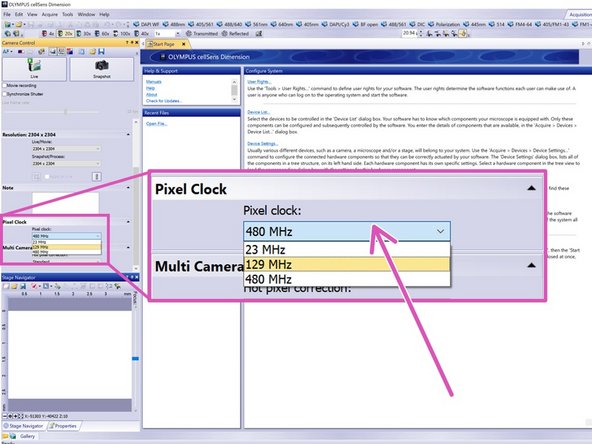
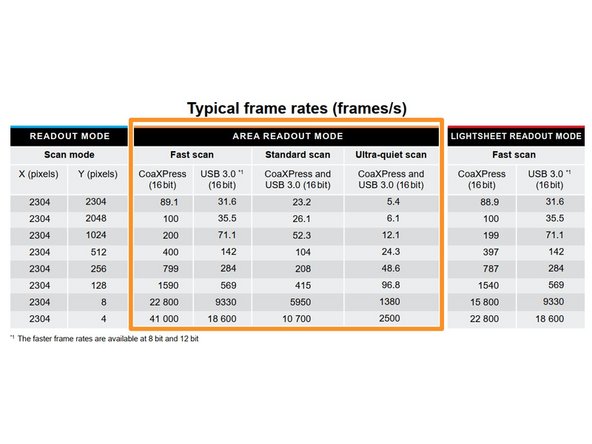
Change here the pixel clock (determining the read out speed of the camera sensor):
-
23 MHz: Ultra-quiet scan (recommended).
-
129 MHz: Standard scan .
-
480 MHz: Fast scan.
-
Find here in addition the typical (corresponding) frame rates (frames/s) for each modi.
-
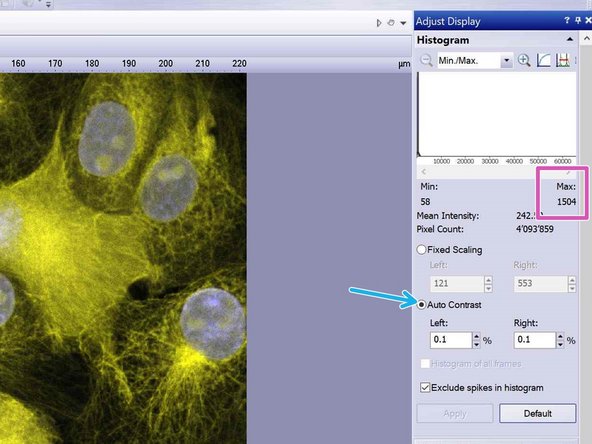
If you are acquiring at 8 bit the histogram max should be lower than 255, at 12 bit lower than 4095, while if you are using 16 bit the max should be lower than 65535.
-
-
-
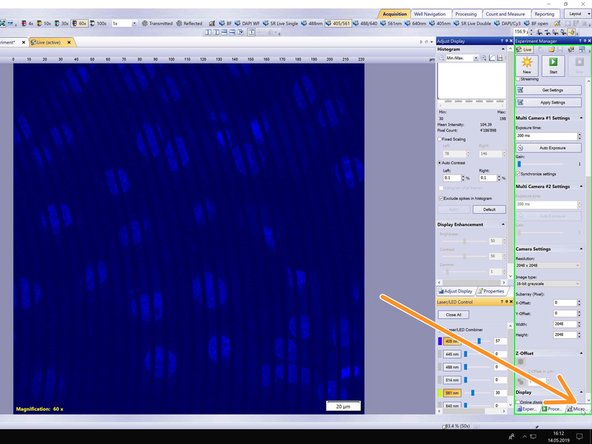
Adjust contrast on the Adjust Display tab by choosing "Auto contrast".
-
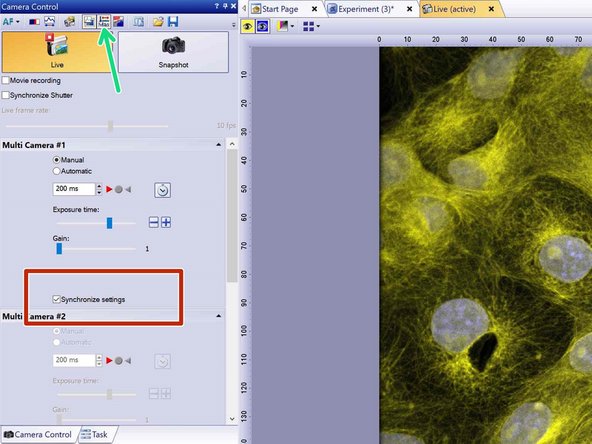
Adjust camera exposure times ("Camera control" tab) .
-
Type in values (multiples of 10, 20, 50, 100, 200, etc) rather than using the scroll.
-
If you are using double camera settings also define the exposure time for the second camera.
-
If you want to have the same acquisition time for both cameras select "Synchronize settings".
-
Here you can toggle the camera bit depth between 16 bit and 8 bit. Make sure you use the appropriate camera settings.
-
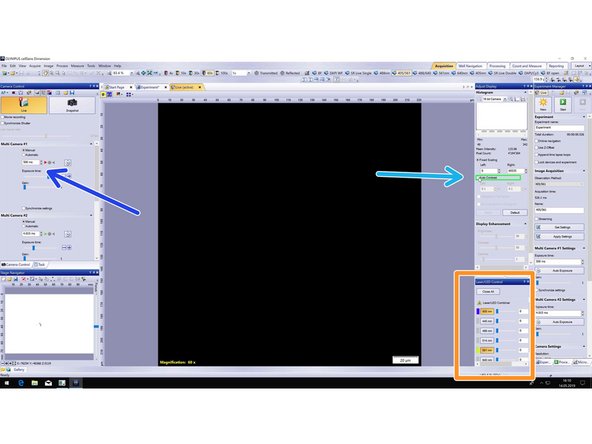
Adjust laser intensities on the "Laser/LED Control" tab.
-
Check the histogram and avoid saturating your signal.
-
-
-
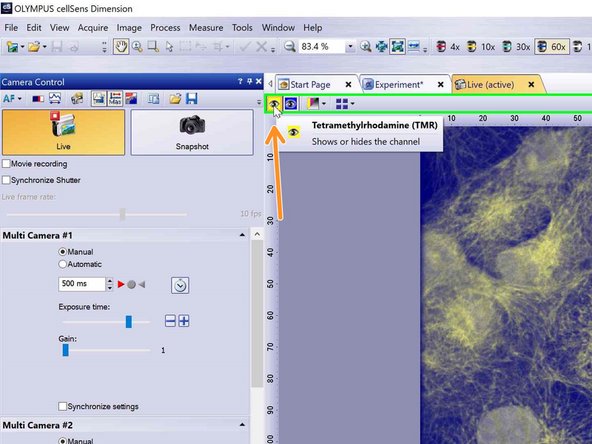
If you are using the dual camera by toggling this button you can show or hide channels.
-
-
-
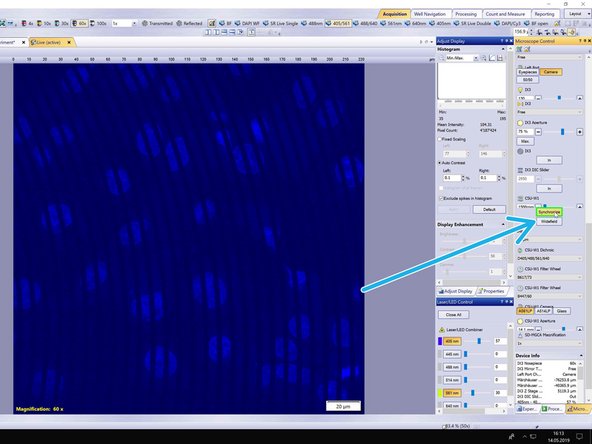
To avoid image artifacts from the spinning disc you need to synchronize the disk with the camera.
-
Select the "Microscope" tab.
-
Scroll down and press the "Synchronize" button.
-
-
-
Once you are satisfied with your settings, stop Live mode by clicking on the "Live" button.
-
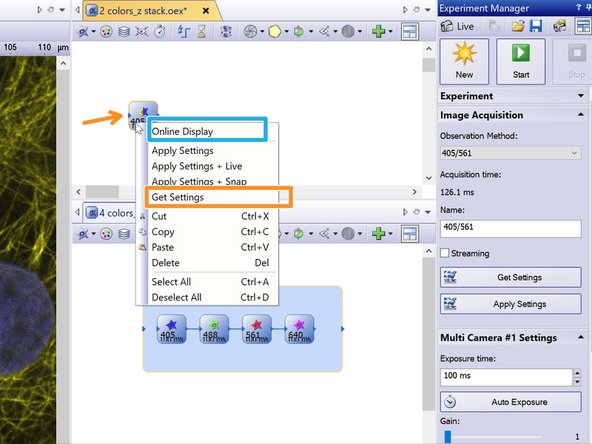
Right click on the observation methods and choose "Get Settings.
-
This will get the settings from the microscope and update your experiment accordingly.
-
The option "Online display" will allow you to visualize your image during acquisition.
-
For a multicolor image you can add it to the multicolor box.
-
You can now start your experiment by pressing "Start".
-
If you want to continue adding objects to your experiment (e.g. Z- Stack or time series), follow the next steps.
-
-
-
Click the z-stack icon.
-
Draw a rectangle around your "Image Acquisition" object (e.g. 405/561).
-
If you want to use the faster Piezo stage follow these Steps.
-
-
-
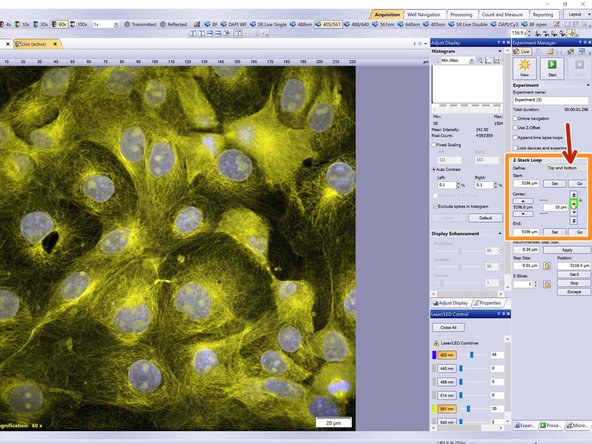
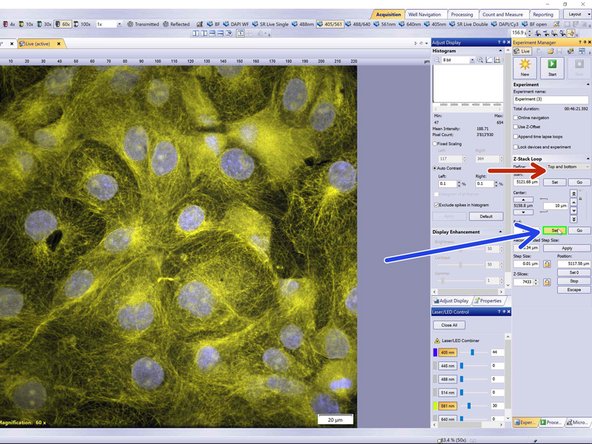
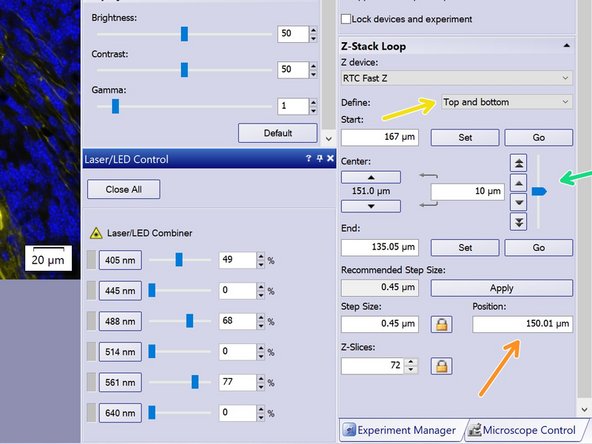
Go to the "Z-Stack Loop" section in the "Experiment Manager".
-
Define stack "Top and bottom".
-
You can use the arrows or Ctrl+mouse wheel to move to the top of your stack.
-
Click "Set".
-
Move to the bottom of your stack and press again "Set".
-
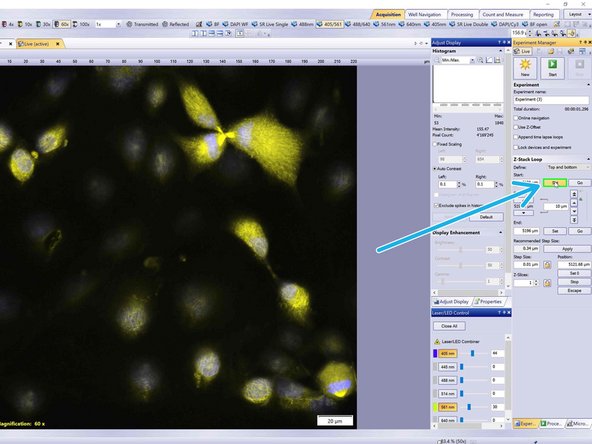
Stop Live mode.
-
Alternatively you can also choose to define a z range from the drop down menu.
-
-
-
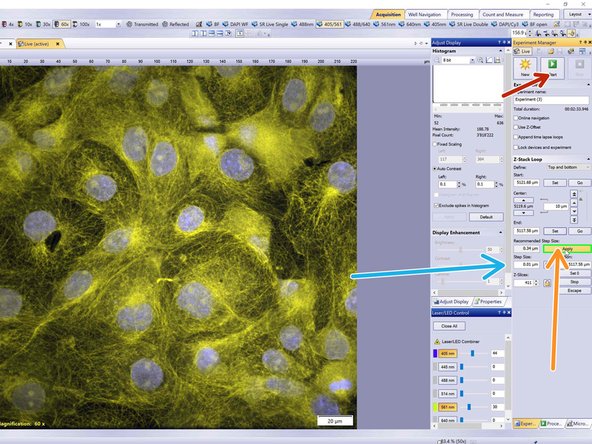
If you want to use the recommended Z-step size click "Apply".
-
Otherwise define your step size in the appropriate field.
-
Start your experiment.
-
-
-
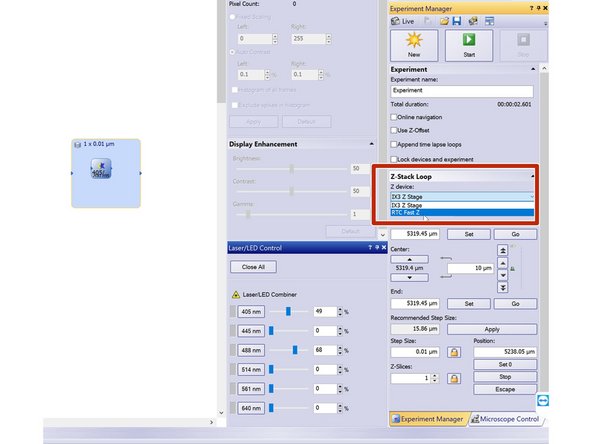
For faster acquisition of z-stacks you can also use the option RTC Fast (Piezo stage) from the drop down menu.
-
The travel range of this stage is 300um and you can define your z-stack according to "Range" or "Top Bottom".
-
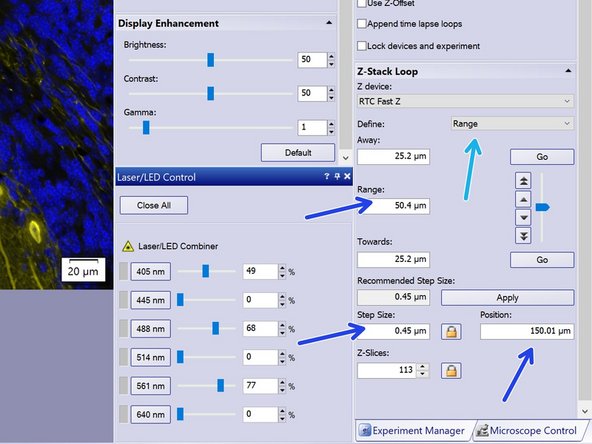
To use "Range":
-
Set center "Position" at 150um, the desired range and step size accordingly.
-
To use "Top Bottom":
-
Make sure you set "Position" at 150um.
-
Use the slider or arrows on the side to define your top and bottom limits.
-
Make sure the Piezo is in the middle of the travel range (150) before you start your experiment.
-
-
-
Check the next guide for more info on - Olympus Spinning Disk - 3: Overviews + multi-positions + xyzt images,
-
Olympus Spinning Disk - 1: Start up, Olympus Spinning Disk - 2: Multichannel + Z-stack acquisition, Olympus Spinning Disk - 3: Overviews + multi-positions + xyzt images,
-
Olympus Spinning Disk and ScanR - Datamover, Olympus Spinning disk - Load new/different device settings.
-
-
-
-


Cancel: I did not complete this guide.
2 other people completed this guide.
