Introduction
Startup of the system
-
-
All basic hardware components and computer should be on. If not, start the system following this sequence:
-
1. Instrument
-
Optional : if environmental control is needed, turn on sample heater
-
2. Laser (press button powerstatus)
-
3. Turn key to on
-
4. Turn on computer
-
Turn on computer always last
-
-
-
Log in with your ZMB credentials.
-
-
-
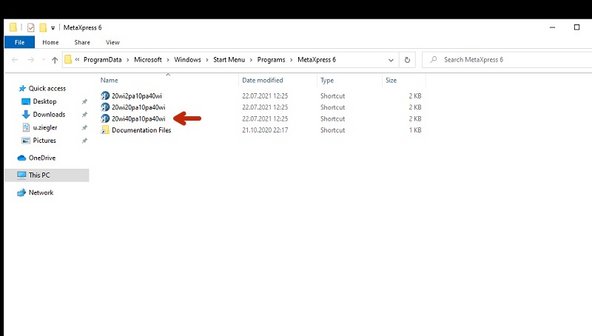
Start the profile defined in the feedback form
-
The other profiles can only be used if objectives in the system are / have been changed.
-
Available profile are eg 20wi2pa10pa40wi (2025-08-29)
-
-
-
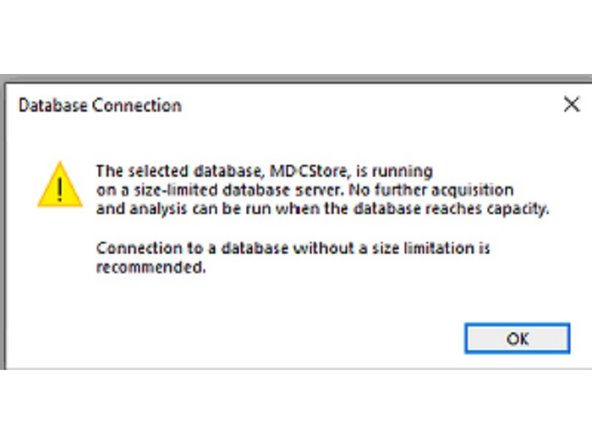
Login to MDCStore
-
username: use the username for the SQL database MDCStore.
-
username is different from your windows username. Generally it is the windows username without the dot.
-
password: use your SQL password
-
The SQL password is different from the windows password. If you have forgotten it, the ZMB staff can help you.
-
Accept the two information messages popping up after you connect to the database.
-
-
-
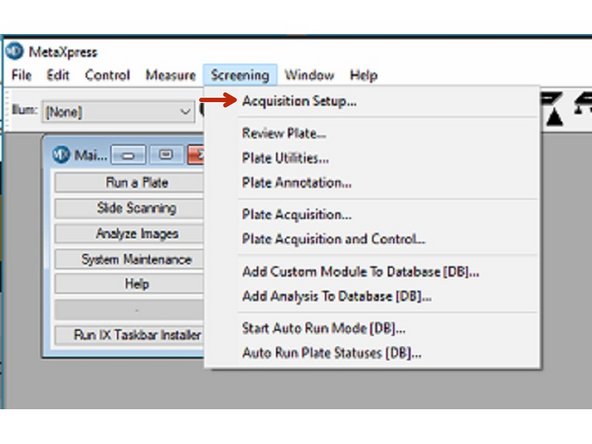
Enter acquisition setup
-
The Screening menu, which is used for protocol configuration and image acquisition.
-
-
-
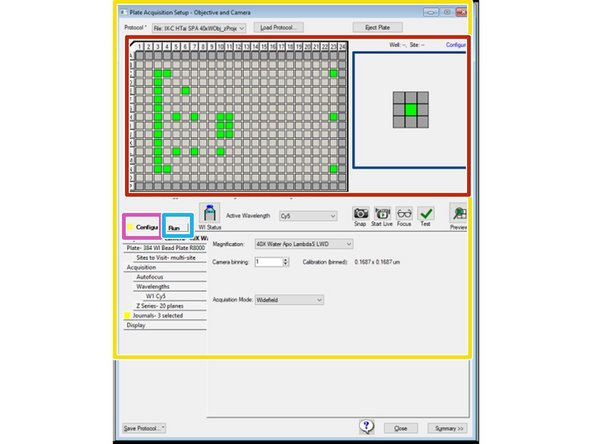
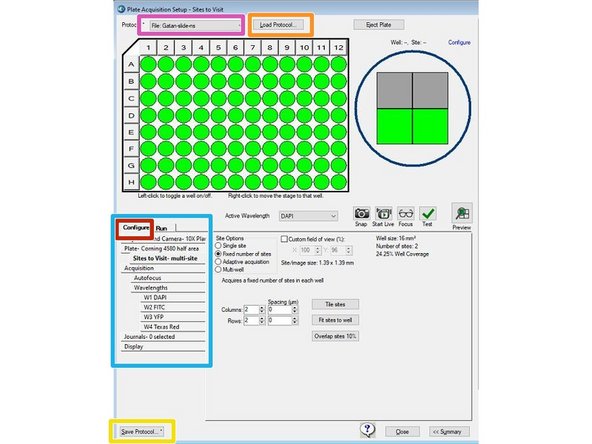
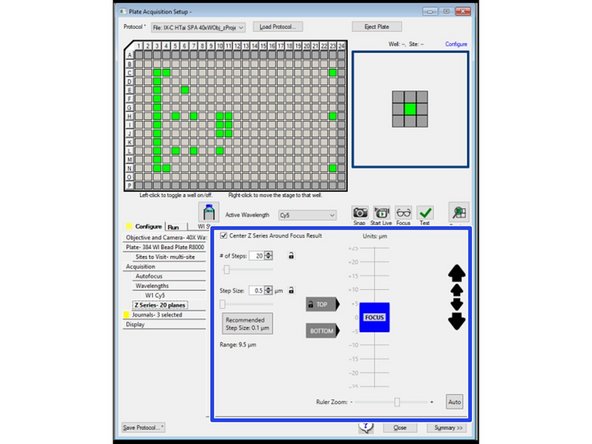
Use the Plate Acquisition Setup dialog to create protocols for acquiring images from plates.
-
The Plate Acquisition Setup dialog provides three primary functions:
-
Configuration control - for setting up plate acquisition protocols.
-
Run - for doing a plate acquisition according to a selected protocol.
-
The Plate Map that displays the plate layout to control movable components of the system by simply right clicking.
-
-
-
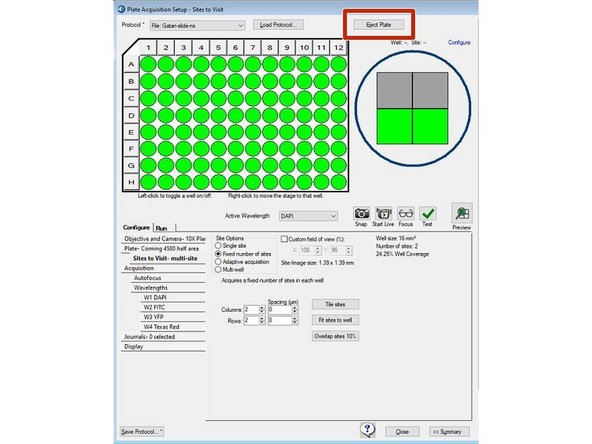
The Eject Plate/Load Plate button switches between the following two options:
-
Eject Plate - Opens the top door and plate clamp to load or remove a plate.
-
Load Plate - Closes the top door and the plate clamp so that the instrument can acquire the plate.
-
Note: The plate clamp closes within 2 minutes
-
-
-
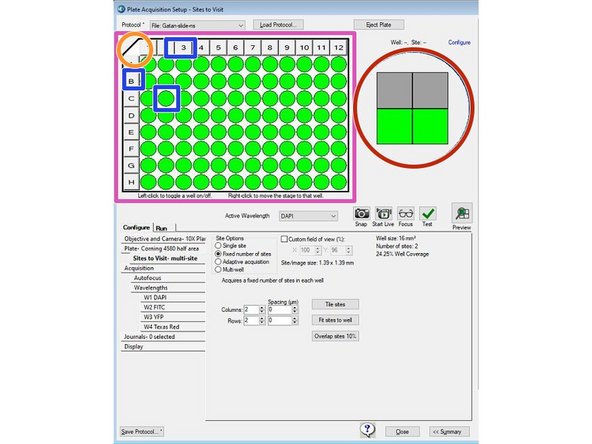
Use the Plate Map to select the wells to acquire:
-
To exclude wells from the image acquisition, click on a well, click a row or column header, or drag the cursor over a section of wells. Excluded wells display in gray.
-
To include or exclude all wells, click the upper left corner triangle.
-
To move the stage to a specific well, right-click a well.
-
The Site Map represents the number of sites in each well and the position of the sites to acquire for each well. Sites you select to acquire display green and sites you choose to not acquire display gray.
-
-
-
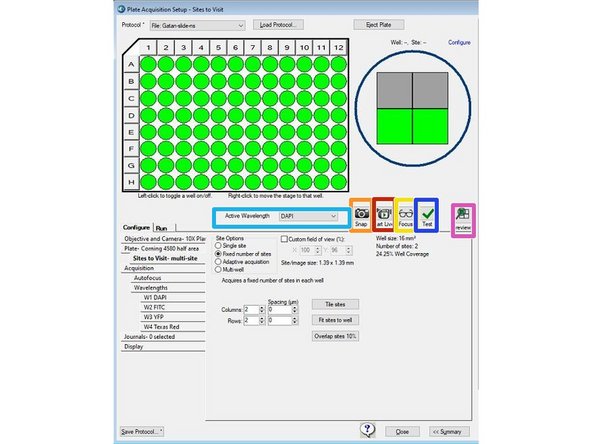
Each shortcut icon performs the action at the well where the stage is currently located and in the wavelength that currently displays in the Active Wavelength field.
-
Use the Active Wavelength drop-down to select an acquisition wavelength.
-
Use the Snap icon to acquire an image without performing (or re-performing) an autofocus.
-
Use the Start Live icon to start and stop Live mode
-
Use the Focus icon to perform the Autofocus routine and then acquire an image
-
Use the Test icon to perform the Autofocus routine and then acquire a Z series and present the corresponding 2D projection when you set up a z acquisition.
-
Use the Preview icon to perform the Autofocus routine and then acquire a Z series at each of the wavelengths you set up in the protocol and present the corresponding 2D projection when you set up a Z acquisition.
-
-
-
Use the Configure tab to configure a plate acquisition protocol. The Configure tab is organized in a “top-to-bottom” tab structure that runs down the left side to guide you through the process ofsetting up the protocol configuration.
-
Make sure to only modify your own protocols!
-
Use the Protocol drop-down to select from the eight most recently used plate acquisition protocols.
-
Use the Load Protocol button to select a protocol that you saved from a previous session for plate acquisition during the current session.
-
If you want to generate a new protocol, save a protocol first before modifying it. Save protocols to file in your private folder and not to database.
-
Select the Save to File Rather Than Database check box.
-
-
-
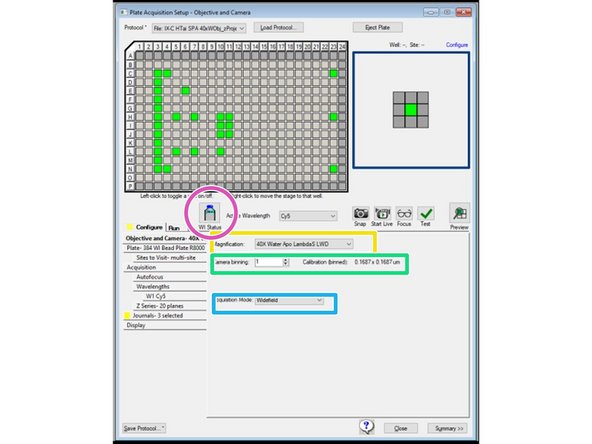
Click the Magnification drop-down and select the setting of the objective to use for the protocol.
-
For 20x and 40x water immersion: control the water immersion system and add water immersion by clicking on Make Ready.
-
Change camera binning if a different resolution is required or to increase the signal to noise signal-to-noise ratio.
-
Higher binning might improve the speed of the acquisition, but reduces image spacial resolution.
-
Dual disk unit allowing selection between 3 modes:
-
Widefield imaging mode.
-
50 micron pinhole disk for your basic confocal requirements (better optical sectioning but less sensitive). Spacing between pinholes 500 um
-
51 micron slit for high throughput confocal requirements (faster acquisition but lower optical sectioning). Spacing between pinholes 250 um
-
-
-
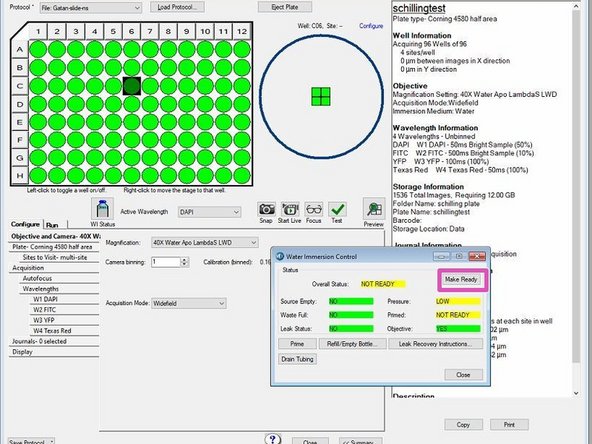
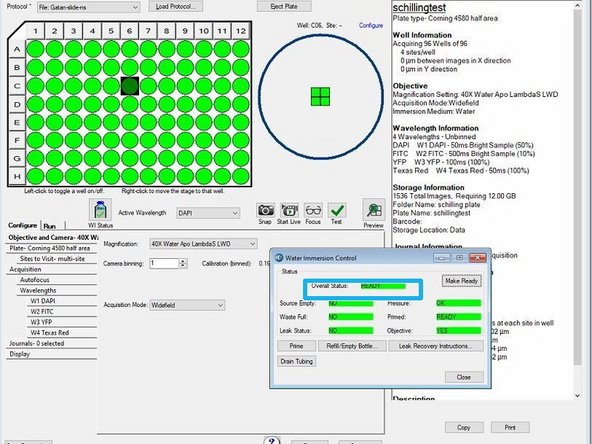
When you select a water immersion objective the WI Status icon displays. Click on the icon to access the water immersion control.
-
Create a water bolus by clicking on "Make Ready".
-
As soon as water bolus is created and objective is ready to use the overall status will turn green "ready".
-
When you switch from a water immersion objective to an air objective, the system drains the water and the software opens the instrument top door so that you can dry the bottom of the plate before using the air objective.
-
If you do not dry the plate bottom, you run the risk of getting water on the air objective and potentially into the instrument.
-
-
-
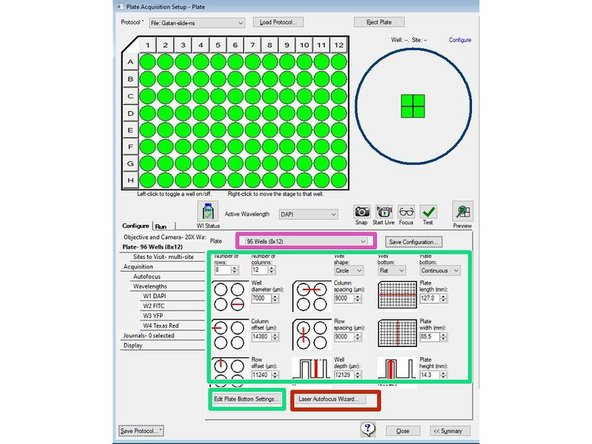
Use the Plate tab to configure the plate dimensions to accurately control the X, Y, and Z movements of the system. The plate dimensions you define also ensure that laser-based autofocusing is as accurate as possible.
-
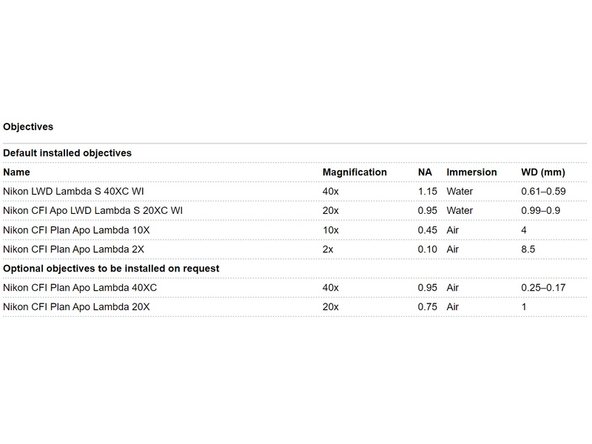
The ZMB provides you with common plate types that are already configured, from which you can choose.
-
If the plate type is not available in the Plate Name list, you can enter the manufacturer’s plate specifications including plate bottom settings (if available).
-
The manufacturer generally cannot provide values for the plate bottom settings, including optical thickness, which is not the same as physical thickness, and bottom variation. You must run the Laser Autofocus Wizard to measure the values to ensure proper focus.
-
Click Laser Autofocus Wizard and follow the instructions to calculate plate bottom measurements.
-
The wizard guides you step by step through the process of automatically calculating plate bottom dimensions and the focus laser exposure times that are required for each objective with your selected plate type.
-
Do not use the Laser Autofocus Wizard for slides because this feature is not compatible with slides.
-
-
-
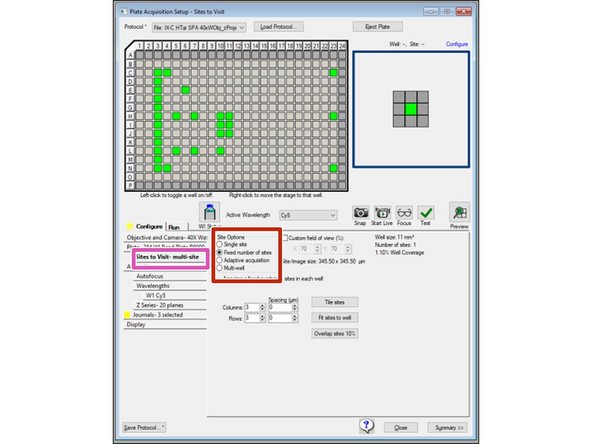
You configure the number of sites that are to be acquired for each well in a plate acquisition protocol on the Sites to Visit tab
-
Depends on the size of the well, the objective magnification, the distribution of sample material in the well, the type of plate, and the fluid content of the well.
-
Click to acquire a Single site.
-
Click to acquire a Fixed Number of Sites, configure the site layout, and then deselect the unwanted sites.
-
Click to acquire an Adaptive Acquisition is a computational algorithm that counts the number of cells on the fly during sample acquisition. This increases the chances of collecting valid data in every well. The number of sites the software acquires per well is based on the number of cells per well.
-
Click multi-well acquisition to acquire high density plates faster. This option uses the size of the camera field of view to acquire several wells simultaneously while taking a single image, thereby reducing plate acquisition time. The software automatically calculates the number of wells in which a site can be simultaneously acquired.
-
-
-
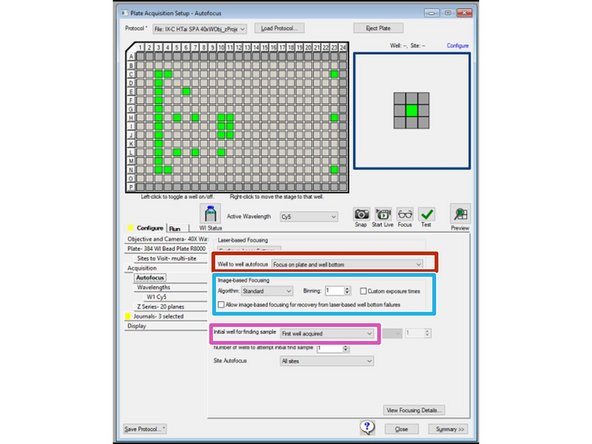
Use the Acquisition tab to specify the autofocus options and additional acquisition options for the protocol.
-
The Acquisition tab provides two autofocus options:
-
Laser Based Focusing is generally set to find the bottom of the well, and then moves the objective a distance up from the well bottom. This method is the fastest and does not cause photo damage to your wells. This method might not be sufficient if the distance above the bottom of the well varies in your sample.
-
Image Based Focusing uses a contrast-based algorithm to identify the best focus image. This option works best for experiments that use low-power objectives or when the sample distance above the bottom of the plate varies. Performance can be slower than Laser Based Focusing and focusing can fail if out-of-focus debris is in a sample.
-
You can configure one or both autofocus options for a plate acquisition protocol. It is recommended primarily using Laser Based Focusing.
-
Some samples can benefit from using both focus options including live organisms, suspension cells, tissue samples, and assays where the best focus position varies with the phenotype. When you select both focus options, the software uses LBF to move the objective to a position above the bottom of the well, and uses the IBF to fine tune the focus.
-
-
-
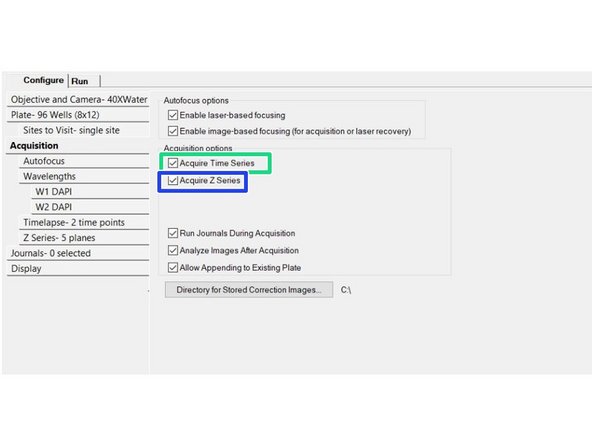
The Acquisition tab provides two series acquisition options (you can select one or both):
-
Acquire Time Series acquires images at multiple time points. When you select this option, specify the set of images to acquire at each time point.
-
Continuous time series acquisition
-
With discontinuous time lapse acquisition, you can return the sample plate to the incubator in between time points, and you can read other plates in the interim.
-
Acquire Z Series acquires individual opticalsections (planes) in sequence through a sample that can produce a 3-D image of the sample. When you select this option, specify the number of steps and the step size to move through the sample.
-
-
-
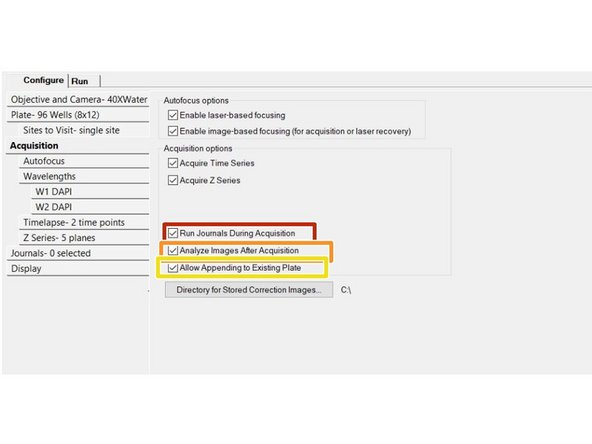
Journals: macro based complex tasks that should be run while acquiring (normally not selected).
-
Analyze images after acquisition (normally not selected).
-
Allow appending to existing plate: data will be added to an already acquired plate. Can be used e.g. for multiplexing experiments.
-
-
-
Adjust focusing routine with laser settings and where the focus will be acquired.
-
Configure image based focusing (if selected in the previous step)
-
Specify the finding of sample and where to focus
-
-
-
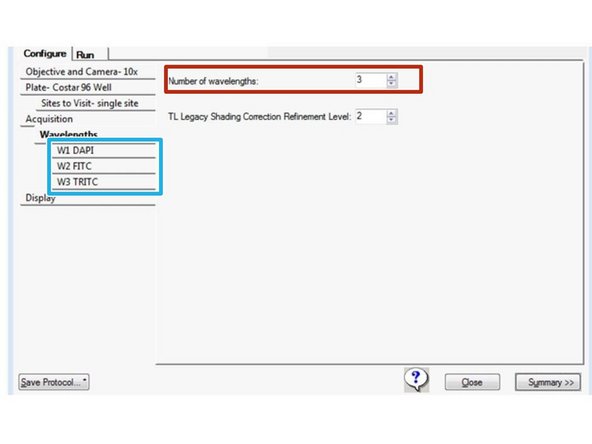
Use the Wavelengths tab to specify the total number of acquisition wavelengths for an experiment.
-
You must specify at least one acquisition wavelength and you can specify up to eight.
-
When you specify more than one wavelength, subtabs display below the Wavelength tab where you configure exposure time, autofocus, and time lapse settings for each acquisition wavelength.
-
Red indicates that you have yet to configure the acquisition wavelengths.
-
Enter the refinement level.
-
Increasing this value slows the acquisition routine. The single value that you enter applies to each acquisition wavelength for which you select Auto Correction for TL Legacy as the shading correction method.
-
-
-
Use the W# tabs below the Wavelength tab to configure acquisition wavelengths.
-
Click the Illumination drop-down and select the illumination setting; for example, FITC.
-
Specify the exposure and illumination power.
-
Calculate Offset to calculate the offset for all subsequent wavelengths.
-
Specify the z-series (3D, projection) and how the projection should be calculated
-
Digital confocal is a deconvolution computation. Normally this is not selected
-
-
-
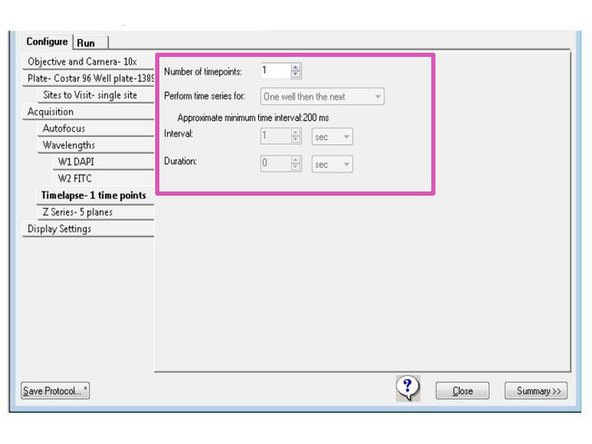
Use the Timelapse tab to configure time series acquisitions (if activated previously).
-
-
-
Use the Z Series tab to configure Z series options (only if activated previously).
-
-
-
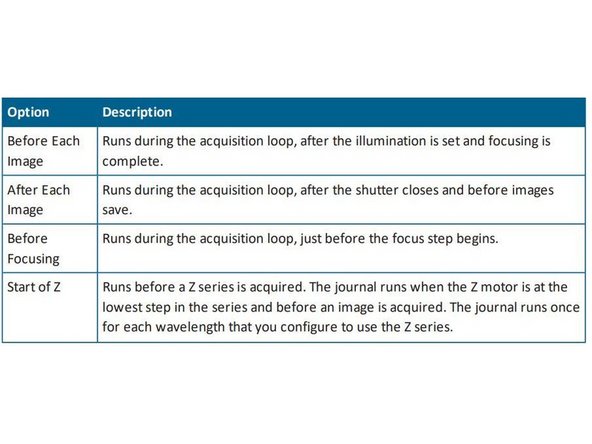
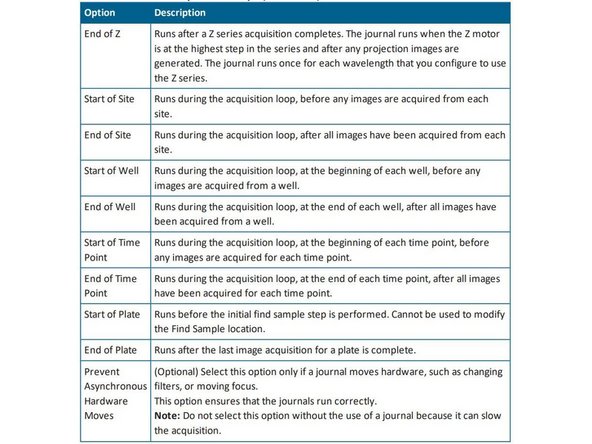
Specify the journals that should be run.
-
Only available if you previously selected Run Journals during acquisition in the Acquisition tab.
-
Note: The Journal function is the only way to combine time-series and Z-series with each other in one acquisition for this system
-
-
-
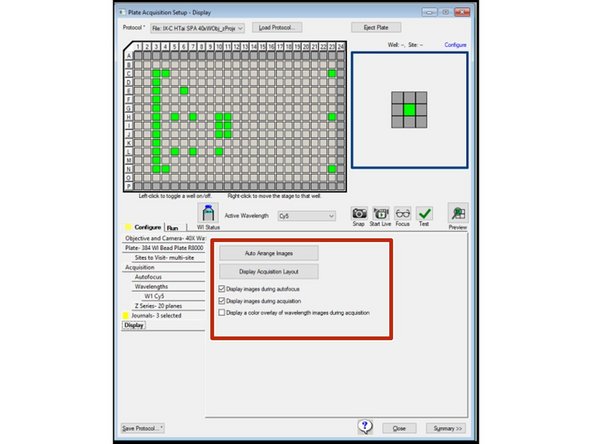
Specify how and if images should be displayed during data acquisition
-
-
-
You should save a plate acquisition protocol to a file (and not to database).
-
Click Save Protocol to display the Save Acquisition Protocol dialog.
-
Select the Save to File Rather Than Database check box.
-
Navigate to the location to save the file in your private data folder (transfer server will be deleted wihtin 7 days).
-
-
-
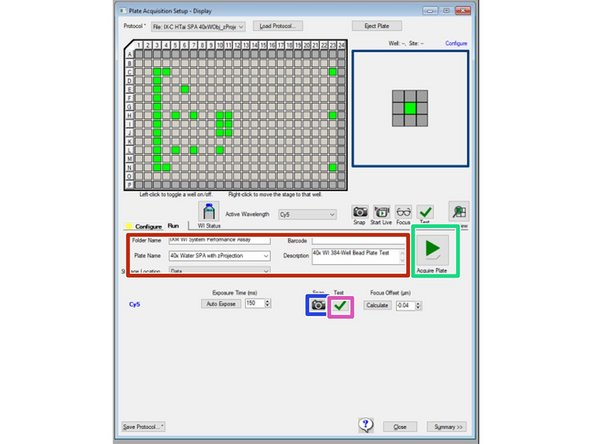
Use the Run tab in the Plate Acquisition Setup dialog to run the plate acquisition protocol and acquire the plate data.
-
Specify folder and plate names for organizing the data within the database.
-
Names become part of the image file paths. If the overall path length is too long, it causes errors.
-
You MUST use your username in the "Folder Name" field for data to be transferred correctly. The username is your core username without the dot (e.g. dduck). For Staff please use Folder - "ZMBStaff", Plate name - project nr.
-
Click to snap an image.
-
Click to test your settings.
-
Click Acquire Plate to acquire images from a plate based on the settings for the loaded protocol.
-
To export your images please check the corresponding guide: MD ImageXpress Confocal HT.ai (Irchel) - Datamover & file conversion
-