Introduction
You can process your data either on the microscope computer (usually when you process only a few
files during your microscopy session) or on our special VM C.
-
-
SIM is a one-step processing option where a theroretical PSF is used for reconstruction and a generalized Wiener filter is applied.
-
SIM² is a two-step method (with combination of the different lattice images, denoising and frequency suppression filters as a first step), where a PSF based on your imaging data is generated from step one and applied in the second step, an iterative deconvolution. SIM²will theoretically give you access to 60 nm resolution.
-
Often the SIM²alogrithm will be able to process data with more background with more background reduction but you run the risk of over processing your data. One should always aim to have as little background as possible in the image by optimizing the sample preparation protocol.
-
-
-
In order to process lattice SIM, lattice SIM²and Apotome data you can either do it in the operating software on the elyra or with the Special C VM.
-
Open "ZEN 3.0 for Elyra".
-
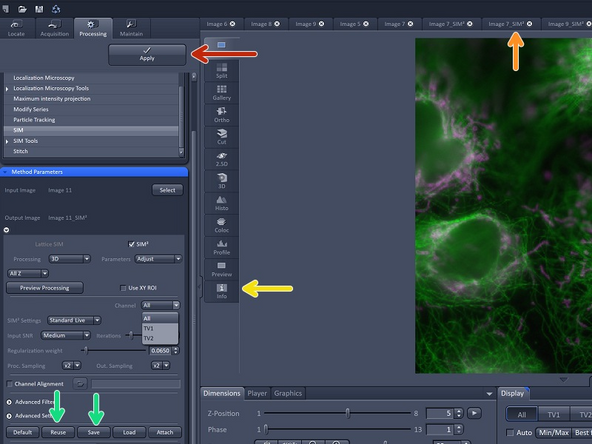
Switch to the "Processing" tab.
-
Scroll down to the "SIM" tab.
-
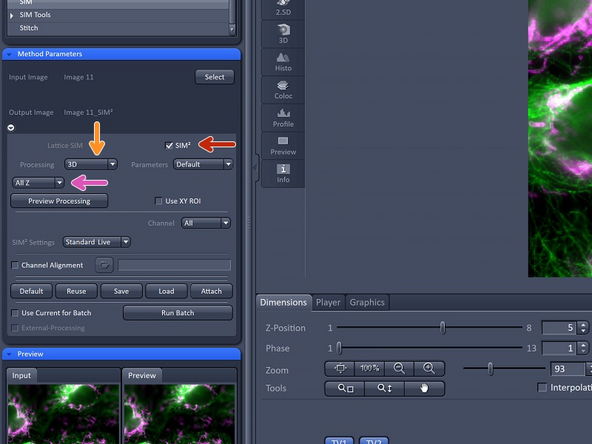
"Activate" the image you want to process in the image container and press the "Select" button to load the image.
-
The Processing SIM tool works exclusively for data acquired in the SIM Apotome as well as Stripe & Lattice SIM imaging modes.
-
As long as no file is open AND selected all options in Method Parameters will be greyed out.
-
Then expand the Method Parameters tool window to have access to setting parameters.
-
-
-
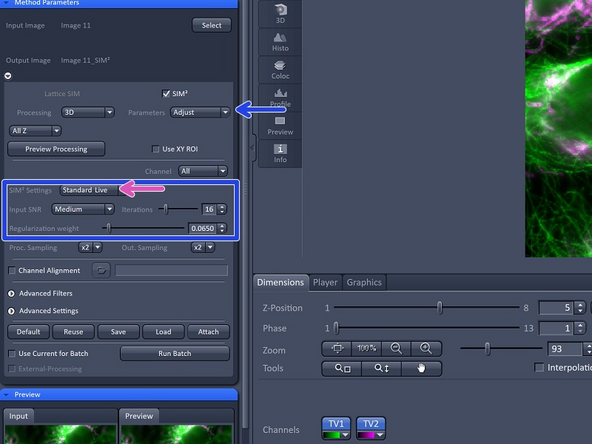
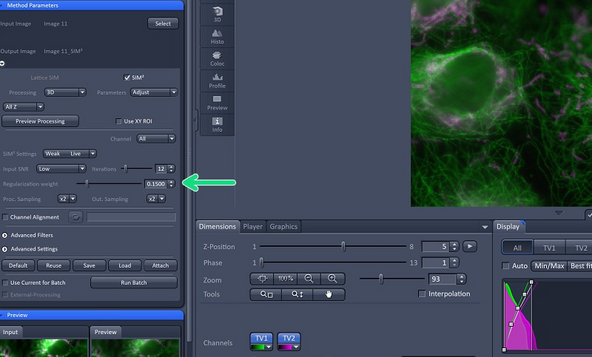
Activate "SIM²" procssing option, some options available in the Method Parameters window will change.
-
Note: The selected file has been automatically recognized as a Lattice SIM file in z-stack format and therefore for processing the option "3D" is automatically selected. If you have acquired your data in leap mode this will be automatically recognized by the software.
-
3D leap processing will reconstruct 3 planes for each plane you have acquired giving you the full 3D information, unless you chose to deselect this. If you have 2D data you will see the 2D+ option which gives an improved sectioning result, reducing infromation from planes that are out of focus.
-
For 3D data you can decide to just projcess a sub-stack of the full stack you have acquired, instead of "All Z".
-
We recommend reviewing your Z stack and limit your sub-stack to a range of planes where you have enough modulation contrast.
-
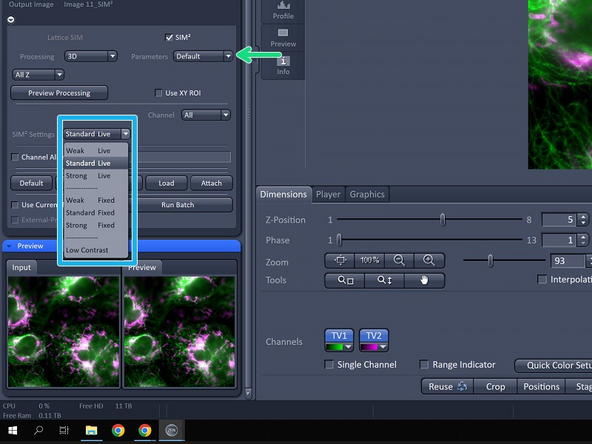
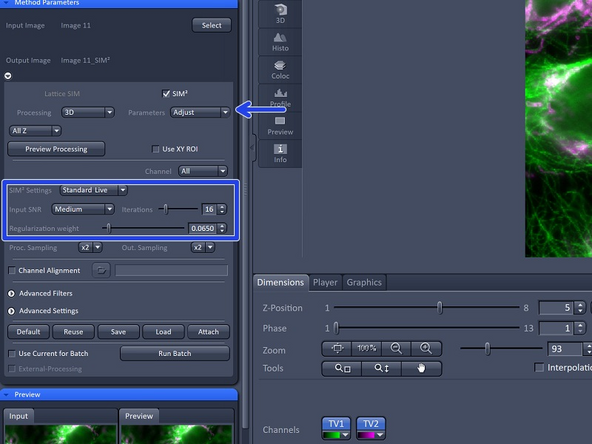
In general there are two options for SIM² processing: Automatic processing with "default" values and manual processing with "adjusted" values.
-
Here you find the default pre-sets.
-
By switching to Adjust the settings behind the presets become visbile and can be changed. Manual adjustment of paramters should be done to maximize image quality/ resolution, but one should have a close look at the results to exclude overprocessing when manual processing is done.
-
-
-
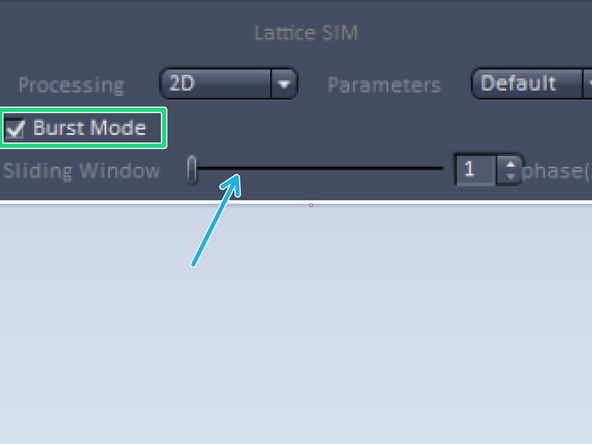
Burst mode processing uses the rolling window approach to let you observe processes in your living samples at up to 255 fps. Since Burst mode is an image reconstruction feature as well, you have the flexibility to use it with already acquired data sets. You decide how much time information is required for your data analysis.
-
If the image was a 2D time series acquired with Lattice SIM, the Burst Mode check box becomes available.
-
If checked, the SIM calculation is not any more done by blocks of 15 phase images (i. e. 1-15, 16-30, …; Block mode), but by 15 phase images in a gliding or rolling manner with the number of phase image steps as defined in the Sliding Windows…phase(s) slider (Burst mode).
-
This allows to reconstruct a higher number of reconstructed final images from a time-series and results in a higher frame rate for the reconstructed final image series.
-
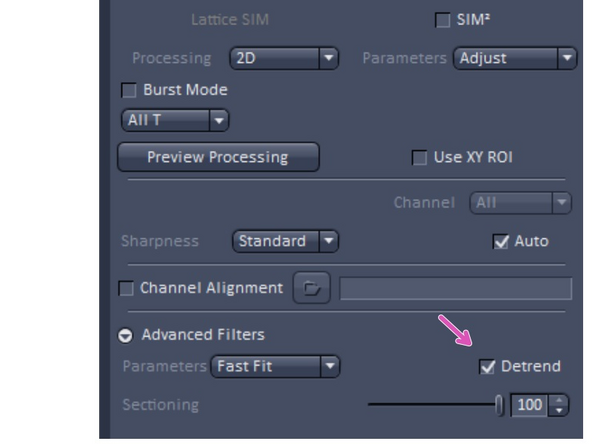
If you see bleaching in your data set you can try to adjust for this by using the Detrend option within the processing software.
-
Detrend option in the SIM processing in case of bleaching over time
-
-
-
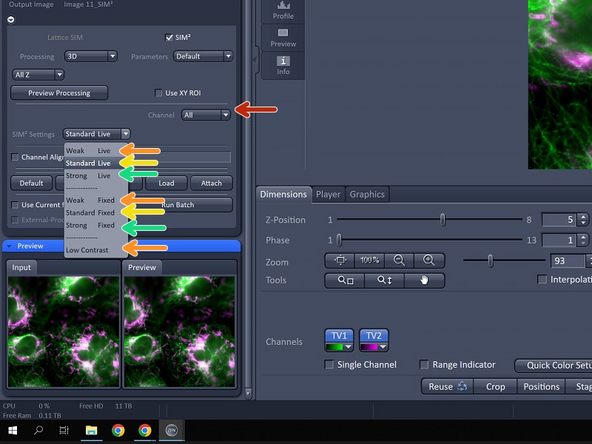
There is no universal law for choosing the best SIM² preset setting, however the following guideline might help. There are different SIM² preset settings accessible for either "Live" or "Fixed" samples. "Weak, Standad and Strong" refer to the iterative deconvolution step used in this type of processing.
-
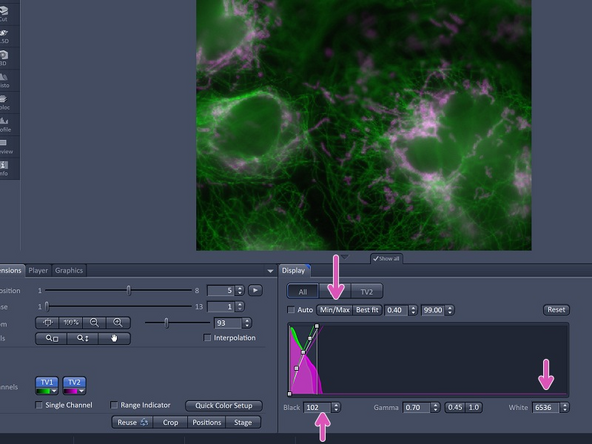
Click "Min-Max" button to get information about the grey value range, calculate the 𝑚𝑎𝑥/𝑚𝑖𝑛 ratio. Choose following preset settings according to your 𝑚𝑎𝑥/𝑚𝑖𝑛 ratio.
-
𝑚𝑎𝑥/𝑚𝑖𝑛 = 2 - 5 → mostly Weak, processing with max/min ≤ 2 might be challenging'. Additionally. choose "Live" for low SNR or "Fixed" for high SNR. Choose Low Contrast: For homogenous stainings and low frequency (large structures) data (e.g. free GFP in the cytosol, DAPI or Hoechst and similar).'
-
𝑚𝑎𝑥/𝑚𝑖𝑛 = 5 - 12 → mostly Standard. Additionally. choose "Live" for low SNR or "Fixed" for high SNR.
-
𝑚𝑎𝑥/𝑚𝑖𝑛 > 12 → mostly Strong. Additionally. choose "Live" for low SNR or "Fixed" for high SNR.
-
𝑚𝑎𝑥/𝑚𝑖𝑛 ≫ 12 → Strong, try manual adjustment of the parameters to get even higher resolution (details here)
-
Note that you can combine differnet SIM² settings for individual channels of the same data set via Channel dopdown menu. Using different settings per channel is usually advisable. As diffuse signals (e.g. DAPI) requires different settings compared to signal of a very evident structure.
-
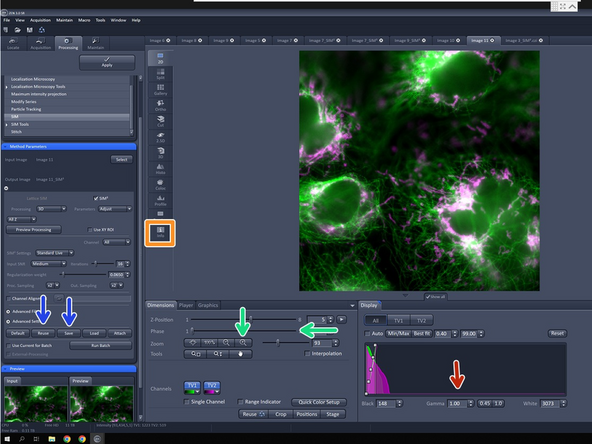
Click "Apply" to start the processing.
-
-
-
Review the processed result.
-
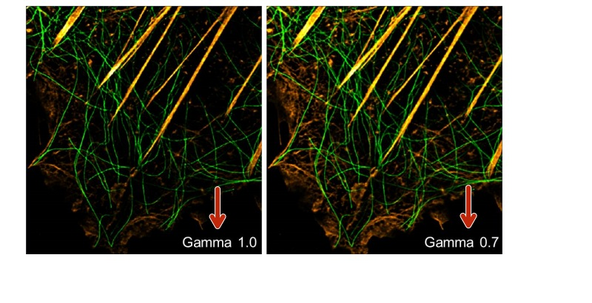
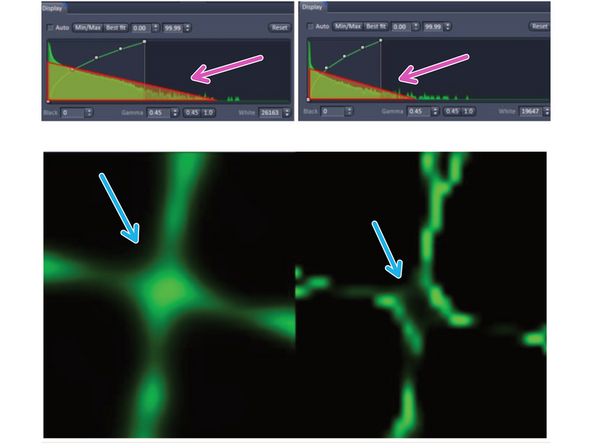
Not that sectioning of the processed data in many cases is strong, so display of initial results is often improved by applying some gamma to the display curve (e.g. 0.7)
-
Zoom into the raw data and move the Phase slider to check the quality of modulation of the structured illumination (visibility of the pattern shifting in the image).'' Even for high max/min values, when no modulation is observed the SIM processing will be very challenging and should first be tried with the Weak mode'.'
-
The two groups Live and Fixed will be applicable to most of the data. Nevertheless, there might be cases, where living cells express very bright fluorescent proteins, or fixed samples have high background noise. In these cases, Fixed settings can be used for high S/N live samples or Live settings can be applied to fixed samples with low S/N.
-
In case you were using the ROI function. it might lead to non-optimal results for different reasons: The ROI is not representative for the data set, the ROI is too small (e.g. 50x50 pixels), ROI contains too few phase-modulated structures (here the estimation of lattice grid position would fail during processing).
-
Note that the settings will be recorded and can be checked in the info tab of the processed image. They are therefore documented.
-
You can "save" your processing parameter once you are happy. One can re-use the settings by opening and selecting a processed image and clicking Reuse.
-
-
-
In case you have a 𝑚𝑎𝑥/𝑚𝑖𝑛 ≫ 12, you should try to manually adjust the values in order to increase your image quality and resolution.
-
Choose "Fixed Strong" as a preset for a starting point in oder to further adjust the settings.
-
By switching to Adjust , the settings behind the presets become visbile and can be changed.
-
It is recommended to always use these as a starting point for manual adjustment.
-
Manual adjustment of paramters should be done to maximize image quality/ resolution, but one should have a close look at the results to exclude overprocessing when manual processing is done.
-
If the data has not enough SNR, too strong processing will lead to singnal loss and more noisy results. Hence settings should be ajdusted for each channel separately.
-
In the following steps the parametsers Input SNR, Iterations, Regularization Weight, Proc. Sampling and Out. Sampling will be discussed in more detail and how they should be adjusted.
-
-
-
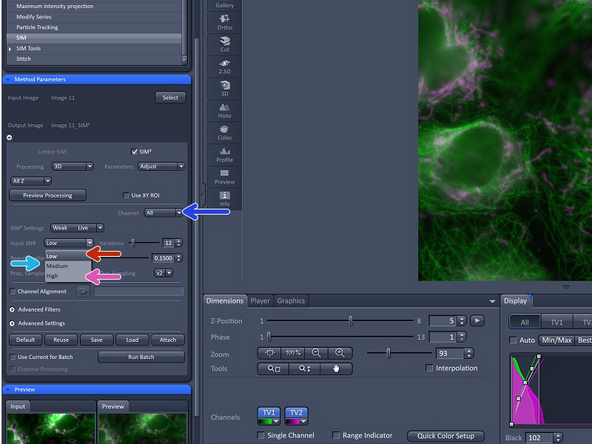
In most cases Input SNR from the default values will be perfectly suited for the data set, so theoretically there is no need to change it. For certain data types (e.g. Leap) Input SNR is set to a fixed default value and is not shown in the Parameters window.
-
One can choose from 3 possible types of SIM image reconstruction from the separated frequency bands before deconvolution:
-
Low for classical Wiener filter. Use for very noisy data like fast live cell time series.
-
Medium for weighting according to illumination strength, i.e. simple summation (no Wiener filter). Use for most of the data (default value).
-
High for more sophisticated weighting to boost higher frequencies (no Wiener filter). Use for highest SNR data to get the highest resolution, but keep in mind, that this option will also enhance residual noise.
-
Stronger filtering allows higher frequencies to be processed and yields higher resolved data but also images with more noise.
-
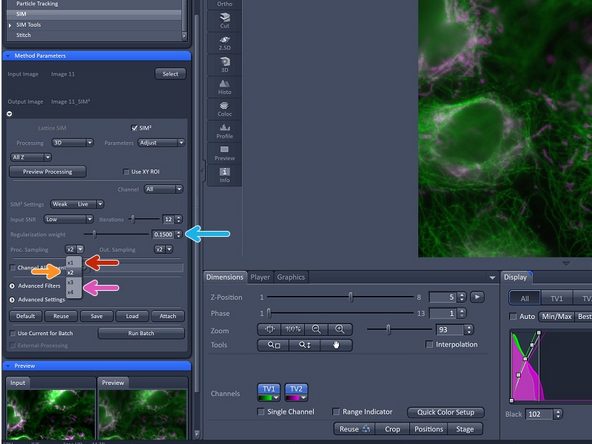
Using different settings per channel is usually advisable. You can apply different setting per channel by using the "channel tool".
-
For example a more diffuse staining (such as DAPI) requires different settings compared to a staining of a very evident structure.
-
-
-
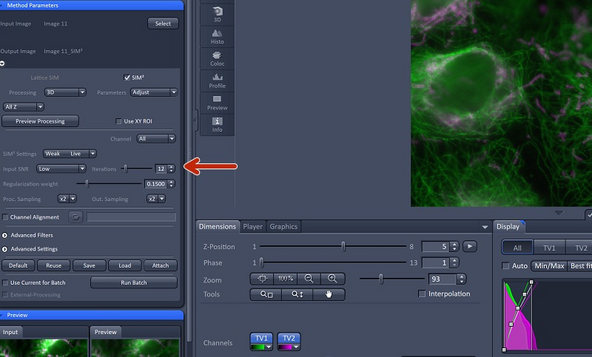
Iterations refers to the maximum number of loops / repeats for the iterative deconvolution. The number of iterations only mildly affects the outcome when changed moderately.
-
The following considerations might help to find reasonable number of iterations:
-
If the number of iterations has to be decreased to ~5 to get artifact-free results, the data set is not suited for SIM² processing. (see this step to identify processing artefacts).
-
Use less iterations to avoid potential over processing for noisy data. Usually the algorithm converges quickly, so moderate differences (e.g. increase by 25%) in the number of iterations after convergence has a mild effect on the results.
-
Use higher numbers of iterations to process stronger and potentially achieve better resolution. For highest resolutions (~60 nm), it is recommended to use high iteration numbers of ~40.
-
-
-
Regularization weight ensures that the solution of the optimization in the iterative loop has contraints such as non-negativity of the intensity by setting the weight of the regularizer term in the iterative deconvolution.
-
Regularization Weight is the most important tool for finetuning image processing.
-
Choose a higher number (stronger regularization) in oder to soften the final image and prevents the user from overprocessing the data.
-
Choose lower number to increases the resolution but can potentially lead to overprocessing.
-
We recommend to start from the default preset "Fixed Strong" and start adjusting the regularization weight from there empirically.
-
The perfect adjustment for the regularization weight is the lowest value for which no overprocessing artifacts are seen in the image.
-
To find accurate regularization weight might be time intensitve.
-
-
-
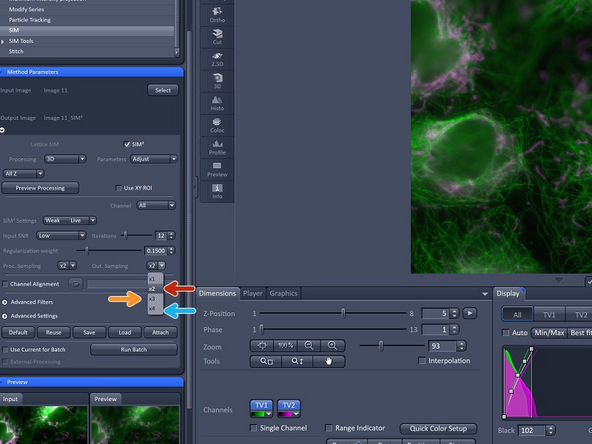
With the settings ''Proc. Sampling ''you can control: How the data is up-sampled before the iterative deconvolution is started (step 2 of the SIM2 processing).
-
This settings should not be set to x1.
-
In most cases, one should use the default value x2.
-
To achieve better resolution for high SNR data, one can choose the values x3 or x4.
-
Make sure to adjust the Regularization Weight when up-sampling to values 3 or 4 as smaller pixels need stronger regularizer weight.
-
As a rule of thumb: When changing Proc. Sampling from 2x to 4x, "Regularization Weight" should be decreased by a factor of 10x.
-
Higher settings will slow down the processing.
-
-
-
With the settings Out. Sampling you can control: How the resulting processed image is presented by changing the pixel size.
-
x2 yields a pixel size of 31 nm
-
x3 yields a pixel size of 21 nm
-
x4 yields a pixel size of 15 nm
-
For 60 nm resolution one needs to use 4x oversampling according to the Nyquist.
-
More pixels here will increase the size of your data.
-
Please note that this parameter can be used independently from Proc. Sampling.
-
For certain cases, it might be sufficient to increase the Proc. Sampling due to increasing the resolution/image quality but not to increase the Out. Sampling because the resulting resolution is still covered by the 2x Out. Sampling.
-
-
-
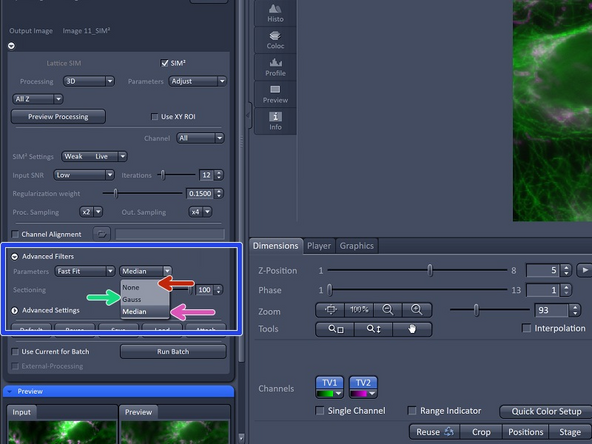
For Lattice SIM2 data one has the options for advanced filtering:
-
None: The prefiltering of the raw data will be switched off.
-
This might be useful for data sets with almost no noise to get the highest resolution.
-
Median is active per default for Lattice SIM data and applies a median filter in XY to the raw data before processing
-
Median filter is known for maintaining all structures while effectively removing the salt and pepper noise. In almost all cases the median filter improves the processing results for Lattice SIM data. Median filter cannot be used for SIM Apotome images.
-
Gauss is active per default for SIM Apotome data and applies a Gaussian filter to the raw data.
-
It is not as effective in removing the noise as the Median filter. But, in contrast to the Median filter, it can be used for SIM Apotome images.
-
-
-
The Advanced Settings option:
-
Scale to Raw - this should be used if any singal quantification is the aim of the experiment.
-
Usually SIM² analysis of imaging data would be used for structural detail analysis, henece this option is not set as default. The output images will be normalized to the maximum dynamic range. This means that quantitative information is lost and images are displayed with best brightness and contrast.
-
Therefore, this setting is good for preparation of images for presentations and publications but not usable for quantitative analysis of the image data. For quantitative analysis of your data you will need to tick the box Scale to Raw Image; this will make sure the original distribution of signal intensity is kept.
-
DCV allows you to reconstruct an image / channel as deconvolved wide-field image (small resolution improvement and better sectioning and contrast).
-
WF allows you to reconstruct an image / channel as standard wide-field image (no resolution improvement).
-
-
-
Once you have set up the parameters you can hit "Apply" at the top of the "Processing Tab" and the raw image you have selected will be processed with your settings.
-
The processed data will appear under yourdataname_SIM2 in the image area of ZEN Black and you will need to save this manually.
-
The default values will be chosen by the software but can be adjusted. The settings will be recorded and can be checked in the info tab of the processed image. They are therefore documented.
-
You can "save" your processing parameter once you are happy. One can re-use the settings by opening and selecting a processed image and clicking Reuse.
-
Save allows to generated a separate file (.par) containing the settings chosen for processing. A ‘.par’-file can be reused via Load. Save therefore allows to save and document applied settings in a permanent way and makes them accessible for repeated processing.
-
Default will store current values in the Method Parameters window, this can be recalled by clicking Reuse (recalls last stored default settings). Default and Reuse might therefore be useful when switching briefly between different settings to compare them.
-
-
-
According to ZEISS the SIM² automatic processing with the presettings is very robust against overprocessing (when choosen correctly), especially compared to conventional Wiener-based image reconstruction. Nevertheless, when performing manual adjustment of the parameters, overprocessing might occur.
-
The indicators for overprocessed data for SIM² are the same as for iterative deconvolution algorithms in general. Thus, an averagely experienced user should be familiar with them.
-
It should be noted, that overprocessing is rather unlikely when using SIM², thus, all the following examples were created by setting Regularization weight to 0, Iterations to >70 (and switching off the Median filter in one case).
-
The typical signs of overprocessing are:
-
Loss of signal/structure Loss of signal can be easily seen in the grey value histogram as a markedly reduced total count (area of the histogram)
-
Crossing artifacts
-
Occurrence of additional structures
-
Occurrence of structured background instead of dotted
-
-
-
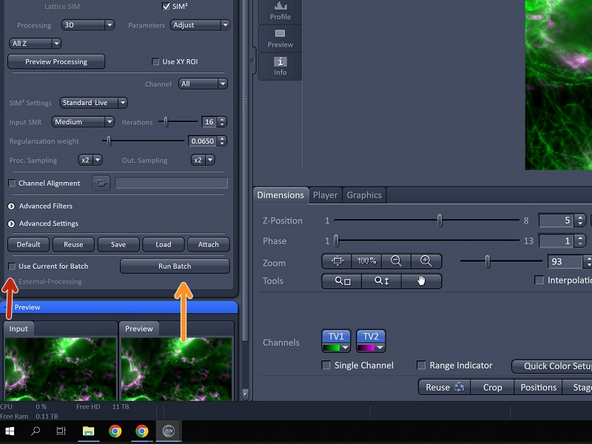
For processing a batch of raw data SIM images, all the images must already be saved in your folder.
-
To start, you can select any of the images you wish to process (you will select the rest after).
-
Check the box next to Use current for batch ensures the settings you have selected and set in the Method Parameters window are used for the batch processing.
-
Click the "Run Batch" button.
-
A separate File Explorer window will pop up for you to select all of your raw data images.
-
When running batch processing, the new images will not automatically open in Zen Black, but will automatically be saved in the folder with the original images.
-
You will see a progress window in the bottom panel showing the processing status of your files.
-
Files will simply be appended with “_SIM²”.
-