Introduction
Please not that SIM has (as all techniques) its limitations. Therefore SIM might not work well in the following scenarios:
• Dense staining pattern: Excessive fluorescence is generated, which leads to an uncontrolled distribution of excitation patterns.
• Thick/refractive/scattering sample: The presence of these types of samples causes aberrations in the excitation wave pattern due to interactions and distortions.
• Sample movement during image collection: The mathematical assumption (reconstruction algorithm) of stationary samples is violated when the sample moves during the acquisition of the reference images, which affects the accuracy of the reconstruction.
• Weak signal: Low signal-to-noise ratio (SNR) results in the loss of valuable information, limiting the effectiveness of SIM in capturing fine details.
-
-
Turn on the HXP lamp.
-
Turn ON the "Main Switch" and also switch the laser key to "ON".
-
Switch ON the "Components" on the table.
-
-
-
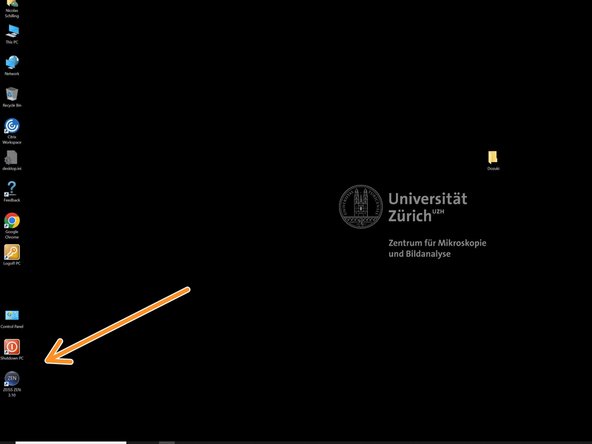
Turn "ON "the computer.
-
For your information, the PC checks network cards in the background after being turned on. This means the display might stay black for 2-3 minutes before you see Windows booting.
-
Sign-in with your ZMB core credentials.
-
In case you forgot your password please follow this link.
-
-
-
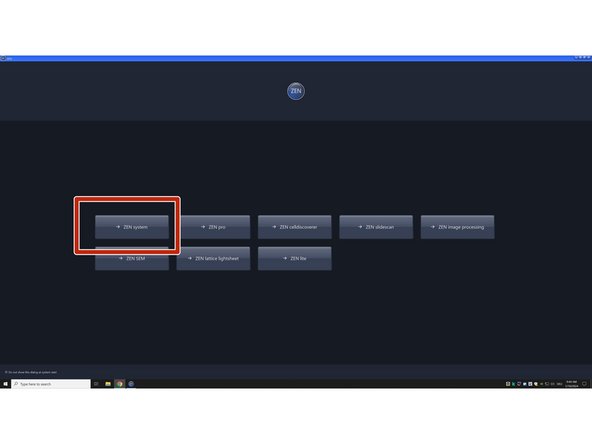
Start the "ZEN Blue" software.
-
Choose "ZEN System".
-
Make sure there is no sample on the microscope stage and calibrate the stage by clicking "Calibrate Now".
-
The system will automatically initialize the hardware.
-
-
-
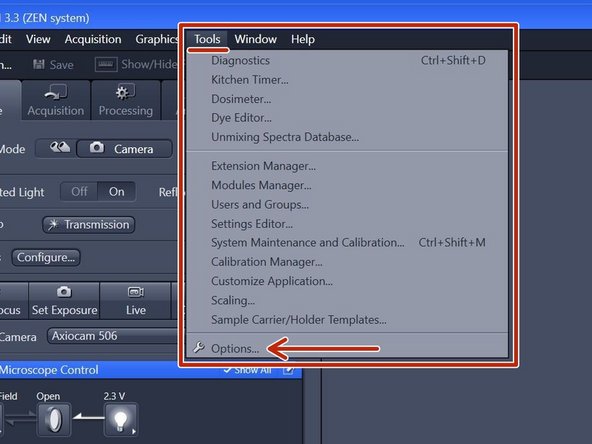
In the "ZEN" software go to Tools > Options.
-
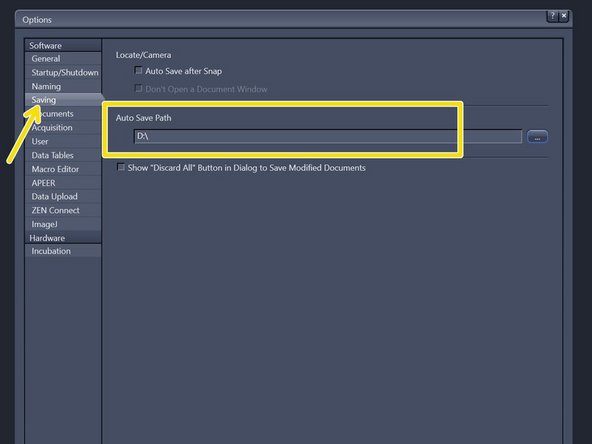
Choose "Saving" and check that the "Auto Save Path" is set to the local Data (D:) drive. If not, please change accordingly.
-
Please generate a new folder with with your username. D:\ ZMB-USERNAME e.g. D:\m.mustermann.
-
This path setting is saved in your profile and should be retained even after logging out or restarting the microscope.
-
-
-
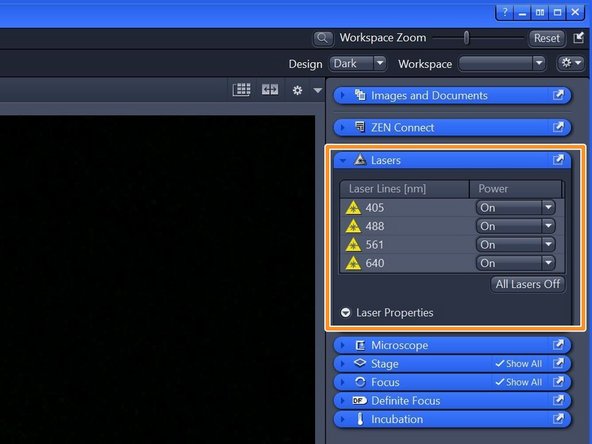
Click "View" - Show all global.
-
Make sure you have selected "2 Containers".
-
Switch on all lasers needed for your experiment.
-
Note: Red highliting indicates that lasers are still in warm up phase.
-
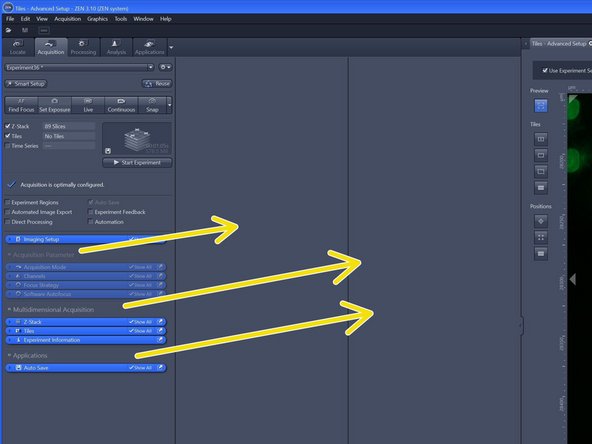
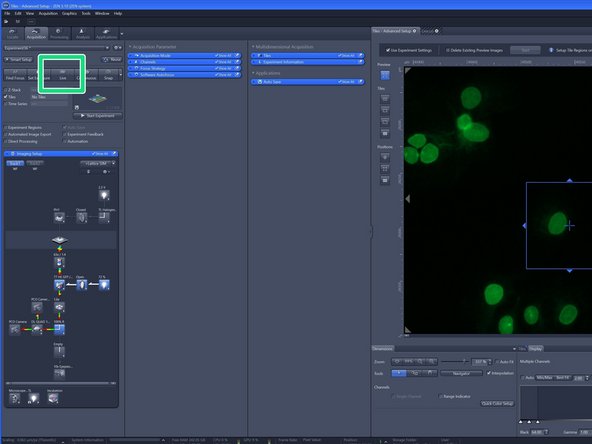
Drag and drop the "Acquisition parameters", "Multidimensional Acquisition" and "Applications" to the right in order to get more organized.
-
-
-
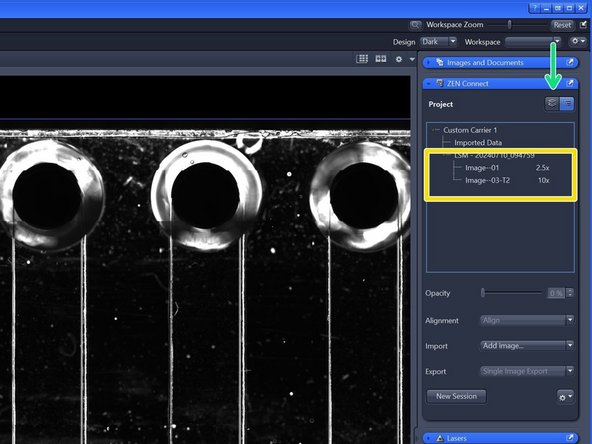
"ZEN Connect" correlates all data associated with your sample. It allows you to map high-resolution images on the larger overviews, maintaining the context and simplifying your file organization.
-
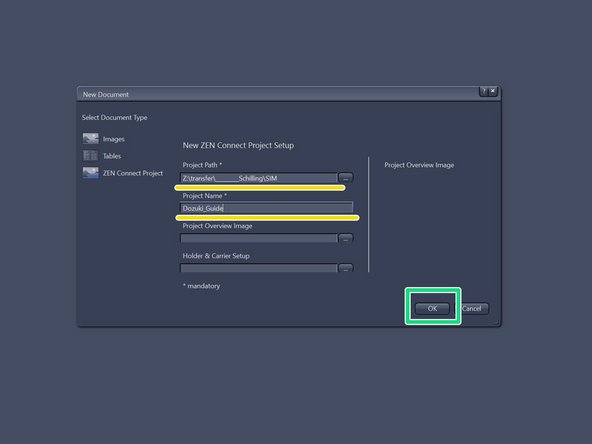
Choose "Create".
-
Alternatively, open the "ZEN Connect" tab and click "Create" (right hand side in "ZEN" software).
-
Define "Project Path" and "Project Name".
-
Click "OK".
-
-
-
Drag and drop "ZEN Connect.a5proj" file to the 2nd container (outmost container right hand side).
-
You need to grab the tab by the text in order to move it.
-
-
-
Place you sample with the correspondin Click-In insert.
-
Make sure the frame locks securely into the stage completely flat.
-
-
-
The slide insert is compatible with the following formats:
-
µ-Slides by Ibidi
-
Nunc Lab-Tek™ Slides
-
Chambers by Thermo Scientific
-
Object Slides
-
PDMS Chips based on 25x75mm slides
-
-
-
Insert the 35 mm Petri dish into the KM Frame.
-
-
-
Compatible with all kind of well plate formats.
-
-
-
Make sure you have mounted your sample and the 10X objective lense is bellow your sample.
-
Not that the following feature is not available for the 2.5X objective.
-
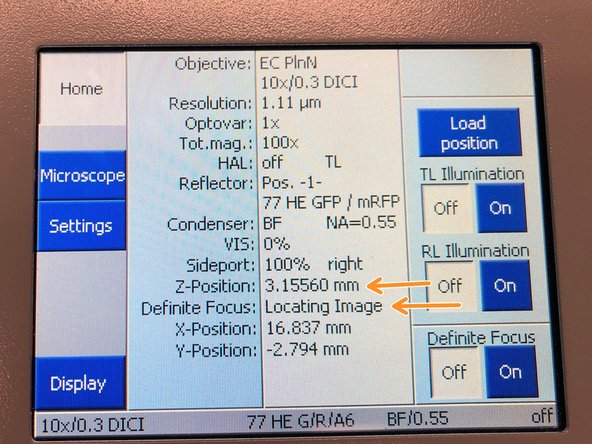
Open "Definite Focus tab" and click "Find Surface".
-
Definite Focus Settings are located on the right.
-
The microscope will perform a full range Z-scan and the Definite Focus will look for the strongest reflection signal.
-
On the touch panel you can monitor that the system automatically trys to find the covergalss reflection while moving through Z.
-
In Zen Blue the Definite Focus with Find Surface is not providing "Reflex found" as previously in ZEN Black 3.0.
-
If the refractive index mismatch between the immersion medium and glass is low, a reflextion might be too weak to be detected.
-
-
-
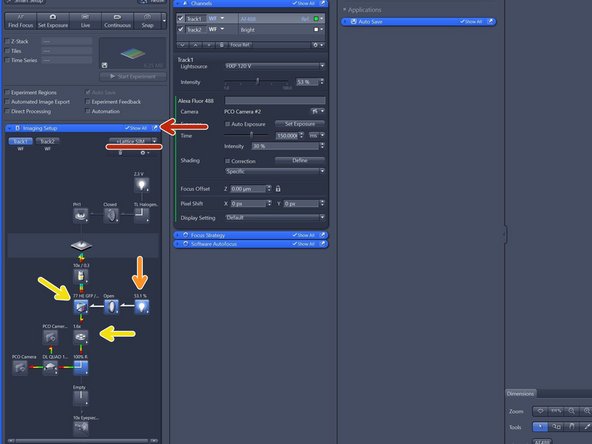
Open the "Imaging Setup tab" and define a classic wide-field track by clicking "WF".
-
Switch on the fluorescent lamp.
-
Make sure that FSe77HE filter is selected and the 1X tube lense.
-
FSet77HE is a triple band filter (Green-Red-FarRed) is the only filter for visual inspection.
-
Click on "live".
-
In case you have a black image click on "Min/Max" or "Best fit" in order to adjust the display of your image
-
When a reflex is found, this does not necessarily mean that the sample is in focus. Therefore, fine tune your focus with the coarse hand wheel by turning towards you.
-
-
-
Activate "Tiles".
-
Withing "Multidimensional Acquisition" open "Tiles" and click "Show viewer".
-
Choose the "Anchor Point Tool".
-
Drive the stage in "live view" to the top left corner of your sample carrier.
-
Set the first anchor point by clicking "+".
-
Drive the stage in "live view" to the bottom right corner of your sample carrier.
-
Set the first anchor point by clicking "+".
-
Confirm the Tile Area by clicking "Done".
-
-
-
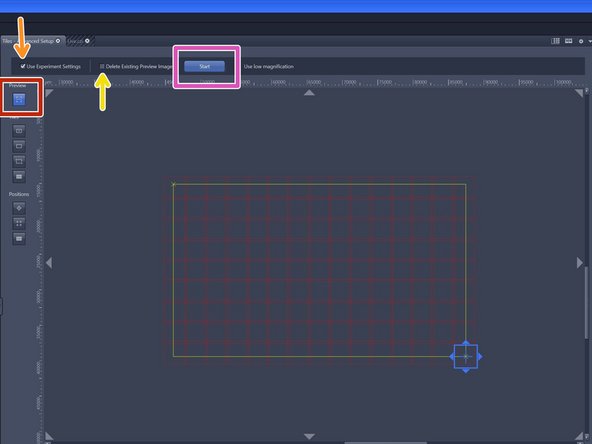
Click "Preview".
-
Make sure "Use Experimental Settings" is activated.
-
Make sure "Delete Existing Preview Images" is deactivated.
-
Start the Overview acquistion by clicking "Start". Ideally use low magnifaction objective such as 2.5X.
-
Note: This overview will only be available as temporary preview, meaning it will not be saved automatically as raw data, eventhough "Use Experimental Settings" is activated.
-
Only when you click "Snap" or "Start Experiment" actual raw data will be generated and auto-saved into your ZEN Connect Project.
-
You can deactivate or delete the defined Tile Area.
-
You can now navigate on your overview and define more detailed overviews with different objectives or define multipositions etc.
-
-
-
Optional: In case you would like to keep / import previews into your ZEN Connect Project follow this step:
-
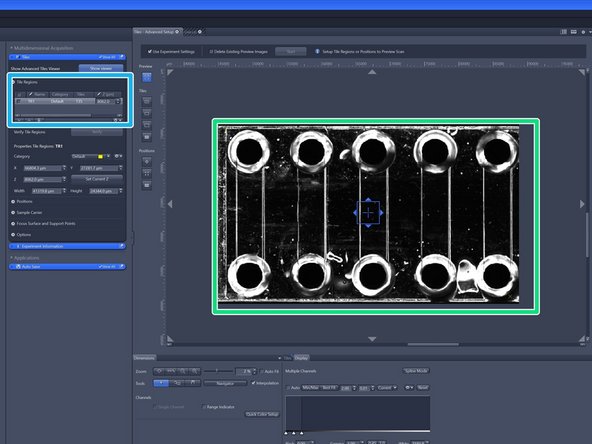
Right click on the corresponding preview and choose "Save Preview Images".
-
Save the preview into the same folder as you defined it in the beginning.
-
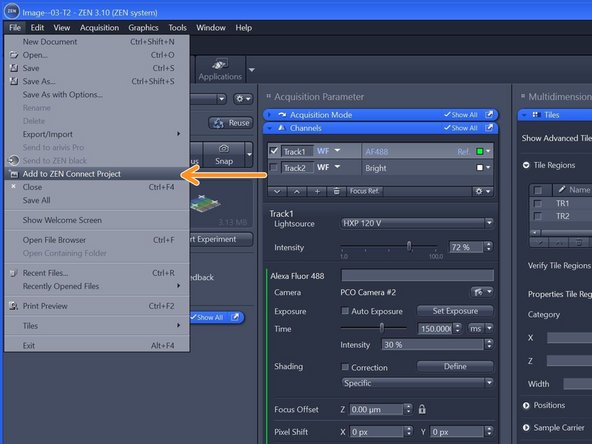
Click "Add to ZEN Connect Project".
-
Find now your preview imported into your ZEN Connect Project.
-
In case you would like to send an image to the back or front, use drag and drop in layers view.
-
-
-
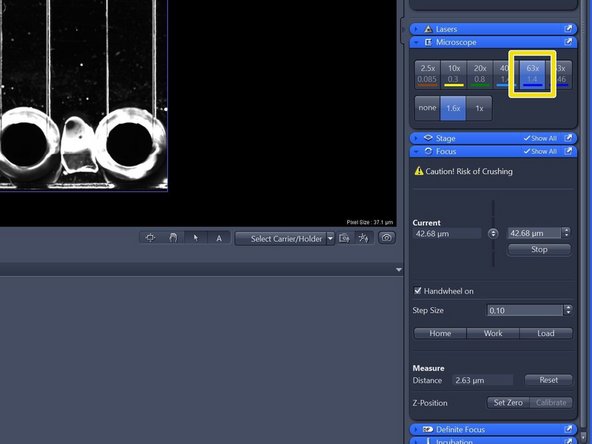
Switch to the 10x or 20x objective and check that you are in focus.
-
In "Imaging Setup tab" click "Focus" and click "Load" - in order to lower the objective.
-
Change to the desired objective via the drop down menu.
-
Objectives suited for a certain imaging mode will be highlighted, but every objective can be selected.
-
Note that for SIM the Plan-Apochromat 63X 1.4 oil and for TIRF/SMLM the alpha Plan-Apochromat 63X 1.46 oil are the objectives of choice due to their optimized optics.
-
-
-
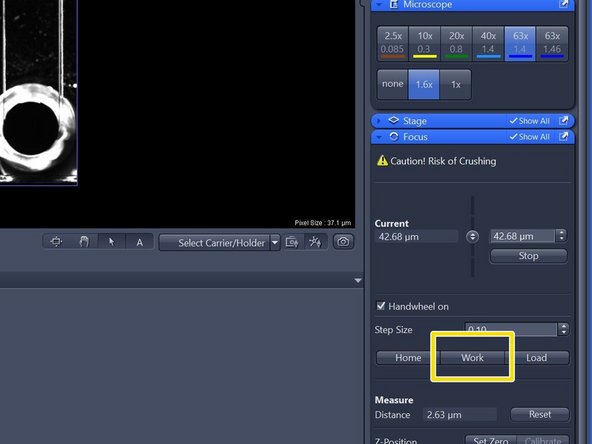
Remove the sample carrier plate.
-
Do not touch your sample within the carrier plate as this will disalign the overview.
-
Add a drop of immersion oil onto the objective lense.
-
Place the sample carrier plate again back in the frame and close the incubator box of the microscope.
-
Bring sample in focus by clicking on "work".
-
Click "live" and fine-tune your focus with the hand-wheel or with mouse and keyboard by keeping "ctrl" pressed and focus with mouse wheel.
-
Try to use the coarse hand-wheel and turn it slowly in your direction.
-
-
-
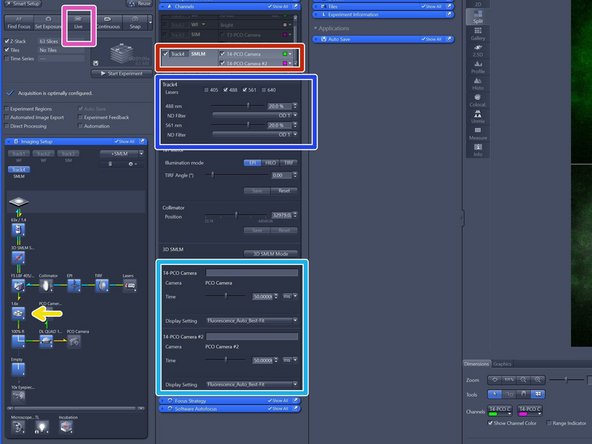
Select "SMLM" which is esentially LaserWF.
-
Choose the camera (PCO Camera or PCO Camera #2) depending on your fluorophores used.
-
Make sure 1.6 X tube lense is selected.
-
For WF imaging mode, Lens 1x is appropriate, for Laser WF, SIM Apotome and SIM imaging modes Lens 1.6x should be used.
-
Make sure you have "TIRF" mode activated.
-
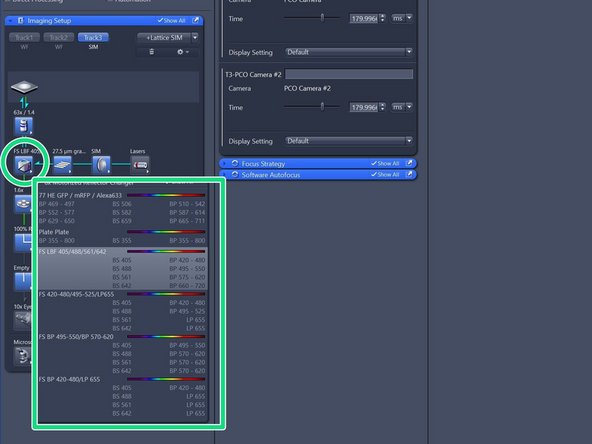
Select via the reflector button the "LBF" filter and choose your SBS configuration.
-
Activate and adjust your laser lines. Note that OD1 is only 10% transmission meaning when laser power is set to 20% it is actually only 2%.
-
Adjust your required exposure time.
-
-
-
Activate both cameras.
-
Choose your SBS configuration.
-
Make sure tube lense is 1.6X.
-
Select your filter of choice. We recommend the LBF.
-
Activate two compatible laser lines based on SBS configuration.
-
Adjust exposure time. Note that when using dual link that exposure time is the same for both cameras.
-
Click live and and adjust the display by adjusting the histogram.
-
-
-
Click on "DuoLink" - click "Open alignment tool".
-
Insert "Callibration pattern" by activating it.
-
Click "XY" and wait for finishing.
-
Click "Z" and wait for finishing.
-
Please do not touch Rotation.
-
Note that the alighnment should only be judged in the center as at the edges it will be off due to lense distortion.
-
When done with the alignment remove the callibration pattern by deactivating it.
-
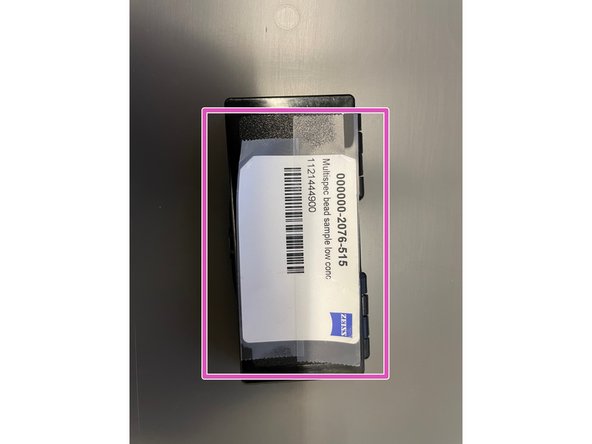
Please note that the alignment via the calibration pattern is only rough, in case you need a precise alignment please it manually with multi-spec beads.
-
-
-
Activate "Lattice SIM".
-
Check that "SIM" is selected.
-
Check that tube lense is 1.6X.
-
Choose your filter of choice.
-
Choose your SBS configuration based on your experiment.
-
Choose cameras and lasers accordingly.
-
Click "Grating" button to open the Grating selection. The system should automatically load the grating for optimal resolution enhancement, if this is not the case switch on and off lasers.
-
You can choose between an Empty position and 5 grid (G1-G5) with increasing spacing. The grating depends on laser line and objective used. Not that the SIM grid pattern will always be adjusted to the higher wavelength when using dual camera.
-
-
-
Click "Continous" in order to apply all imaging parameters to see SIM modulation contrast on your sample.
-
In "Acquisition Mode":
-
You can adjust your frame size.
-
You can adjust your grating. More phases will result in more modulation information meaning and better resolution.
-
For optimal performance of the Elyra 7, it is recommended to use only 10 – 15% of the full grey value range, i.e., intensities of up to 6000 – 8000. For dimmer samples, it is advantageous to reach at least 100 – 200 grey values above the background noise.
-
-
-
Activate "Z-stack".
-
In case "First/Last" option is selected, move to the start of your Z-stack with the hand-wheel and click "Set First", then move to the end of your Z-stack and click "Set Last".
-
In case "Center" option is selected, move to the center of your Z-stack with the hand-wheel and click "Center".
-
Click "Optimized" to have ideal sampling for your Z-dimension.
-
Optimal sets interval to match the Nyquist criteria (2 fold over sampling) and accordingly adjusts the slices to keep the range within the limits defined.
-
Leap sets the spacing 3 fold broader than Nyquist.
-
Note: For SIM it is important to define your Z-stack in the range of the modulation contrast otherwise SIM processing will be less effective.
-
-
-
Activate "Positions".
-
Select ROI by navigating in your overview and click "add" to add a position.
-
Note: Multipositioning can be combined with Time Series and/ or Z-Stacks.
-
-
-
All your raw data is auto-saved when ZEN Connect Project is active.
-
Open "Add Format-IDs"
-
Define your sample information: Name, Prefix, Suffix.
-
Click in "Format" - erase everything to start from scratch.
-
Double-click the desired "Format IDs" to add them to the "Format" section, which will also activate an auto-counter.
-
-
-
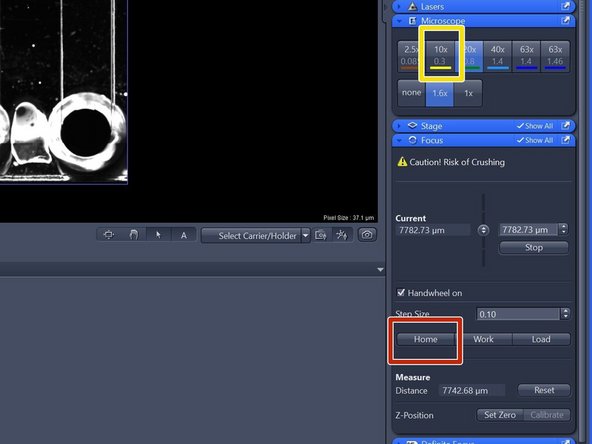
Click "Focus" and click "Home".
-
Remove your sample.
-
Clean immersion-objective with lens paper and Isopropanaol.
-
Change to the 10X air objective.
-
Make sure your data is saved.
-
Check booking system if anyone booked the system within the next 2 hours:
-
If yes just log off.
-
If not shut down the computer, then switch OFF the "Components" on the table, then turn OFF the "Main Switch" and finally turn OFF the HXP lamp.
-