Introduction
In this guide for the ZMB MesoSPIM lightsheet microscope you learn how to locate and focus a sample as well as setting up and acquiring a z-stack.
For a full documentation about the microscope please, visit the project webpage: http://MesoSPIM.org
-
-
Press "live" to get the first image and stop.
-
Default settings: Right laser illumination; Zoom: 1; 488 nm; Filter 405-488-561-640-quadrupleblock filter. Change this in the corresponding boxes if you need other settings.
-
Click "Adjust Levels" for adjusting the histogram.
-
Use the Y arrows to move the sample up or down (Y).
-
Use the X arrows to move the sample left or right (X).
-
Use the Z arrows to bring the sample into the plane of the lightsheet.
-
It is recommended, after some movements, to stop the scan and check the position of the cuvettes to avoid collisions between the inner and outer cuvettes.
-
-
-
Manual Focus: use the Focus arrows to focus the lightsheet. For a fine focus, change the focus "Increment" to 20 um.
-
AUTO Focus: click on the "AUTO Focus" to launch an optimizer that lets you automatically search for the best focus within a given range from the current position.
-
Click on "RUN"
-
Once the autofocus has run a new window will appear showing the optimization results. If you are satisfied with the new focus click "Accept".
-
-
-
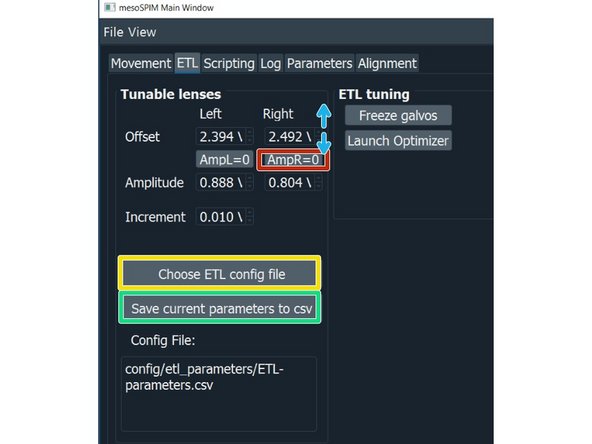
Click "Choose ETL config file", select your ETL parameters file. The file is also specific for the clearing method you are using.
-
Manual ETL adjustment with sample: For the ETL optimization press on "AmpL = 0" to set the ETL amplitude to 0.
-
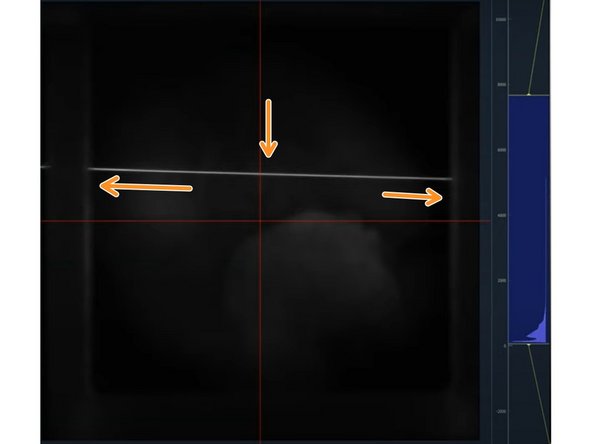
Hover with the mouse arrow over the corresponding offset value and use the mouse wheel to adjust it. Find the waist in the camera image and bring it to the center.
-
Press again on "AmpL = 0" to set the value back to the stored value.
-
Press "save current parameters to csv".
-
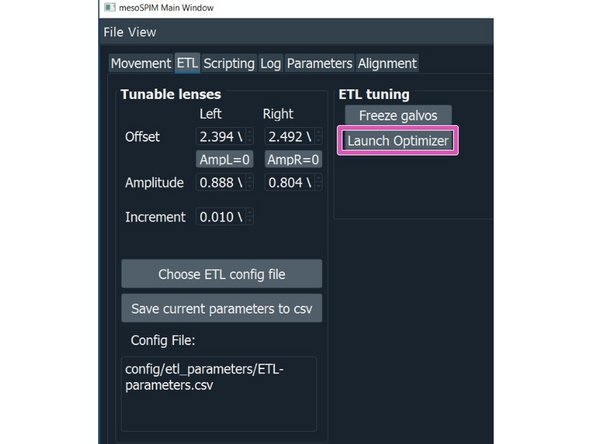
ETL parameter optimization: It best performs using a highly transparent sample with sparse but evenly distributed labeling, such as vasculature.
-
Manual method without sample using a parked galvo and scattered laser beam: "https://www.youtube.com/watch?v=dcJ9a7VA...
-
-
-
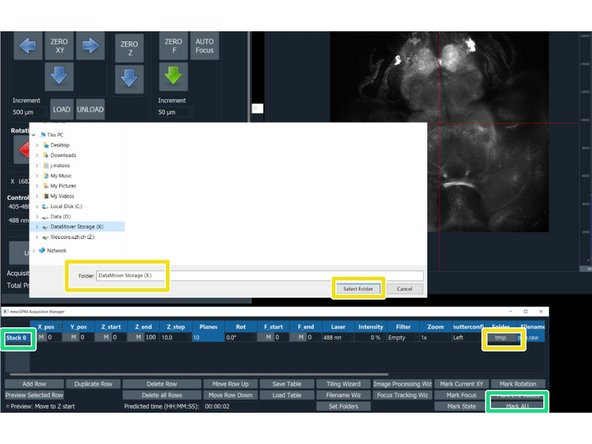
In the "mesoSPIM Acquisition Manager", click on "Stack 0", followed by "Mark ALL"
-
Saving data: Click on "Folders" and select the Network drive X:\
-
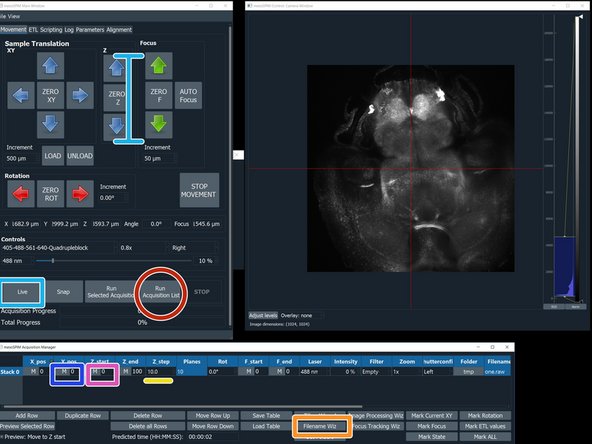
Press live and use the Z arrows to select the beginning of the stack.
-
Click on the "M" button to the left of the "Z_start" to record this position.
-
Use the Z arrows to localize the end of your stack. Then press the "M" button to the left of "Z_end".
-
Insert the step size in micrometers. The number of planes will be automatically calculated.
-
Click "Filename Wizard". In the appearing menu select "save as" BigDataViewerfile: h5; give a name to the file and press "finish".
-
Click "Run Acquisition List"
-
-
-
When recording samples with a magnification that requires stitching of multiple fields of view (FOV), the mesoSPIM software offers two options: Manual Tiling and Automated Tiling. Each mode is more suitable for some applications, mostly depending on the shape of the sample you want to image.
-
Automated Tiling: Automated tiling is the most useful when working with samples with shapes that can be approximated in a square or a circle.
-
On the "Acquisition Manager" panel, select "Tiling Wizard". This will open the automated tiling window, where you will be able to select the boundaries of a virtual rectangle that should include your desired total imaging area.
-
Open live view, select the XY coordinates to define your imaging area, then always by navigating with live view define Z upper and lower limit.
-
Select the number of channels you want to record the selected volume in. You can leave the other settings in the panel with the default values.
-
Specify each channel properties and confirm the number of FOVs recorded.
-
Select ".h5" as file format and fill in the name of your stack. This last step will create a grid of stacks in the area you selected.
-
Select "Run acquisition list" in the Navigation panel and recording will start.
-
-
-
When recording samples with a magnification that requires stitching of multiple fields of view (FOV), the mesoSPIM software offers two options: Manual Tiling and Automated Tiling. Each mode is more suitable for some applications, mostly depending on the shape of the sample you want to image.
-
Manual Tiling: Manual tiling is the most useful when working with samples of complex shapes and variable thicknesses. If your sample shape cannot be approximated in a square or a circle, this is the mode you want to use.
-
Prepare the first FOV as described in step 4 of this guide.
-
Using the navigation panel, move the FOV so that the adjacent area is now visible, with about 10% overlap with the previous (you can control this in the "Overview window" on the top right).
-
In the Acquisition manager, press on "Add Row", "Mark All" and again follow the instructions contained in step 4.
-
Once you registered the stacks for the whole volume with the desired channels, select all stacks and press "Filename Wiz". Select ".h5" as a file format and insert the desired filename.
-
Control that the folder is correct and press on "Run Acquisition List" in the Navigation Panel.
-


