Introduction
All hardware components and computer should be on. If not contact the ZMB responsible staff member.
-
-
All core hardware components (COMET instrument, air compressor, and control computer) must be powered on at all times. If not, contact ZMB staff. Do not restart them yourself.
-
Log in using your ZMB username and password.
-
Wait for Feedback form to appear and always check Device Status Information within the colored box.
-
Start COMET control software by double-clicking on the icon.
-
If any issues occur, take a screenshot with the Snipping Tool and submit it via Feedback. If the error form is closed, use the Feedback shortcut (? - symbol) on the desktop.
-
-
-
On the HOME screen, complete all NEXT ACTIONS.
-
Here you can see the countdown of the buffer lifetime. Do not prepare more than what is needed for your run. Also do not waste previously prepared buffers on the system just top up what is needed for your run according to the preparation pdf issued in Execute on the system.
-
! Red Circled Exclamation Marked actions must be performed before proceeding with reagent, protocol, or run setup.
-
Perform actions listed. Common actions: Imaging Buffer (IB) every 48hrs, Cleaning procedures as instructed.
-
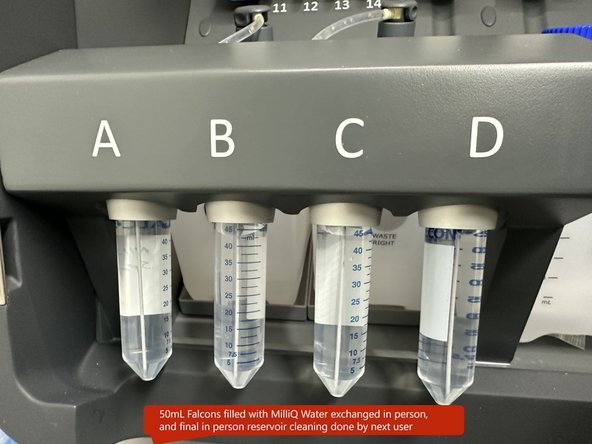
Reservoir cleaning is required after each run and should be completed within 48 hours. Responsibility for remotely triggering the reservoir cleaning lies with the current user. In person steps like unloading slides, exchanging 50mL falcon tubes FA-FD with 50mL MilliQ and triggering the remaining reservoir cleanings lie with the next user.
-
Restart of the ''COMET Instrument'' and ''Fluidics cleaning'' is done once per month by ZMB staff. COMET is blocked in advance in the booking system on scheduled date.
-
Restart COMET Control Station (computer) and (software) once per week, done by user if action is listed.
-
-
-
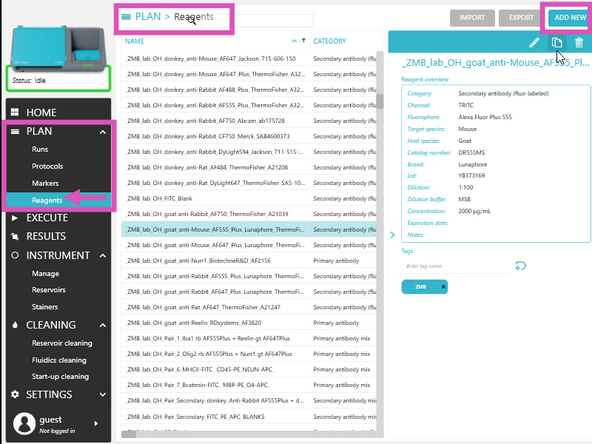
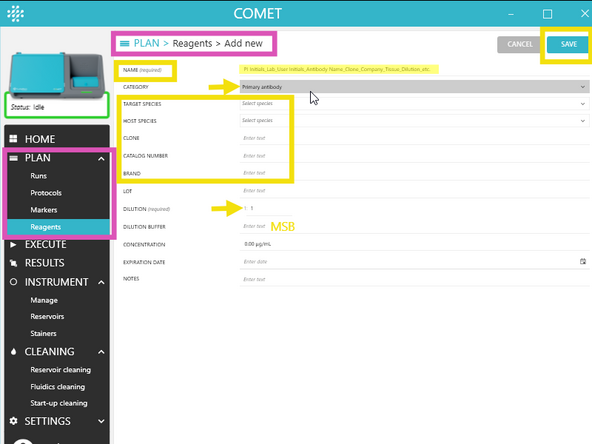
In COMET Control Software, add required reagents via PLAN → Reagents → ADD NEW.
-
Follow the required naming convention: PI initials_Lab_User initials_Antibody_Company_Catalog#_Extra info (Include dilution details if they vary across tissues or experiments.) Add relevant lab TAGS to help group and locate reagents.
-
Once a reagent is in a protocol you can't edit the following fields: NAME, category (secondary/primary/etc.), Channel, target species, host species, or dilutions.
-
For each new reagent, fill in at least the required fields: Name, Category, Channel (if applicable), Dilution (if applicable), Target genes (if applicable), Tails (if applicable)
-
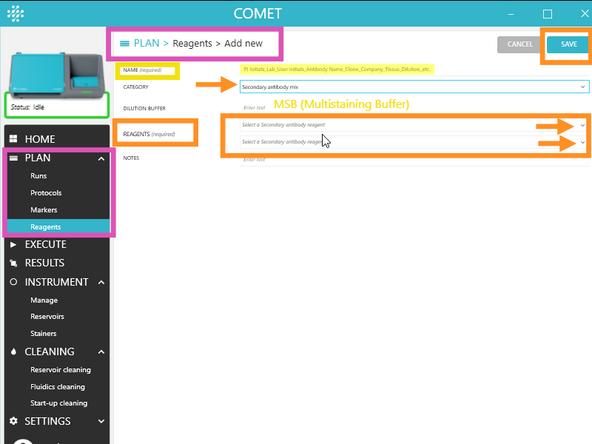
2. For some reagent categories, a mix of reagents can be created by combing reagents already existing in the library; to do so, select a "mix" category in the Add new page and select the reagents to mix from the drop-down menu
-
-
-
1. In COMET Control Software, create the necessary protocols: PLAN> Protocols> ADD NEW
-
a) Select a template from the list (see section 3 of this short guide and UM for more details on the available templates). b) Chose the parameter for the selected template. c) Press OK to create a new protocol
-
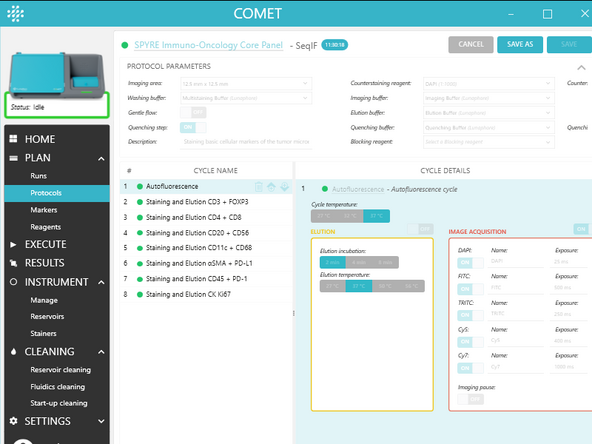
2. On the protocol edition page, adjust the PROTOCOL PARAMETERS in the upper banner (valid for the whole protocol). See UM section Create and edit protocols for more details on those parameters.
-
3. On the protocol edition page, adjust the parameters in CYCLE DETAILS for each cycle. See UM section Create and edit protocols for more details on those parameters.
-
4. Click SAVE to save the newly created protocol.
-
Protocols with remaining errors (red dots) can be saved as drafts but are not executable (indicated by the red cross X). By hovering over the red dot, see the rule conflict, which prevents the protocol from being executable.
-
Should protocol remain red without any obvious reason, save the protocol, close the COMET Software, reopen software, check protocol again. If it is now green, the glitch is resolved, please save protocol again and use in your run.
-
Once all mandatory rules are fulfilled within one protocol (only green or orange (warning dots), it can be saved and executed (indicated by a blue check).
-
-
-
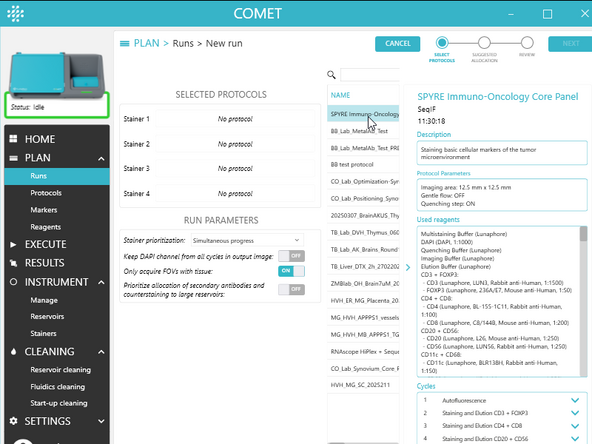
1.) In COMET Control Software, create a run composed of the desired protocols by following the run creation wizard: Plan > Runs> ADD NEW
-
a) Select 1 to 4 executable protocols using the + button (s). The same protocol can be added multiple times (max 4).
-
b) Drag and drop the selected protocols to assign them to stainers 1 to 4.
-
c) Choose RUN PARAMETERS (see I< section Create and edit runs for details on those parameters) and click NEXT.
-
2.) On the SUGGESTED ALLOCATION page, see suggested allocation of reagents based on the selected protocols (highlighted reservoirs will be used for the execution of the run) and click NEXT.
-
3.) On the REVIEW page:
-
a) Review run summary. Optional: edit run name, add notes. b) Optional: generate the preparation PDF for the created run by clicking on PREPARATION PDF.
-
c) click SAVE to save the newly created run.
-
-
-
In COMET Control Software, follow the EXECUTE wizard to select protocol(s) or run, load reagents, load slide(s) and start your run.
-
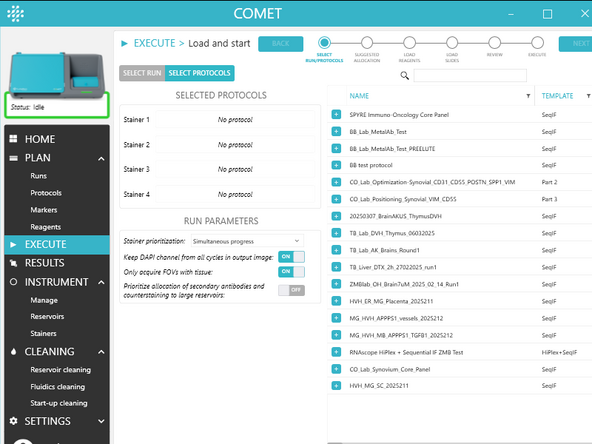
1.) In the first step of the EXECUTE wizard, choose if you wish to select individual protocols or a run using the toggle.
-
In SELECT PROTOCOLS:
-
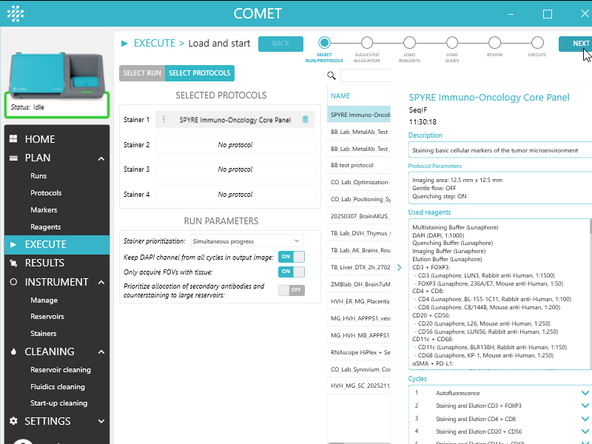
a) Select 1 to 4 executable protocols using the + button(s). The same protocol can be added multiple times (max 4).
-
b) To change the protocols assignment to stainers, drag and drop a selected protocol and assign it to a particular stainer.
-
c) Choose RUN PARAMETERS (see UM section Select run/protocols for details on those parameters)
-
In SELECT RUN: Select the run to be executed.
-
Then, click NEXT
-
-
-
2.) In the second step of the EXECUTE wizard, review the allocation of reagents.
-
Highlighted reservoirs indicate the allocation suggested by the system based on the selection of protocols.
-
Click NEXT to accept, or
-
Manually force the allocation of a reagent to a specific reservoir in INSTRUMENT > Reservoirs.
-
Then, come back to EXECUTE.
-
-
-
1.) In the third step of the EXECUTE wizard, prepare and load the reagents:
-
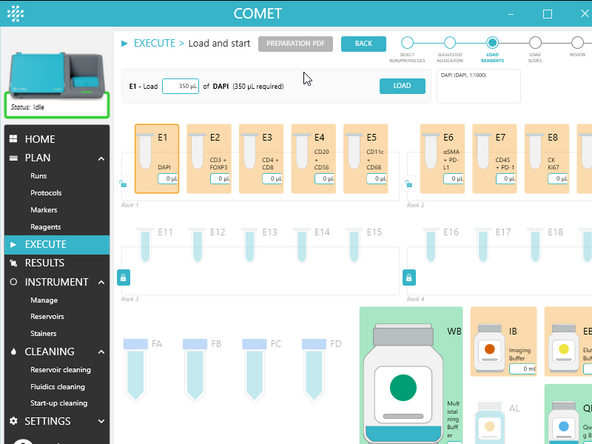
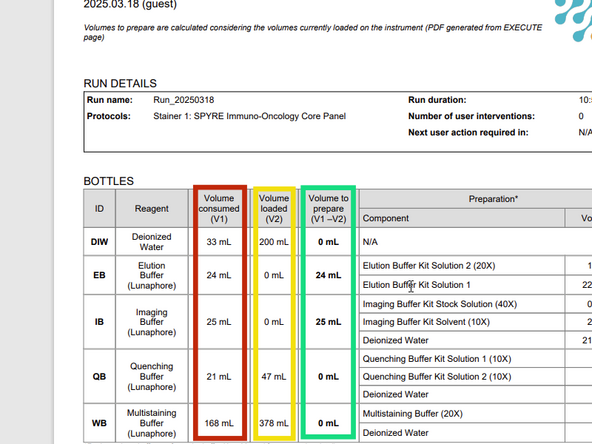
a) Generate the preparation PDF by clicking on PREPARATION PDF Even if already done earlier in Plan Run section as here in Execute the Preparation PDF takes into account the current reservoirs status. Add volume to Prepare in green, do not waste volume already loaded in yellow, and confirm total volume consumed in red is on the system
-
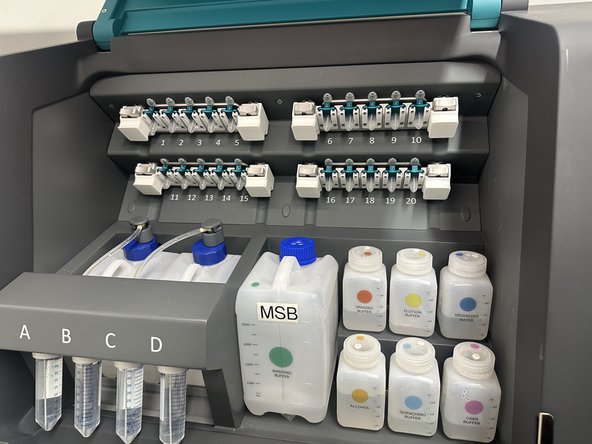
b) Prepare the reagents according to the preparation PDF. Please note if you have a preparation PDF from the COMET emulator software or from the PLAN run section, the reagents may shuffle in the execute wizard. Carefully check if your pre-prepared reagents have changed reservoirs.
-
c) Open the Reagent module door.
-
d) Load the reagents on COMET instrument as instructed by the software (see UM section Handling for details on how to handle reservoirs and bottles). For each loaded reagent, click LOAD in the COMET Control Software.
-
Important: Reservoirs and volumes must precisely match those indicated in the software. If needed, edit loaded volumes in the software.
-
e) Once all reagents have been loaded, click NEXT. Visually check reservoir bottles and software reservoir volumes match.
-
f) Close the Reagent module door
-
-
-
In the fourth step of the EXECUTE wizard, load your tissue slides and one COMET Chip per slide:
-
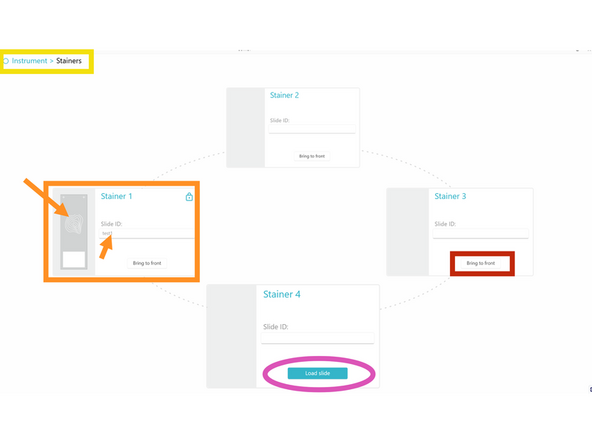
a) In COMET Control Software, review the protocol assignation to each stainer, adjust if needed.
-
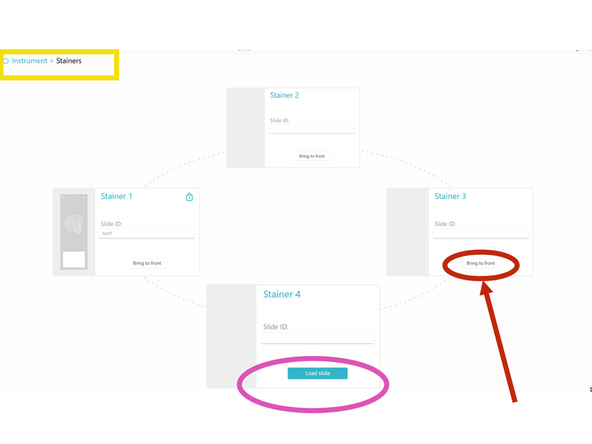
b) If needed, bring the stainer to be loaded in the front position by clicking on BRING TO FRONT.
-
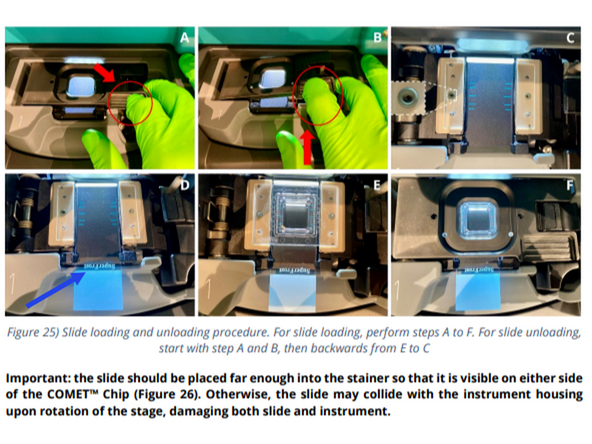
c) ON COMET Instrument, open the Staining and Imaging module door.
-
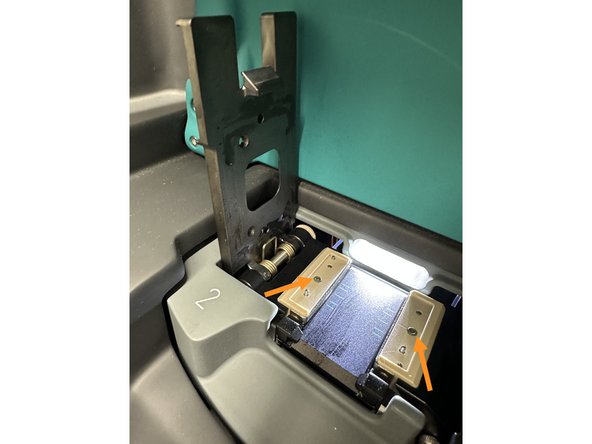
d) Open the lid of the front stainer. Check that the two o-rings are present and correctly positioned.
-
Remove any dust with ethanol wetted lense paper and by using both electric dust blower and dust blower bulb. Dust can ruin experimental autofocus finding.
-
e) Take the tissue slide out from the buffer in which it is stored and remove excess buffer on the slide using a lense paper wipe both on the back and front of the slide. Carefully dry around the tissue without damaging it. Ensure the back of the slide is entirely dry.
-
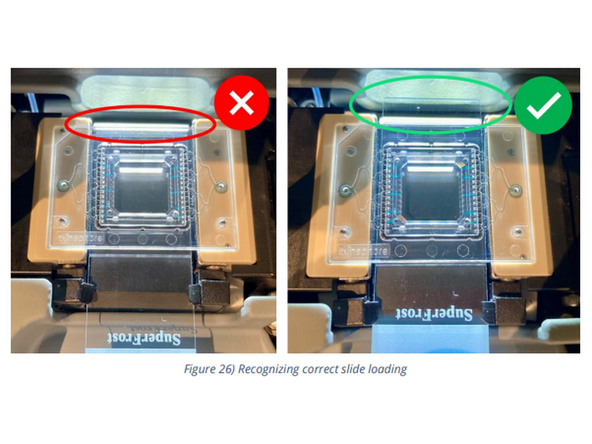
f) Insert the tissue slide in the stainer by sliding it horizontally, with the tissue facing upwards.
-
-
-
g) Place a new COMET Chip within the guiding pins, seal facing downwards. The cut corner of the chip must be placed on the top left corner of the stainer.
-
h) Close the stainer lid until the lever clicks to secure it in closed position.
-
i) Move the slide to have the region of interest right under the imaging window of the chip.
-
j) Close the Staining and Imaging module door.
-
k) In COMET Control Software, click LOAD SLIDE to start the slide loading protocol. Wait until its end, indicated by a slide icon and a lock symbol on the stainer.
-
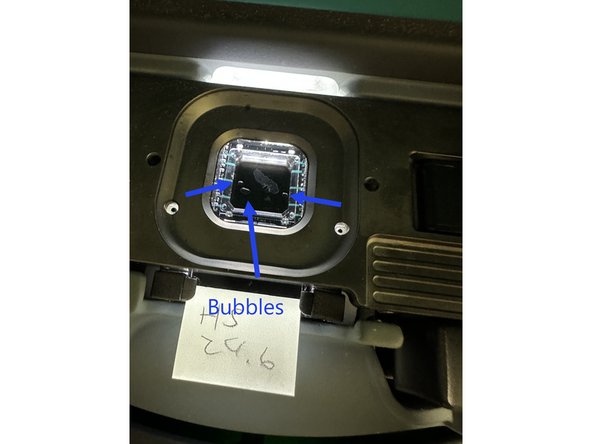
l) On COMET instrument, open the Staining and Imaging module door, and inspect the stainer: no bubbles should be visible. In case of bubbles, refer to IM section Troubleshooting and Repair- Slide loading.
-
m) optional enter slide ID. n) Close the Staining and Imaging module door.
-
o) Repeat b) to n) for remaining slides to be loaded. p) Once all stainers have be successfully loaded, click NEXT in COMET Control Software.
-
-
-
In the fifth step of the EXECUTE wizard, review all parameters of the run. If any change is needed, click BACK to return to any previous step in the wizard.
-
Once all parameters have been reviewed and are correct, click START to begin the automated execution of the run.
-
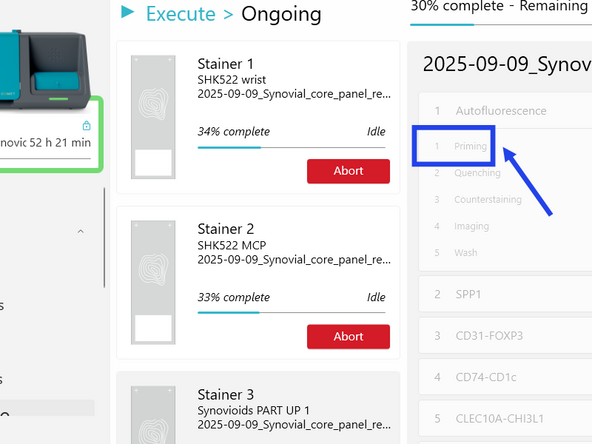
Check that initial priming proceeds before leaving the system. Should an abort error occur in priming it is likely within first 30min of the first slide, contact ZMB staff to restart run or evaluate the error message immediately.
-
Lunaphore support can help with stalled experiments if you start within business hours. Contact ZMB staff to initiate Lunaphore support.
-
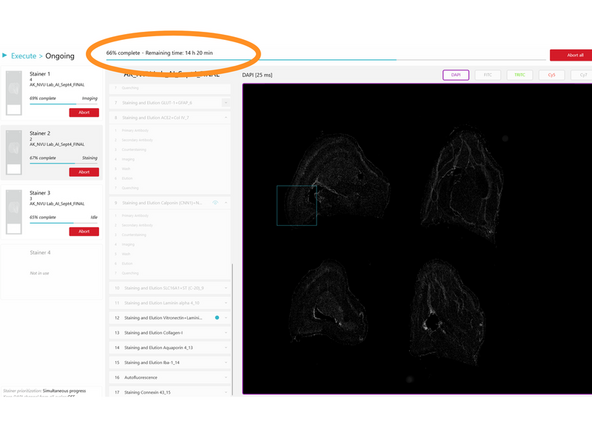
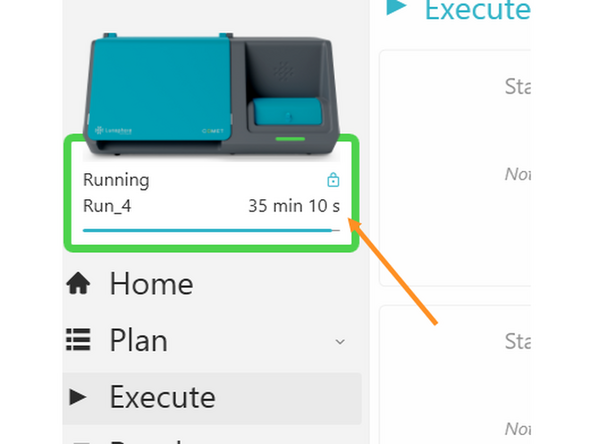
Monitor Your Run Time using the Remote Control via Citrix. Please Communicate with the next user and ZMB staff about longer or shorter run times to adjust scheduling in advance. Book an extra 1 to 2 hours for required run reservoir cleaning, remotely triggered by you, the current user.
-
It is the responsibility of the current user to trigger remotely the reservoir cleaning. In person steps like unloading the slides, and exchanging the 50mL Falcons FA, FB, FC, and FD with MilliQ water 50mL falcons, and triggering this in person reservoir cleaning for these 4x 50mL Falcon tubes can be done by the next user. Coordinate.
-
-
-
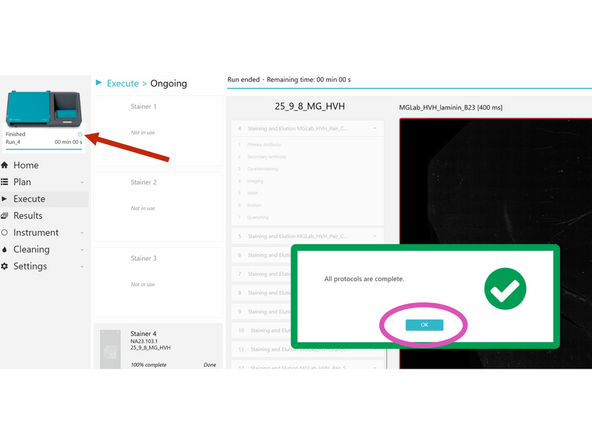
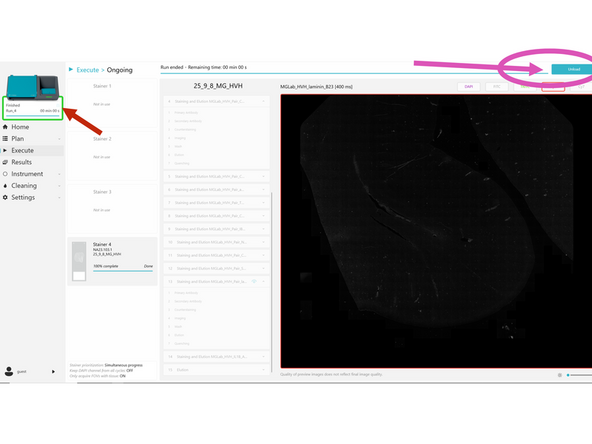
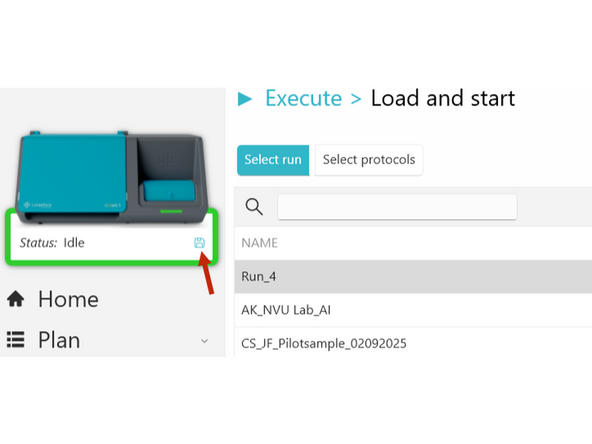
When a run is complete, check the pop-up in COMET Control Software to see its status. If the status is orange or red, make sure to later check the protocol report(s) to see the details of the warning(s)/error(s). Clicking Protocols complete-okay does not mean run has finished saving - Carefully check save icon status!!!
-
Close the pop-up. Preview images for completed protocols can be seen. Once the review of preview images is done, click UNLOAD.
-
If at the system. In COMET Control Software, go to INSTRUMENT > Stainers to unload the slides.
-
a) Bring a stainer to the front to retrieve its slide and click OPEN STAINER. Wait until the open stainer procedure is finished (slide icon not visible anymore on that stainer).
-
b) On COMET instument, open the Staining and Imaging module door and open the lid of the stainer in the front. Remove the COMET Chip and discard it. Retrieve the slidel if the slide needs to be kept for later use and store in appropriate buffer.
-
Important: The stainer inlet/outlet o-rings may remain stuck to the COMET Chip. If the do, remove them from the chip and place them back into the o-ring grooves on the stainer. If an o-ring is lost, place a new one from the spare parts provided with the system.
-
Additionally, the COMET Chip seal may remain stuck to the slide. If it does, remove it from the slide before removing the slide from the stainer.
-
c) Dry the stainer with a tissue if any liquid remains. Close the stainer lid and the Staining and Imaging module door. d) Repeat steps a) to c) for other slides to unload.
-
-
-
Confirm Saving is complete before closing COMET software/logging off. Saving Icon Pictured- Data will be lost if you don't wait for the floppy disk icon to disappear before proceeding.
-
In COMET Control Software, check results from individual protocols in RESULTS. This can be done in person at the system or remotely using CITRIX and the Remote Control option.
-
a) Click on the protocol of interest (by default the most recent appears at the top of the list).
-
b) Click on the "Open report" icon to open the corresponding PDF report. Refer to UM, section Protocol report errors for details on errors reported, if any.
-
c) For completed protocols, click on the "Open image" icon to open the Viewer and see the acquired images.
-
d) Click on the "Open output folder" icon to open the folder containing the output files (report and image).
-
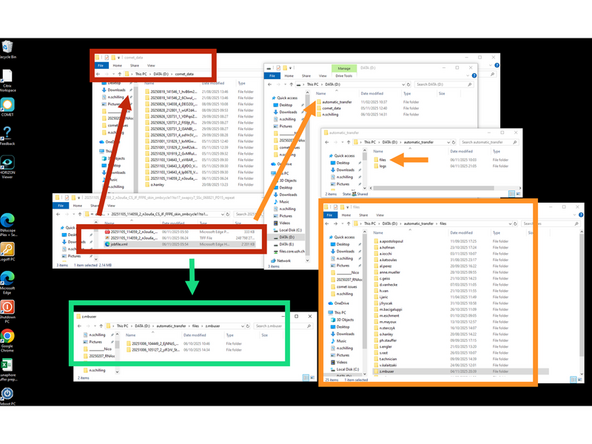
Use CITRIX and the Remote Control to access the COMET. Only once data is completely saved (jobsfile.xml present, not jobstempfile.xml)***. Move your data: from This PC > DATA (D:) > comet_data to This PC > DATA (D:) > automatic_transfer > files > initial.lastname user folder (i.e o.hanley) by using CUT PASTE- never COPY PASTE
-
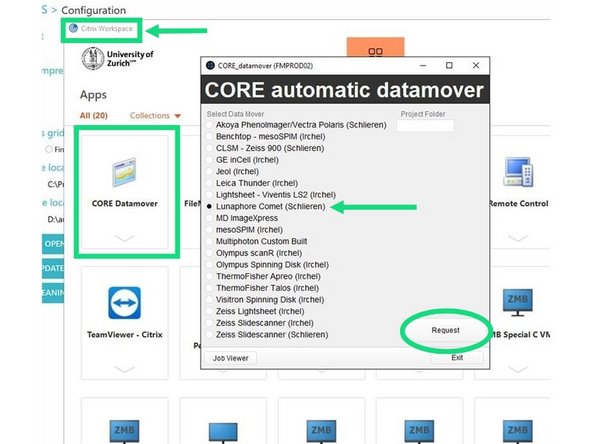
DATA MOVER INSTRUCTIONS: You again go to Citrix from your own computer (not necessary to trigger from COMET PC)-> Select CORE Datamover at top left corner -> and select Lunaphore COMET (Schlieren) -> Select Request. IT will send a series emails updating you on the status of your data move.
-
-
-
Within 24 hr after the end of a run, the current booked user performs a Reservoir cleaning of all small and large reservoirs used during that run. If the water & EtOH reservoirs are properly filled at start of run you can trigger this cleaning already remotely- by deselecting 50mL falcon reservoirs via remote control while using CITRIX.
-
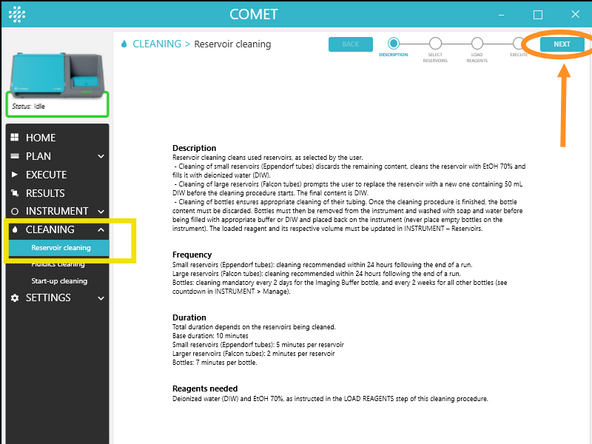
a) In COMET Control Software, go to CLEANING > Reservoir cleaning
-
b) Read the Description and click NEXT.
-
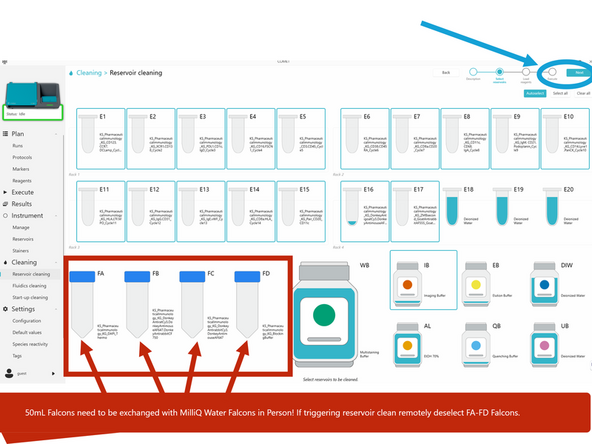
c) Select the reservoirs to be cleaned by clicking on them. By default, all used reservoirs are automatically selected. If triggering remotely, unselect 50mL falcons. Click NEXT.
-
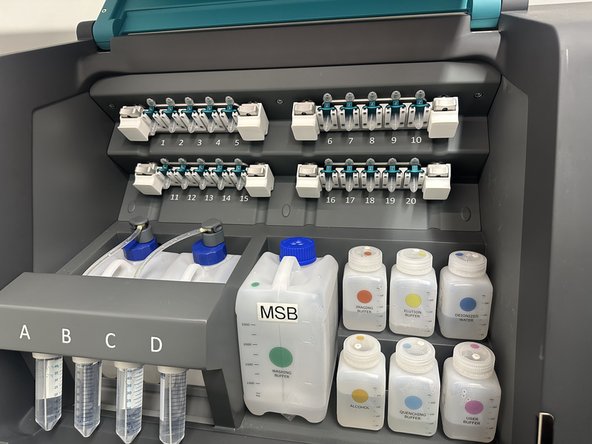
d) Open the Reagents module door and perform the required actions displayed in COMET Control Software. If triggering remotely only select appropriate reservoirs- deselect falcons
-
Used 50mL Falcon should be swapped with prefilled 50mL MilliQ Water Falcons and the large 70% Ethanol Reservoir and DIW (MilliQ) water reservoir filled to 250mL before starting the clean. Must be done in person at the system
-
e) Optional: remaining reagents in small reservoirs (microtubes) can be saved before starting the cleaning procedure. To do so, go to INSTRUMENT > Reservoirs, open the rack containing the reagent you want to retrieve by clicking on the corresponding lock symbol, replace the microtubes with empty ones, and store leftover reagents for later
-
f) Close the Reagent module door and click START in CLEANING > Reservoir cleaning.
-
-
-
Once Reservoir cleaning is completed, cleaned small and large reservoirs are filled with DIW (MilliQ) no user action is needed.
-
Perform the following actions for each bottle that has been cleaned:
-
a) Discard its content (bottle content is shown black in INSTRUMENT > Reservoirs).
-
b) Wash it in the sink with soap and hot water.
-
c) Fill bottle with DIW or fresh buffer (never leave bottles empty!) and place it back on the instrument.
-
d) In INSTUMENT > Reservoirs, allocate the corresponding reagent to that bottle.
-
Important: Always keep the bottle content and volume up to date in COMET Control Software to avoid any confusion, which could lead to erroneous protocol results.
-
The currently booked user cleans the reservoirs from the previous run, by triggering remotely. Coordinate with the subsequent user to confirm how many Eppendorf reservoirs/tubes still need cleaning in person. ZMB blocks the instrument monthly for full fluidics cleaning. Do not shut down the COMET; leave it on unless instructed by ZMB.
-
-
-
Review your data: Horizon Viewer or Horizon Software for analysis.
-
Horizon and HALO software tutorials- see pdf guides and ask follow-up questions & discuss workflows with ZMB Image Analysis Specialists https://www.zmb.uzh.ch/en/ImageAnalysis....
-
Latest Horizon Training Video (Nov. 3 2025)
-


