
Introduction
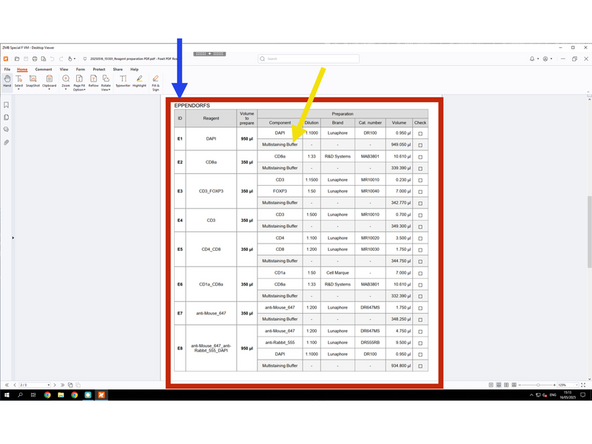
The emulator helps save time during the actual COMET session by allowing you to pre-design protocols and prepare XML files. Based on the Preparation PDF, all antibodies must be pre-diluted and brought in 2 mL Eppendorf tubes only, which are required for use with the COMET.
-
-
Book Special F VM via https://booking.core.uzh.ch/
-
Access CITRIX via app or via broweser https://vdi.core.uzh.ch/ and launch Special F VM.
-
Start COMET control software by double-clicking on the icon.
-
-
-
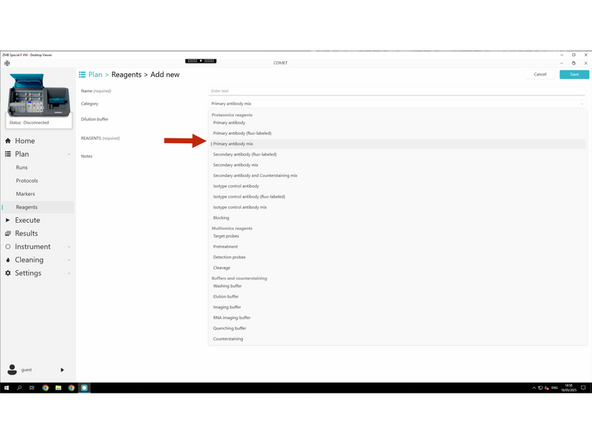
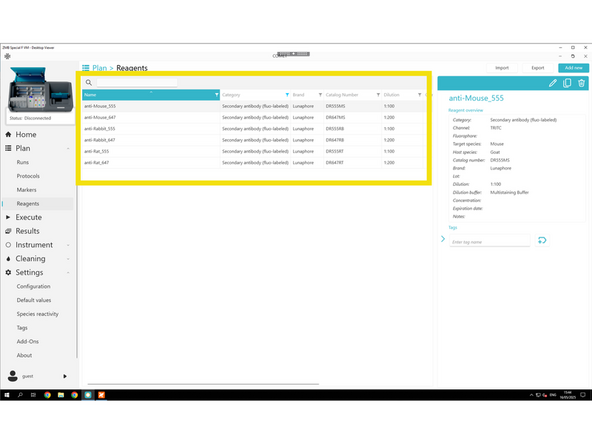
Click Reagents.
-
Click Add new
-
Start creating new primary antibody - here an example
-
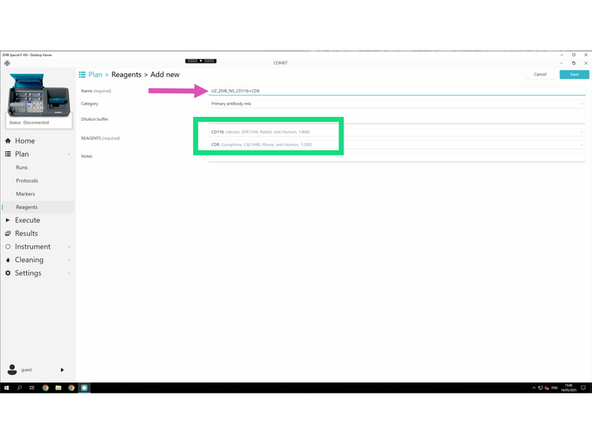
Follow the required naming convention: PI initials_Lab_User initials_Antibody_Company_Catalog#_Extra info
-
If a host or target species is missing for your antibody, follow these steps to add it (follow step 3)
-
For each new reagent, fill in the required fields: Name, Category, and, if applicable: Channel, Dilution, Target genes, and Tails.
-
-
-
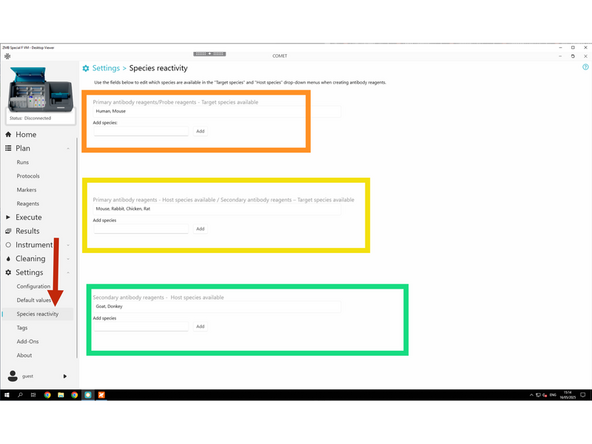
If a host or target species is missing for your antibody, follow these steps to add it.
-
Settings → Species reactivity
-
Configure Target Species for Primary Antibodies / Probes
-
Configure Host Species for Primary and Secondary Antibodies
-
Configure Host Species for Secondary Antibodies
-
-
-
Once you have all primary antibodies created. You can now create the mix of two primary antibodies which will be than used in the protocol.
-
Follow the required naming convention: PI initials_Lab_User initials_Antibody_Pair_cycle#
-
The software will only allow to combine two different species for obvious reasons.
-
-
-
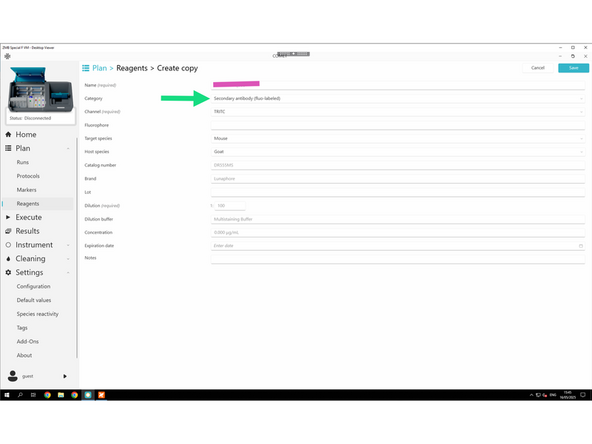
Create your individual secondary antibodies.
-
Follow the required naming convention: PI initials_Lab_User initials_Antibody_Company_Catalog#_Extra info
-
For each new reagent, fill in the required fields: Name, Category, and, if applicable: Channel, Dilution, Target genes, and Tails.
-
Adapt dilution for secondary antibodies accordingly.
-
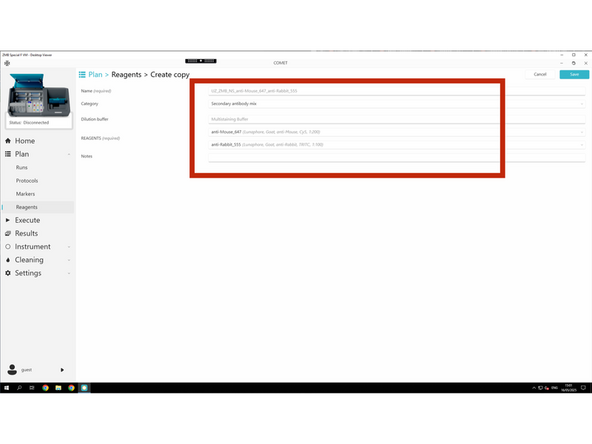
After creating your individual secondary Antibodies - create mixes of secondary antibodies.
-
Follow the required naming convention: PI initials_Lab_User initials_Secondary_Pair_i.e. Pair_dk_anti_ms_AF555_dk_anti_rb_AF647
-
Lunaphore secondary antibodies must be used unless discussed beforehand. Stick to Alexa Fluor™ Plus 488, 555, 647, or 750.
-
-
-
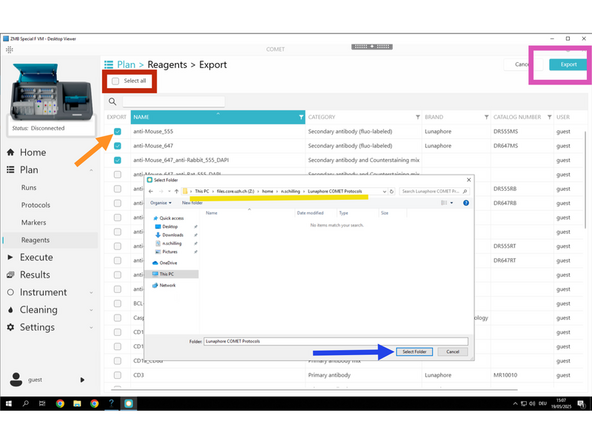
Click Export
-
Use the checkboxes to select individual reagents.
-
Or use Select All if you want to export the entire reagent library.
-
Creat a new folder "Lunaphore COMET Protocols" in Z:\home\u.ser\Lunaphore COMET Protocols Export the selected reagents to Z:\home\u.ser\Lunaphore COMET Reagents
-
Click Select Folder in order to save it as an .xml file
-
-
-
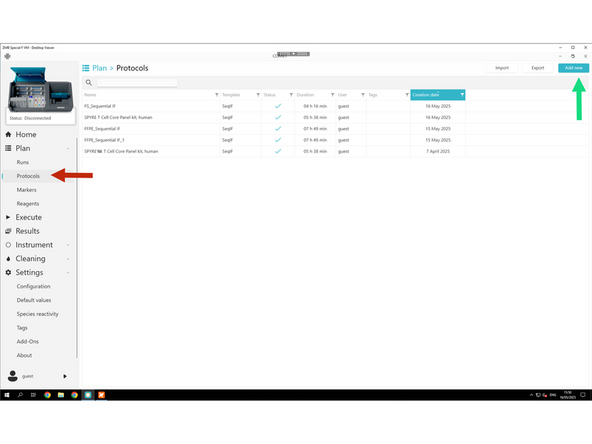
Click Protocols.
-
Click Add New.
-
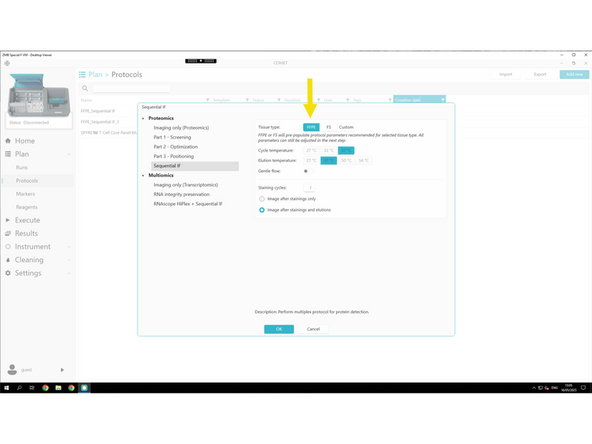
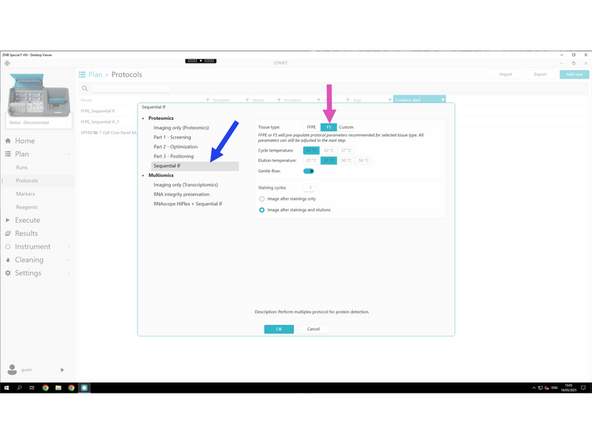
Select Sequential IF template.
-
Select your tissue type (When selecting FFPE or FS, default protocol parameters are automatically optimized, so you typically don’t need to change anything.):
-
FFPE – for paraffin-embedded samples
-
FS – for fresh frozen samples
-
-
-
Provide Name of your Protocol ( PI initials_Lab_User initials_Protocol)
-
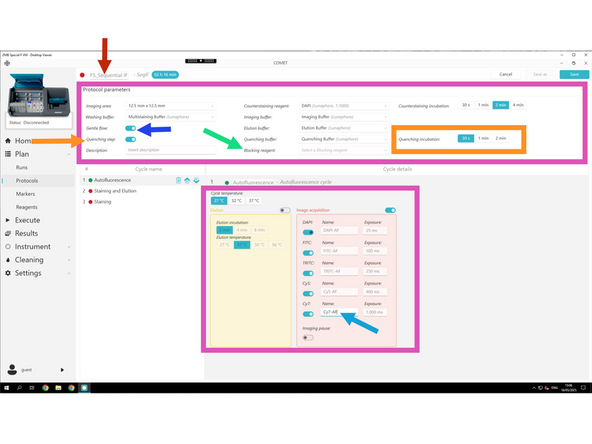
Do not change default values (adapt as shown here).
-
Gentle Flow: Toggle ON to reduce flow pressure for delicate tissues (default for FS samples).
-
Quenching is optional depending on your choice
-
Blocking is optional depending on your choice
-
Add AF to each channel name in order to label it as Autofluorescence channel for background subtraction
-
-
-
Click Staining and Elution .
-
Select your primary antibody mix.
-
Select your secondary antibody mix.
-
Keep all other settings as they are — the default values generally work well, unless you've already optimized them.
-
Do not change the exposure times for Alexa Fluor secondaries — they are pre-optimized by Lunaphore for proteomics. If you do adjust them, ensure they match the exposure times set in the autofluorescence acquisition tab.
-
Once done with the protocol design click Save.
-
-
-
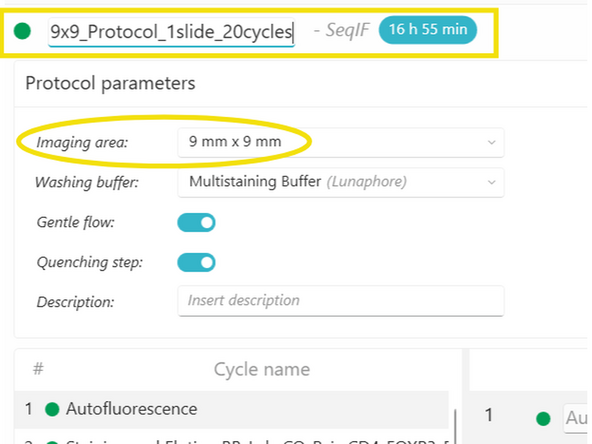
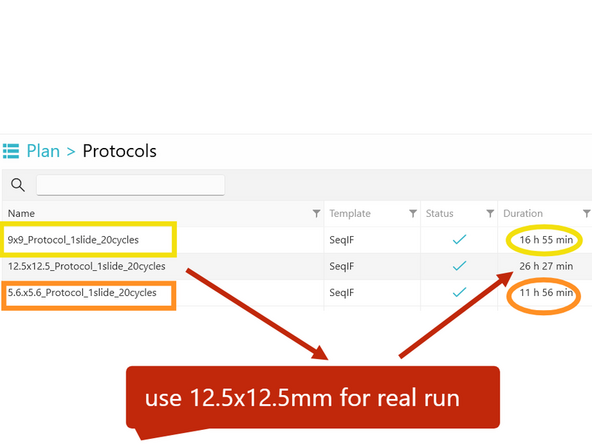
Take your protocol, 12.5mmx 12.5mm (156.25mm2 =100% tissue coverage of imaging area) that you will use in the final run, and make a mock 9mm x 9mm (81mm2 = 50% tissue coverage of imaging area) protocol. Save and use to design a Mock run for more accurate run time estimate.
-
Note, for the Actual COMET Protocol and Run use the 12.5x12.5 version, so that tissue can be detected throughout the entire imaging area, and not just a small 9x9 or 5.6x5.6 centered square within. The mock version is just to block the correct COMET run time in the booking calendar!
-
For very small amounts of tissue instead take the same protocol and make a mock 5.6mmx5.6mm (31.36 mm2 =20% of tissue coverage in the imaging area)
-
Also use prior knowledge of previous run times for similar sized tissue with matching protocols, to better estimate booked COMET run time accurately. ZMB staff will not reduce overbooked hours on the COMET when users fail to accurately predict their run times.
-
Comparison of example protocol times. The same 20 cycle protocol used for 1 slide results in: 100% Tissue Coverage of 12.5x12.5mm imaging area = 26hr 27min. The same protocol on 1 slide 50% Tissue coverage 9x9mm imaging area = 16hr 55min. The same on 1 slide with 20% Tissue coverage of 5.6x5.6mm imaging area = 11hr 56min
-
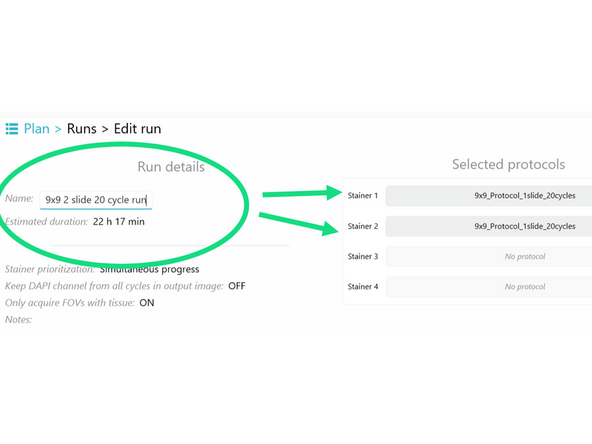
Comparison of example run times. 2 slides get parallelization, faster run time than single slide total time. So same 20 cycle protocol used for 2 slides results in: 100% Tissue Coverage of 12.5x12.5 = 33hr 31min. The same on 2 slides with 50% Tissue coverage 9x9 = 22hr 17min. 2 slides with 20% Tissue of 5.6x5.6 = 21 hrs
-
-
-
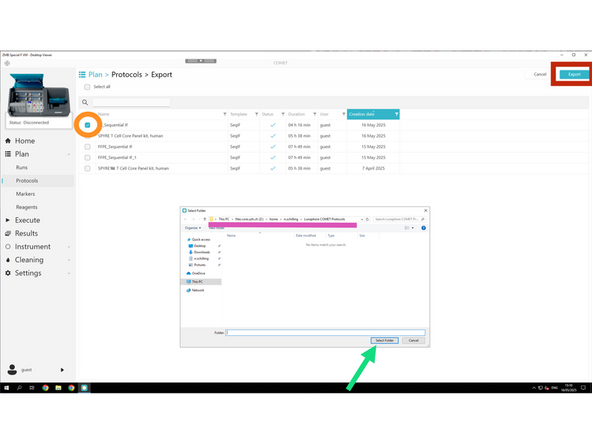
Click Export
-
Select the Protocols to be exported.
-
Creat a new folder "Lunaphore COMET Protocols" in Z:\home\u.ser\Lunaphore COMET Protocols
-
Export the selected protocols to Z:\home\u.ser\Lunaphore COMET Protocols
-
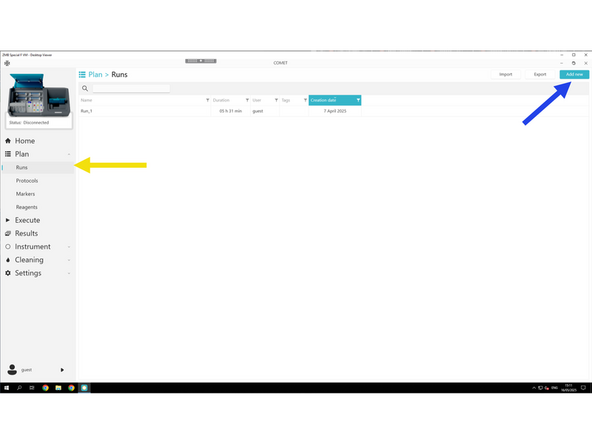
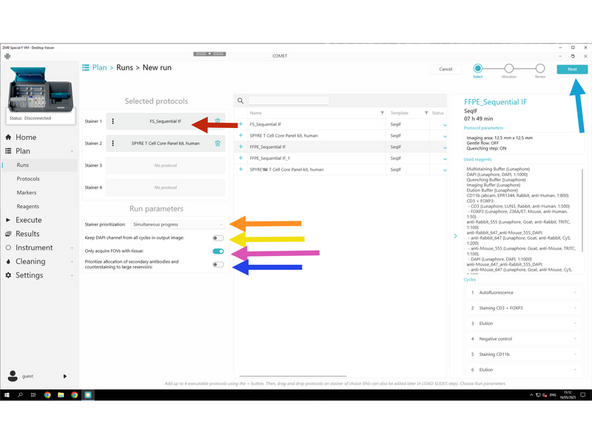
Click Run
-
Click Add New
-
-
-
Drag and drop the desired Protocols to the stainer of choice.
-
✅ Run all stainers simultaneously: enables parallel processing for higher throughput.
-
❌ Use same DAPI image for all cycles in the output image: Disable this to keep only the initial DAPI image.
-
✅ Enable Only acquire FOVs with tissue. Ensures imaging is restricted to tissue-containing areas.
-
❌ Prioritize allocation of secondary antibodies: Disable the fixed priority of secondaries in reservoir assignment — allows more flexible reagent allocation.
-
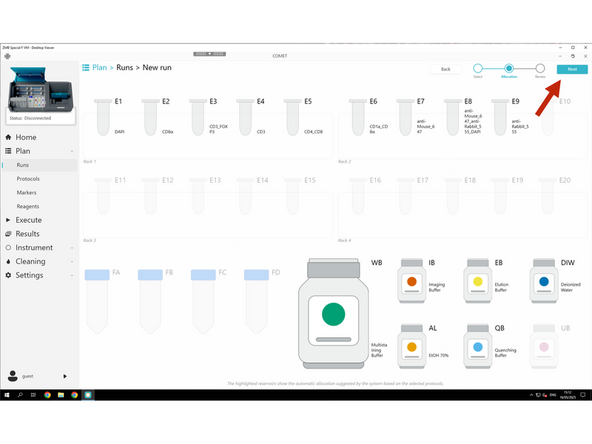
Click NEXT to review settings.
-
-
-
Click NEXT to review settings.
-
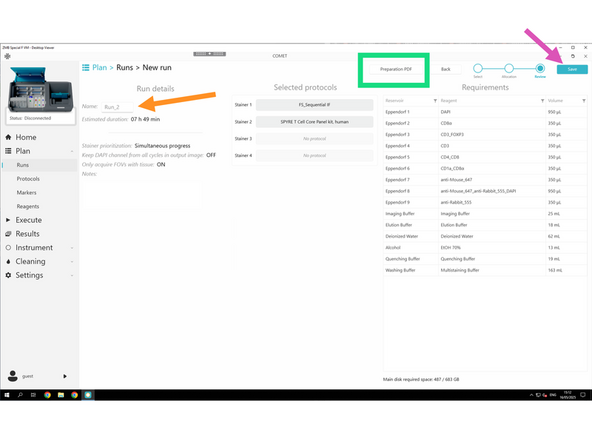
Follow the required naming convention: PI initials_Lab_User initials_RUN_Name
-
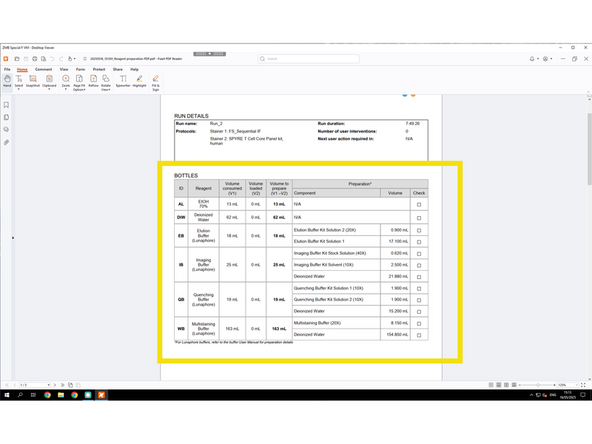
Clicking Preparation PDF before saving lets you download the full reagent prep list.
-
Click Save and save the RUN also under Z:\home\u.ser\Lunaphore COMET Run
-
Since this is the Lunaphore COMET Emulator, it doesn't update buffer volumes from the actual COMET system in real time. Therefore, you can only know and prepare buffers during the actual hands-on training session.
-
-
-
The emulator helps save time during the actual COMET session by allowing you to pre-design protocols and prepare XML files. Based on the Preparation PDF, all antibodies must be pre-diluted and brought in 2 mL Eppendorf tubes only, which are required for use with the COMET.
-
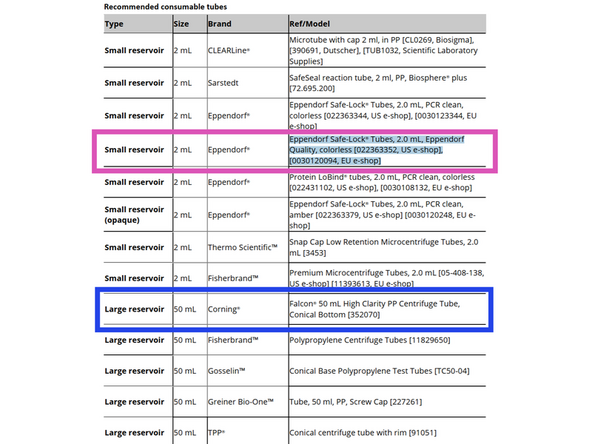
Order for use on the system 2.0mL Eppendorf Safe-Lock Tubes Catalog#0030120094 Product # 700249 on P4U
-
Dilute your antibodies according to the Preparation PDF.
-
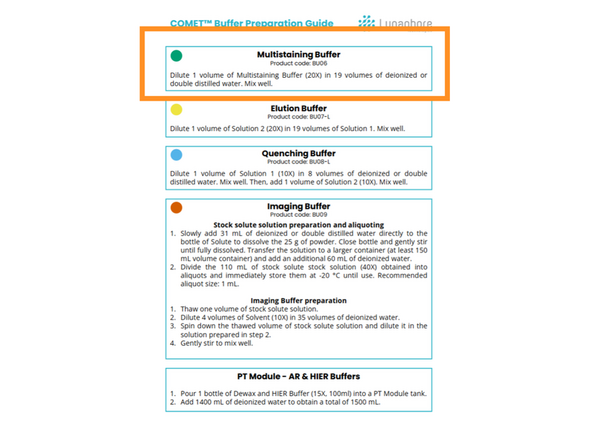
Dilute in Multistaining Buffer (MSB), which is available in the COMET room. Arrange in advance with ZMB staff for an aliquot for your dilutions.
-


Cancel: I did not complete this guide.
One other person completed this guide.