
Introduction
In this guide you learn how to set up and merge/stitch imaging experiments using the Leica LAS X Navigator functionality. This feature is very helpful if you have irregular shaped specimens or sampling needs bigger than the maximum field of view of your preferred objective.
There are different strategies to acquire and merge tile scan experiments at the Leica microscopes using the Navigator tool:
Option 1 (Recommended): Acquire and merge during acquisition at the microscope.
Option 2: Acquire tile scan and post-process using the LAS X offline software available on the ZMB virtual machines: only possible for tile scans with regular shapes (rectangular).
In the following steps we will guide you through the different options.
Please refer to the corresponding guide for more information on acquisition of a z-stack with the Navigator tool.
-
-
Define your region of interests in the "LAS X Navigator" via the different drawing tools as well as "Z-Stack" definitions.
-
Choose "Merge Images during Acquisition" in the "Stage" tab.
-
Make sure to select "Keep Raw Data".
-
3D option OFF: tiles from each z layer will be merged one by one (recommended).
-
3D option ON: Software aligns tiles across different z planes. Can lead to very large files if not enough matching images are found.
-
The "Blend" option "Smooth" usually gives good results.
-
Press "Start" (lower right corner). After acquisition a new file named "TileScan Merged" will be visible in the "Acquisition" panel.
-
Save your *.lif project. Check the last step of this guide for more information about how to visualize your data.
-
-
-
The next steps will help you in case:
-
you kept the "Merge Images during Acquisition" in the "Stage" tab options OFF and still want to merge your images after acquisition.
-
you are not happy with the initial merge result.
-
Go to Step 4 for learning how to merge the acquired tiles on Navigator.
-
-
-
In case you have acquired your tiles in a previous session at the microscope:
-
Open your acquired Tile Scan in the "Open Projects" tab.
-
Go back to "Acquisition" tab.
-
Start the "LAS X Navigator".
-
-
-
Go to the "Mosaic Merge" tab inside the LAS X Navigator and select the TileScan you want to merge.
-
The software will show a preview of the merge according to the stored coordinates.
-
The preselected "Blend" option "Smooth" usually gives good results. You can try the other options in case you are not satisfied with the initial result.
-
3D option OFF: tiles from each z layer will be merged one by one (recommended).
-
3D option ON: software will align the tiles across different z planes. Can lead to very large files if not enough matching images are found.
-
Press "Merge".
-
-
-
A new file named "TileScan Merged" is now visible in the "Open projects" panel.
-
Save your *.lif project.
-
Check the last step of this guide for more information about how to visualize your data.
-
-
-
To acquire a regular shaped TileScan:
-
In the "LAS X Navigator" define your region of interest via the rectangle drawing tool as well as "Z-Stack" definitions.
-
Keep the "Merge Images during Acquisition" in the "Stage" tab options OFF.
-
Acquire your Tile scan by pressing "Start".
-
Save your *.lif project.
-
You can now directly merge your tile scan on the microscope (see Step 4) or on an offline LAS X version (see next step).
-
-
-
Reserve and open a ZMB image processing virtual machine.
-
Start LAS X software.
-
Open your project and select the TileScan you want to merge.
-
-
-
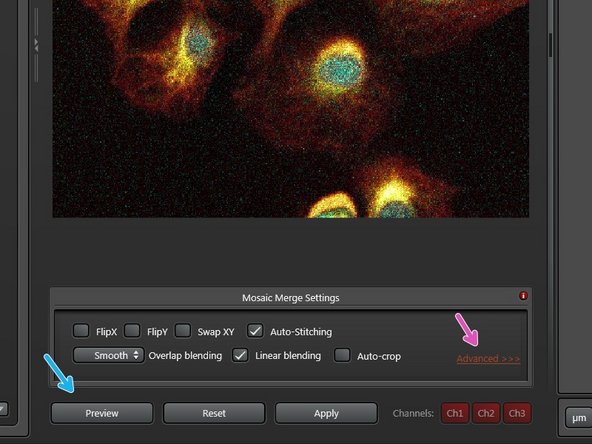
Select the "Process Tools" tab.
-
Choose "Mosaic Merge".
-
Click the "Preview" button to have a first impression of the merge.
-
If you are not satisfied with the "Preview" you can expand the "Advanced" settings and adjust some parameters.
-
Press "Apply" to start the merge.
-
-
-
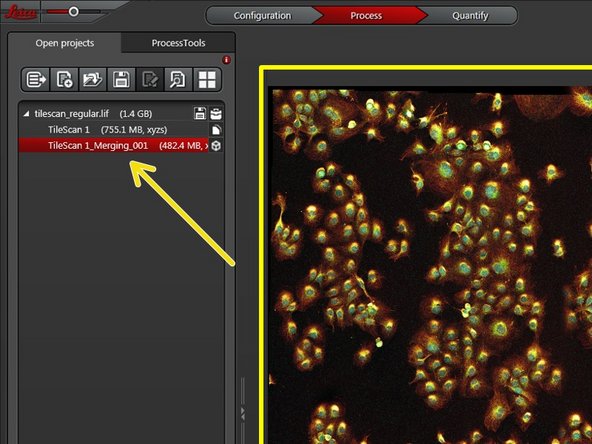
Go to the "Open projects" tab and view your new "TileScan_Merging" file.
-
Save your *.lif project.
-
You now have different options to visualize your merged images, eg:
-
IMARIS: use Imaris File converter to generate an *.ims compatible file.
-
FiJi: Import *.lif using OME Bioformats importer.
-
If you have problems opening the merged file in Imaris or FiJi, make a new empty .lif project in LAS X and copy one merged file into it.
-


Cancel: I did not complete this guide.
One other person completed this guide.
