Introduction
In this guide of the Center for Microscopy and Image Analysis we describe the major steps/aspects required for image acquisition on the Visitron Spinning Disk Microscope.
It introduces you to the "VisiView" software for acquiring a (multichannel) image in 2D as well as 3D. For start-up of the system, mounting and focusing a sample, environmental control, multiposition, xyzt acquisition as well as finishing your session please refer to corresponding guides.
Please find detailed information about the available system here.
-
-
Acquire: control acquisition parameters as illuminations, exposure, gain, binning e.g., adjustments of z-stacks, timelapse or multi area detection
-
Control Panel: controlling LED and/or laser intensities.
-
Overlay: set which acquired images should be overlayed for display
-
Histogram: display of the intensity distribution of the active image
-
Image Display: option for auto scaling, intensity values, adding annotations to image e.g.
-
Processing: there are different processing options available within VisiView software
-
Macros: most used functions and toggling between objectives.
-
Please note, the interface can slightly differ between users (where each window is located, or if active e.g.). Windows can be activated/opened via the menu bar on top, and can be rearranged via drag and drop.
-
-
-
Have your sample mounted and focused as described in Start-up guide.
-
Select a "Wavelength/Illumination" (here e.g. EpiDAPI) within the "Acquire" window.
-
Adjust Camera "Exposure" time and "EMCCD gain".
-
Adjust LED/Laser intensity within the "Control Panel".
-
Click "Show Live".
-
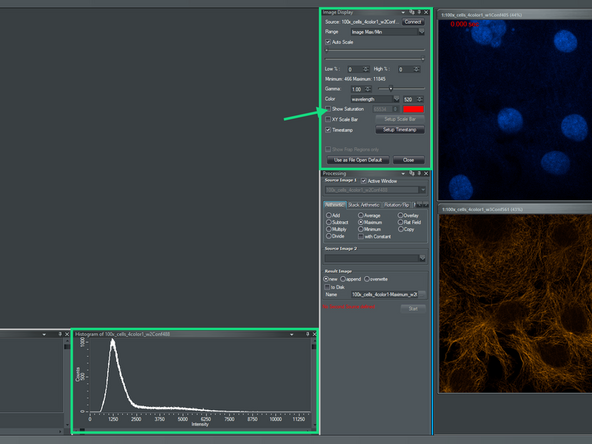
Check "Histogram" and "Image Display" to optimize imaging parameters (as exposure, gain and intensity). Avoid any saturation.
-
Camera(s) run in 16 bit mode, so your max should be lower than 65535.
-
"Binning" and "Live Bin" - Binning can be used to increase sensitivity in low-light conditions, read-out times get shortened, but resolution will also decrease. "Binning" - any adaptions here will be applied to the final image acquisition. "Live Bin" - only applied during live mode.
-
-
-
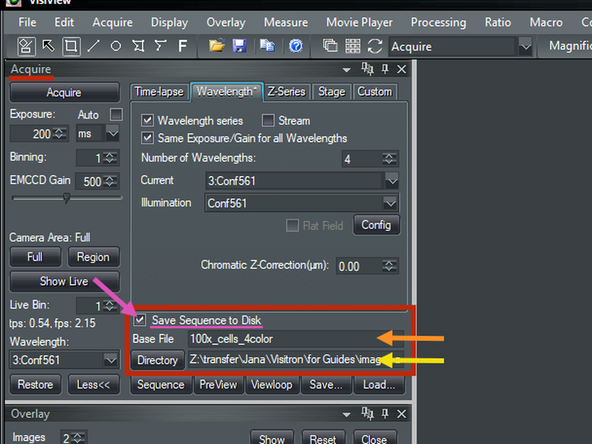
Depending on which tabs are active you can decide if you wanna save your data automatically or manually. For some options data must be automatically saved.
-
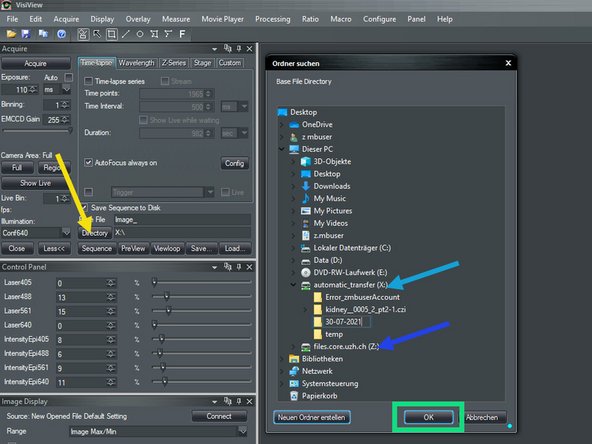
Within the "VisiView" software in "Acquire" window define where your data should be saved:
-
Define "Base File" name.
-
Define Storage location via "Directory".
-
There are two options to save your data:
-
Choose "automatic_transfer (X:)" and generate a new folder. Details can be found in the following guide "Visitron spinning Disk - Datamover".
-
Save directly to network on "files.core.uzh.ch (Z:)". Details can be found here.
-
Finally press "Ok".
-
-
-
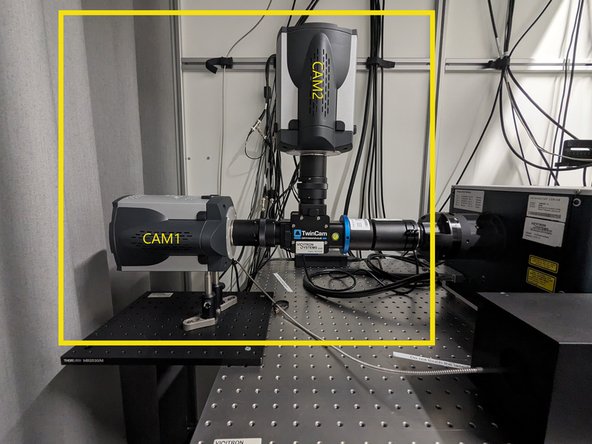
The system is equipped with 2 EMCCD cameras.
-
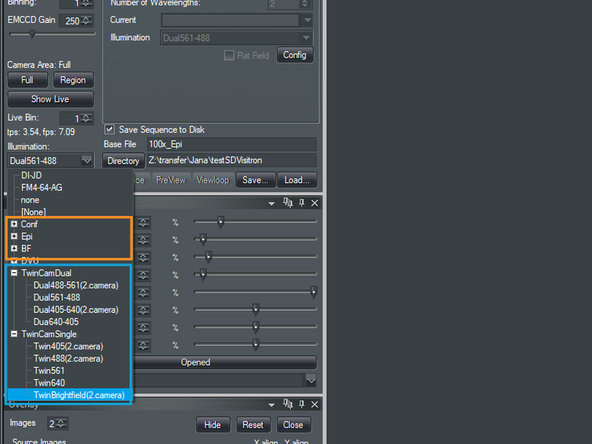
Imaging can be performed either with one camera (CAM1) or with both (CAM1 and CAM2) using the TwinCam module, depending which wavelength setting is chosen.
-
The TwinCam module allows for fast and sensitive simultaneous acquisition of two-color (live) samples.
-
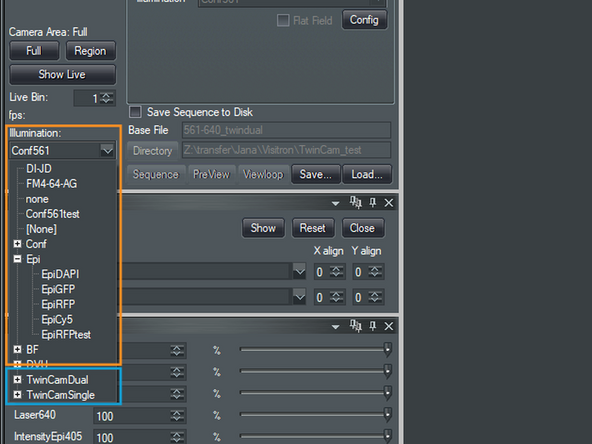
Preset illumination selections for one camera approach - Conf~, Epi~, and BF drop down.
-
Preset illumination selections for dual camera (TwinCam) approach - TwinCamDual~ and TwinCamSingle drop downs.
-
For one camera approach please follow the next steps.
-
For dual camera approach using the TwinCam module please refer to the following guide "Visitron Spinning Disk - Dual camera TwinCam" (guide is still in preparation).
-
-
-
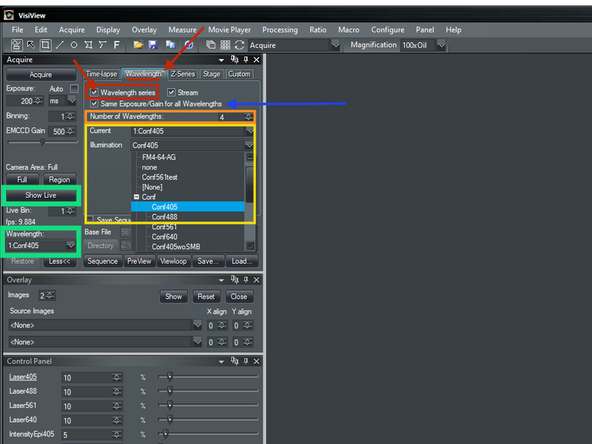
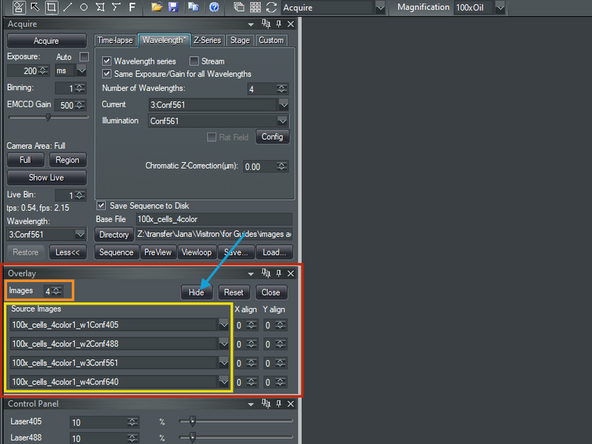
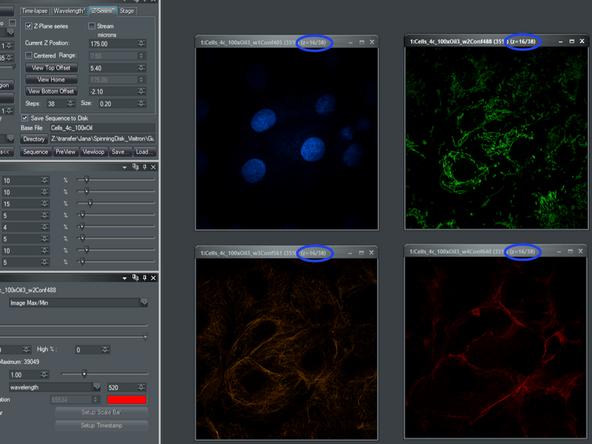
Within the "Acquire" window select "Wavelength" tab and activate "Wavelength Series". The "*" represents if this series is activated.
-
Define how many channels you would like to image (here 4 e.g.).
-
For each channel ("Current") select an "Illumination" wavelength.
-
Adjust your imaging settings (exposure, gain, LED/laser power) for each channel by selecting it first under "Wavelength" and then click "Show Live".
-
Saturation can be displayed in any wished Pseudocolor by checking the box "Show Saturation".
-
Once satisfied with your settings for each channel click "Stop Live".
-
You can define if "Exposure/Gain" should be same for each wavelength by marking "Same Exposure/Gain ..." if applicable. Further re-adjustments might be required.
-
-
-
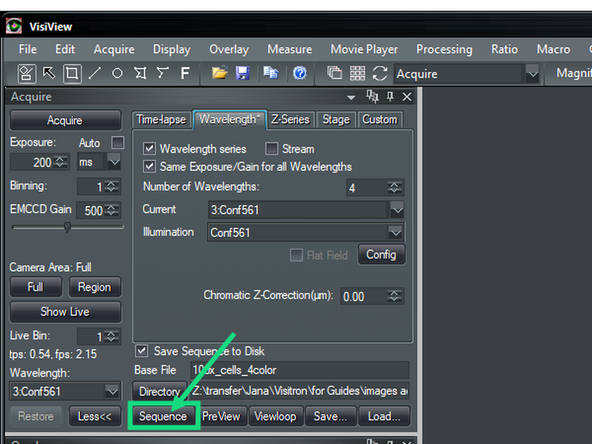
Once you are satisfied with your settings, click on "Sequence" to start acquisition.
-
Depending whether you selected "Save Sequence to Disk", the data will be already saved or not.
-
To observe an overlay of the acquired channels:
-
Select how many channels you wanna overlay.
-
Select which ones in the drop down menus.
-
Click "Show".
-
Here it shows "Hide" instead of "show", as the overlay is already open.
-
-
-
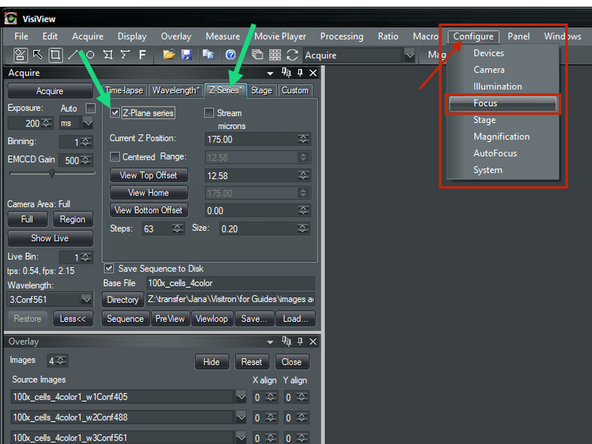
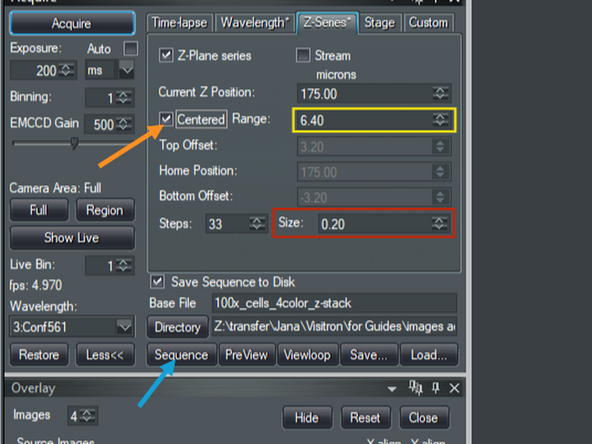
Select "Z-Series" tab and activate "Z-Plane series".
-
To configure which device be used go to "Configuration" and select "Focus".
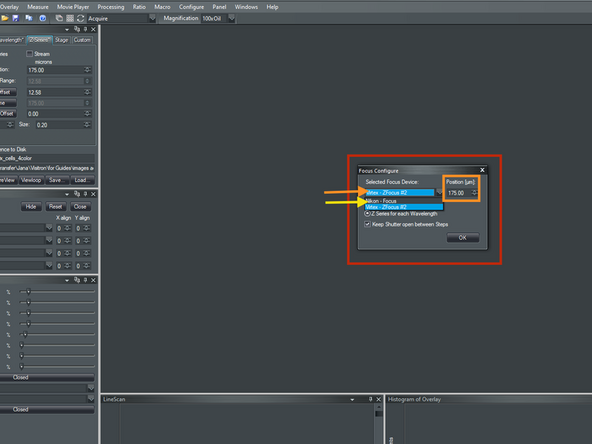
-
Within the opened window "Focus Configure" select your "Focus Device" from the drop down menu.
-
Virtex - ZFocus#2: Fast Piezo stage - the travel range of this device is 350um. Make sure the Piezo is in the middle of the travel range (175) before you start your experiment.
-
Nikon - Focus - full travel range of the stage, so used for thicker samples (more than 350 um).
-
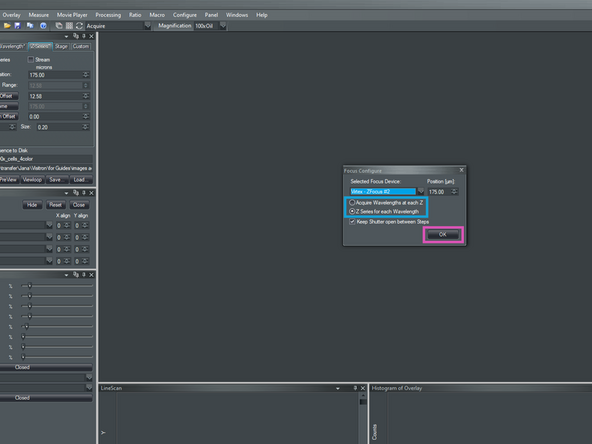
Select if you wanna "Acquire Wavelengths at each Z" or acquire "Z Series for each Wavelength".
-
Click "Ok".
-
-
-
Click "View Home" and focus.
-
Define now your top and bottom limits of your sample:
-
Click "View Top Offset" and adjust the value that you reach the top of your sample.
-
Click "View Bottom Offset" and adjust the value accordingly for the other side of your sample.
-
Stop Live View when satisfied.
-
Define your step "Size" (unit = um). Z-stack direction can be alternated by adding a "-" in front of your defined Step-Size.
-
Click "Sequence" to acquire a z-stack.
-
One can toggle through the different z-layers using the keyboard arrow keys up/down.
-
-
-
Alternatively you can also choose to define a centered range.
-
Check "Centered Range".
-
Define your volume size.
-
Make sure that your current focus is in the middle of your sample.
-
Define your step "Size" (unit = um). Z-stack direction can be alternated by adding a "-" in front of your defined Step-Size.
-
Click "Sequence" to acquire a z-stack.
-