-
-
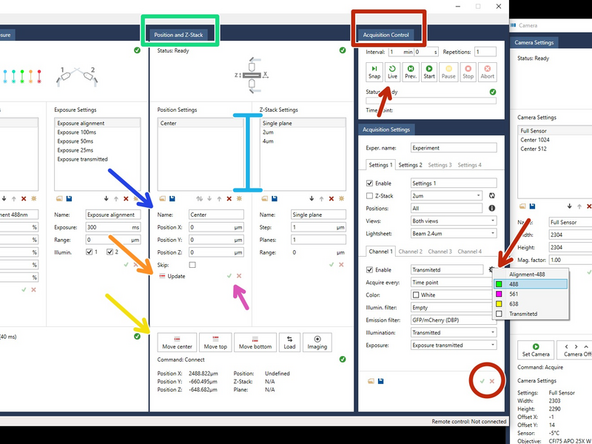
Lightsheet alignments and offsets; these settings are adjusted during the semi automatic light sheet alignment.
-
Laser power settings and exposure time for the cameras.
-
Position list and Z-stack options.
-
Start, stop, and live button.
-
Experiment setup.
-
Imaging parameters are saved in the lists of the respective options (Illumination and Position Settings). The experiment setup is defining which parameters should be used for the actual imaging. For example which positions should be acquired and which channels are used.
-
Time-lapse setup.
-
-
-
Change the acquisition settings to "Transmitted" light, which should allow you to find your sample with the imaging chamber open.
-
With the chamber open, use the stage controller to place the sample holder at the height of the detector objectives on:
-
Y
-
X
-
Then find the bottom of the well containing your sample, and follow to move on X and Y to find it.
-
Focus your sample with Z.
-
You can iterate between camera 1 and 2 by right clicking on the image.
-
You can access the change the step size of the stage controller by pushing the X, Y, and Z knobs. To go back to normal use you can press them once more.
-
-
-
On the Acquisition settings panel, select fluorescent or transmission light to find your areas of interest, click the check-mark to update the selection, and click on "Live" view to observe your sample.
-
On the positions panel:
-
Give your position a name.
-
Save the position by clicking "Update".
-
Click on the check-mark to apply all changes.
-
Click on "Move to center" to check if the stage moves to your desired position.
-
Your positions will appear listed, and can be updated.
-
Remember to click the red check-mark symbol at the bottom of the "Acquisition settings" tab to apply your changes.
-
-
-
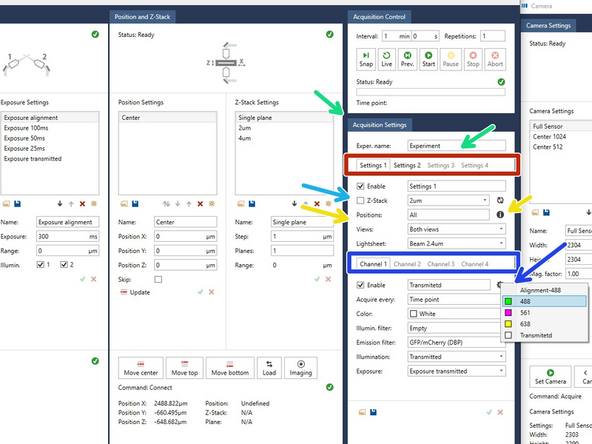
Adjust the parameters "Acquisition Settings", give your experiment a name and configure the following:
-
The option of up to four groups of settings. Each "Settings" group has the following possibilities:
-
Use four different illumination channels, including 488 nm, 561 nm, 638 nm, and transmission light.
-
Apply the settings to selected positions. Click on the "i" button to see the formatting of the listing of the positions.
-
Perform a Z-stack imaging to the selected positions.
-
-
-
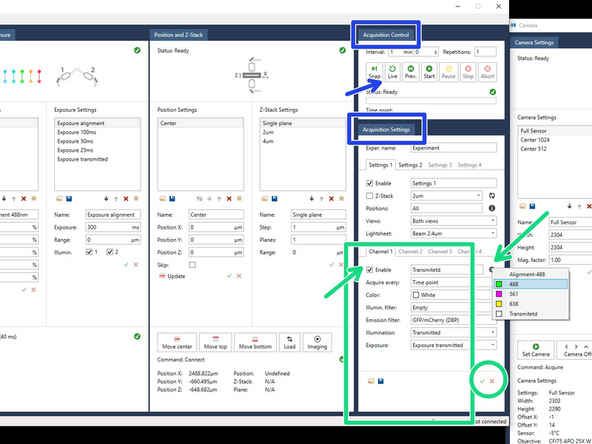
You can image up to four channels per setting, which can be applied to a series of positions. You can select the illumination settings by clicking on the gear symbol on the "Acquisition settings" tab. Simultaneously, you can keep the imaging on "Live" mode in the "Acquisition control" tab. This way, you can see how your changes affect the images.
-
Select and "Enable" your channels of interest by clicking the check-mark and the gear symbol. Each channel selection already has some default standard values. However you can adjust all parameters to your sample's needs. Remember to click the red check-mark when to apply your changes.
-
Acquire every: How often (in frames) to make an image.
-
Color: look-up table.
-
Illumin. Filter: This modulates the power delivered to the sample, no filter means more power; the greater the value of the filter, the lower the power of the illumination that will be delivered to your sample.
-
Emission Filter: This refers to the wavelength filters that correspond to the emission wavelength of your fluorophore.
-
Illumination: Laser selectetion or transmitted light.
-
Exposure: The greater the exposure, the greater the recording time, and greater signal to noise ratio.
-
-
-
Adjust your step-size, and number of planes on the position and Z-Stack panel.
-
You can create a new Z-Stack setting by pressing the sun symbol, and save those setting pressing the floppy disk symbol. Alternatively, you can select one of the predefined Z-stacks from the list.
-
You can define the step size and number of planes.
-
The z-stack is centered at your desired position, and will make half of the planes you have written on the settings in one direction, and the other half on the other.
-
Remember to apply your changes by clicking the green check-mark.
-
Enable the Z-stack on the settings group of your choice.
-
-
-
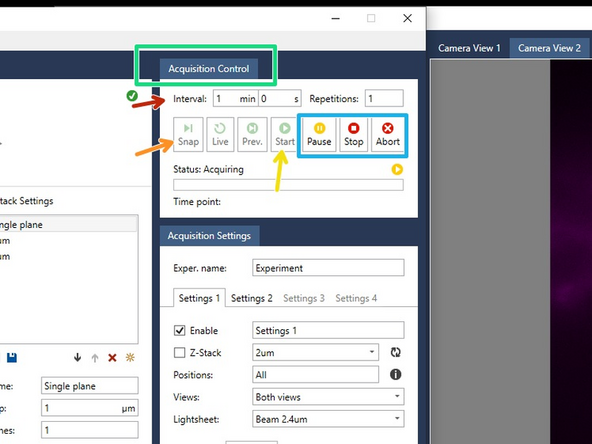
With the "Acquisition control", once your imaging parameters are defined, you can:
-
Make a single image with the "Snap" button.
-
"Start" you imaging experiment.
-
Make sure that the interval is defined such that there is enough time between takes. Otherwise the acquisition will stop after the first image.
-
You can "Pause" and adjust settings, "Stop", and the current image will still be recorded, or "Abort" and end immediately the experiment.
-