Introduction
In this guide of the Center for Microscopy and Image Analysis we describe the major steps/aspects required for image acquisition on the NEW Leica Stellaris confocal laser scanning microscopes.
The most relevant new features are:
- Spectrally flexible white light laser (WLL) with an extended spectral output on the red and near-infrared spectrum (440 nm up to 790 nm).
- NEW Power HyD S, X and R detector.
- TauSense technology, which gives access to lifetime-based information, delivering additional insights to your experiments.
- Possibility of switching between resonant and non-resonant scanner directly within the software
Please find detailed information about the available systems here:
-
-
Go to "Configuration".
-
Select "Laser Config".
-
Switch "ON" the lasers you need.
-
The WLL is set to 85% by default and allows selection of excitation wavelengths from 440 nm to 780 nm.
-
Go to "Hardware".
-
Here you can change the image "Bit Depth" if necessary.
-
Go back to "Acquire".
-
-
-
Make sure your sample is correctly placed and focused. Check the appropriate Start-up guide for more info.
-
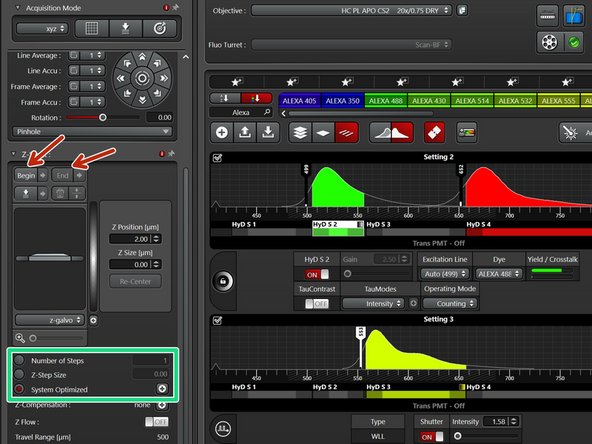
Identify the following sections in the "Acquire" panel:
-
Make sure you are in the "xyz" scan mode.
-
Settings for "XY" ("Format", "Speed" e.g. adjustments).
-
Settings for z ("Z-stack" option).
-
Excitation settings.
-
Objectives.
-
Detectors and emission settings.
-
-
-
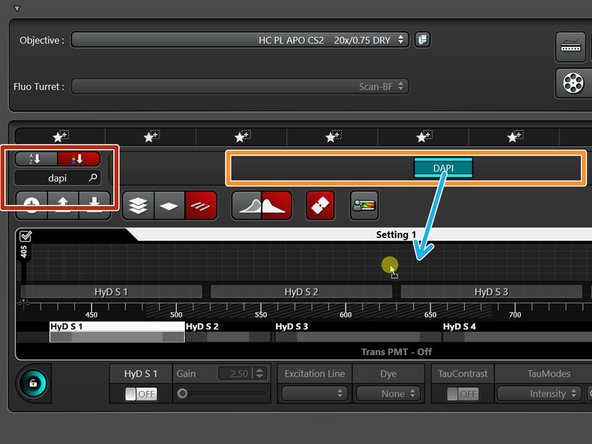
Type to search for your fluorophore/dye of interest.
-
Available results will be displayed here.
-
Drag the suitable one into the empty panel ("Setting 1").
-
The corresponding laser line will be automatically added.
-
Repeat the same procedure for the remaining fluorophores by adding them to the same panel ("Setting 1").
-
-
-
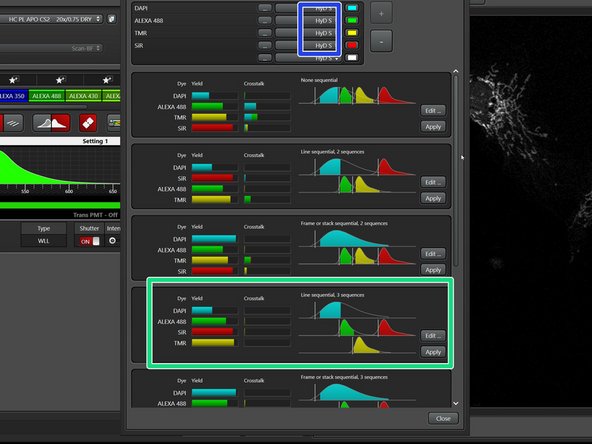
Click the "Open Dye Assistant" button.
-
"HyD S" Detectors are used for regular acquisition.
-
Choose the most appropriate configuration from the different options - avoid having crosstalk!
-
"Line sequential" acquisition is faster compared to "Frame sequential".
-
For TauSense acquisition see the appropriate guide.
-
-
-
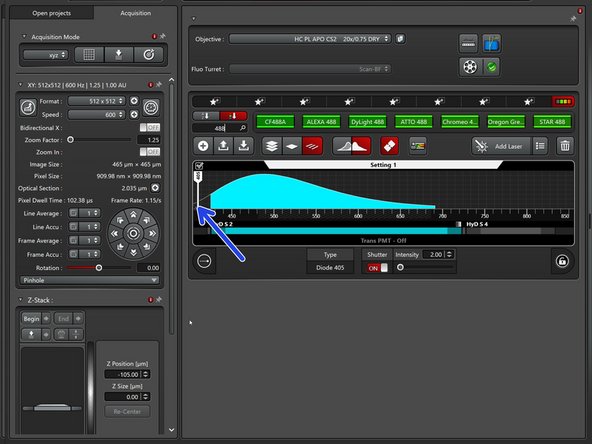
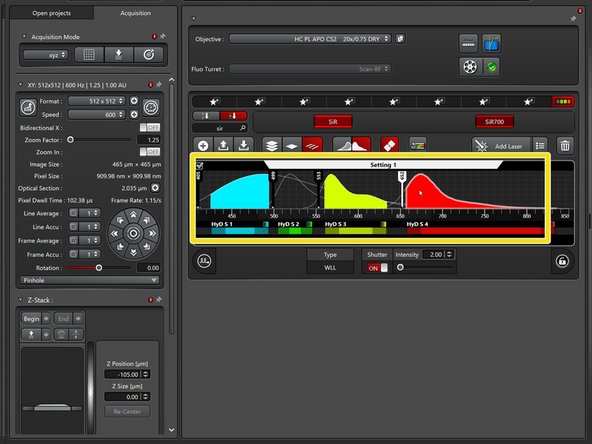
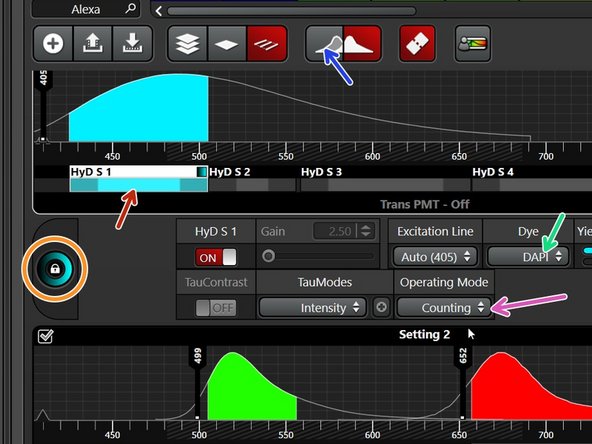
Click on the different detectors to adjust imaging parameters.
-
Check that Detectors are in "Counting" "Operating Mode".
-
Here you can also select your dye to visualize the emission spectra.
-
Toggle to activate/deactivate the excitation spectra as well.
-
Double click here to change look-up table (LUT) for each active detector.
-
-
-
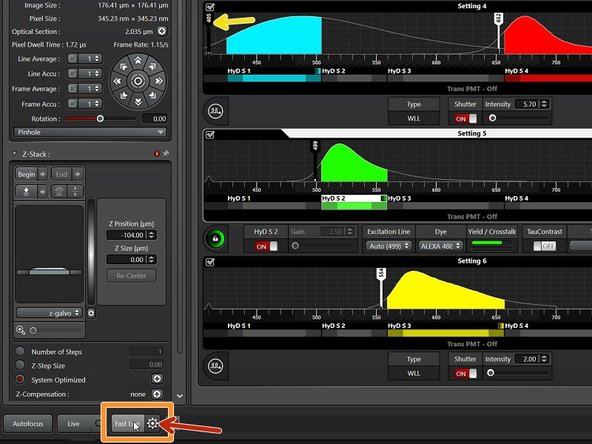
You can use the "Fast Live" button to quickly adjust focus or zoom.
-
Only images from the active sequence will be shown while live.
-
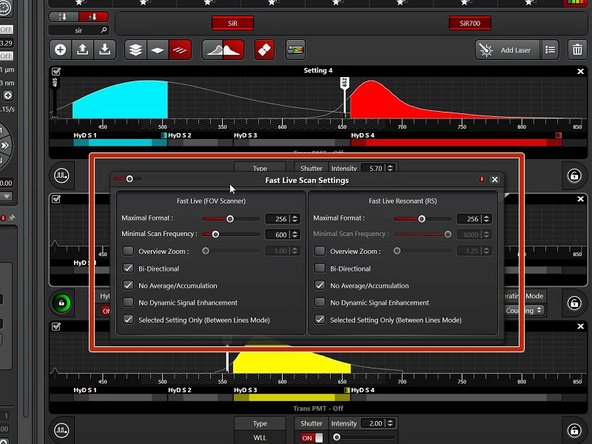
Click the clock wheel to adjust "Fast Live" settings (each scanner has independent settings).
-
Adjust laser intensity by double clicking and typing in.
-
Hovering over the laser bar and rolling the mouse wheel also allows intensity adjustment.
-
These settings are only used to allow a fast screening / localization of your sample. You will need to readjust proper imaging setting under "Live" view for image acquisition.
-
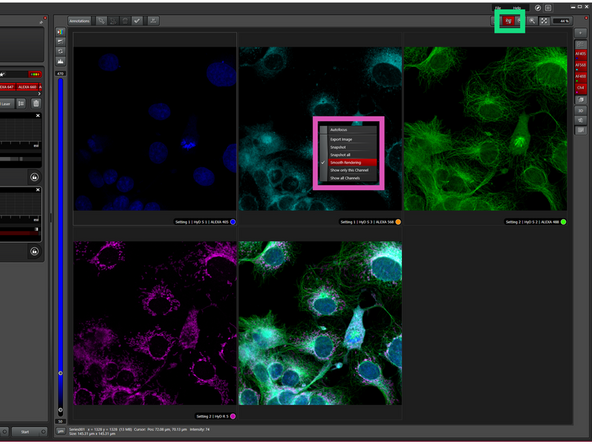
Activate the mouse option - This will allow you to use a mouse to move around in your sample and navigate directly in the SW.
-
BE AWARE OF SMOOTH RENDERING: When right-click somewhere on the image, you can select to Disable smooth rendering - this is how your real image looks like and will look like, when open in another SW.
-
-
-
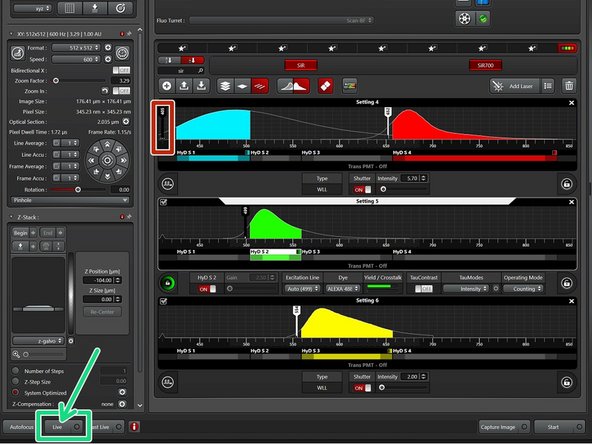
Start adjusting your image sequences/settings.
-
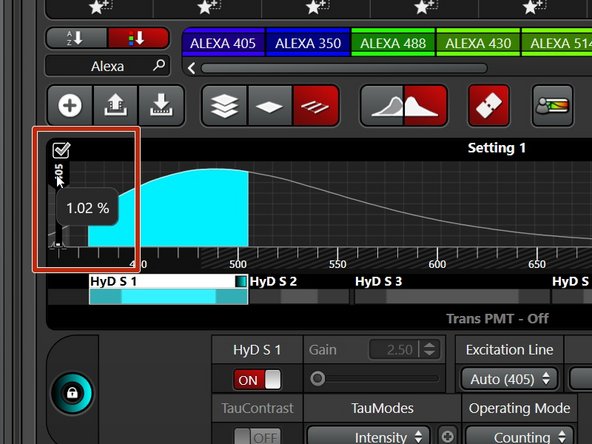
Click "Live".
-
Adjust laser power.
-
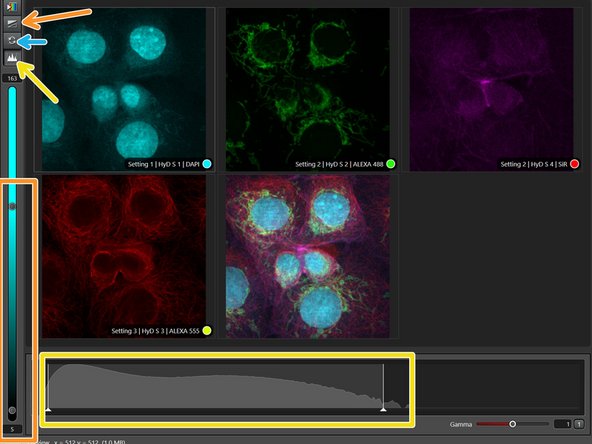
Adjust the image contrast by using the slider or activate automatic contrast adjustment ("Auto Contrast").
-
Click here to reset the contrast adjustment to full scale.
-
Activate the image histogram to inspect the intensity distribution and to optimize your signal. Avoid under- and overexposure.
-
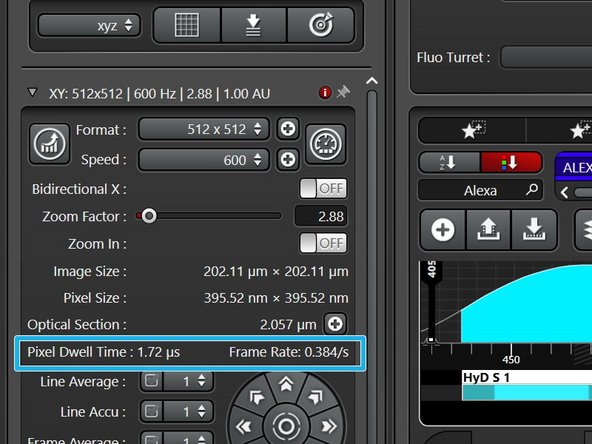
For counting mode adjust to approx. 80 counts / usec pixel dwell time (keep an eye on the pixel dwell time - depending on the set format and scan speed).
-
-
-
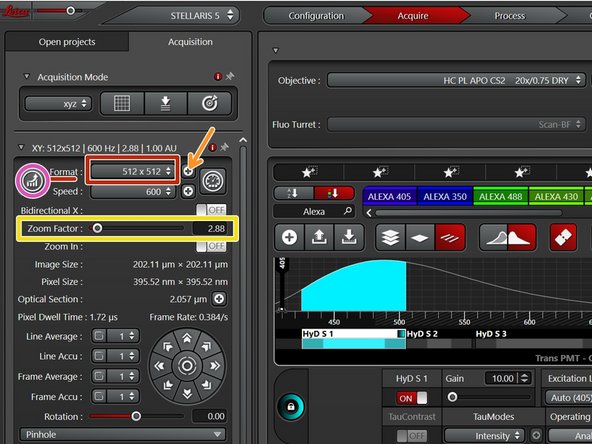
Proper setting of the xy sampling (pixel size) is crucial for acquiring optimal images.
-
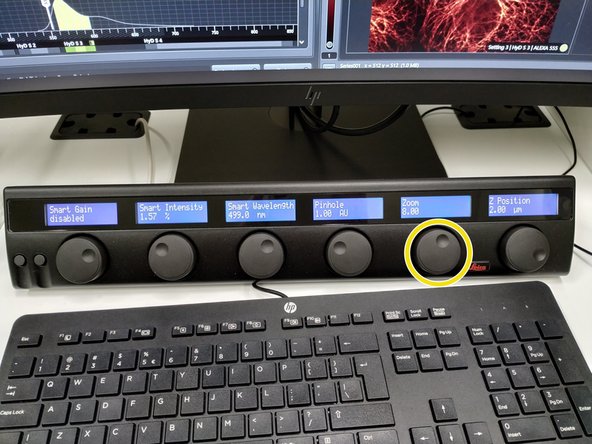
Change your field of view by using the "Zoom". You can also use the knob in the external control panel.
-
"Format" defines the number of pixels in one scan area.
-
One can choose preset formats via the drop down menu.
-
By clicking the "+" every other format can be chosen.
-
To adjust for the correct pixel size/optimal sampling you can either use the online calculator such as the SVI Nyquist Calculator or the auto button for an estimate.
-
-
-
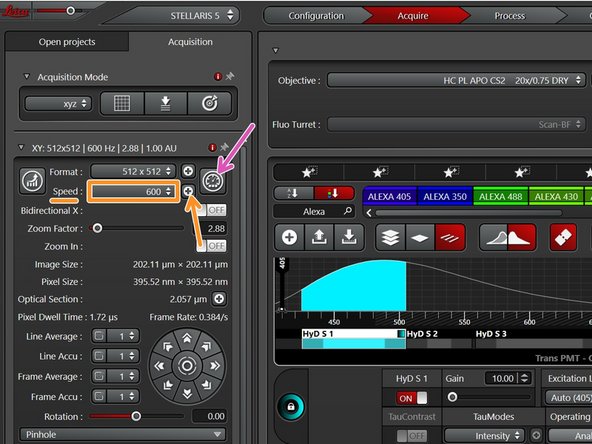
Here you can change the scanning speed:
-
via the drop down menu (presets) or via "+" for every other scan speed.
-
Use slower scan speed to increase the pixel dwell time and thus collect more light.
-
Increased scan speed leads to faster imaging, lower photo-damage and bleaching, but gives more noise and allows a smaller field of view.
-
Toggle between the resonant and galvo scanner here. It might take a few seconds to adjust after switching.
-
You can also activate "Bi-directional" scanning to speed up acquisition.
-
Please make sure the phase is properly adjusted. Usually, there is no need for adjustments. Best is asset on know structure (e.g. nuclei). Nuclei should be rounded - when you see doubling of that structure, this might be a sign of not corrected phase.
-
-
-
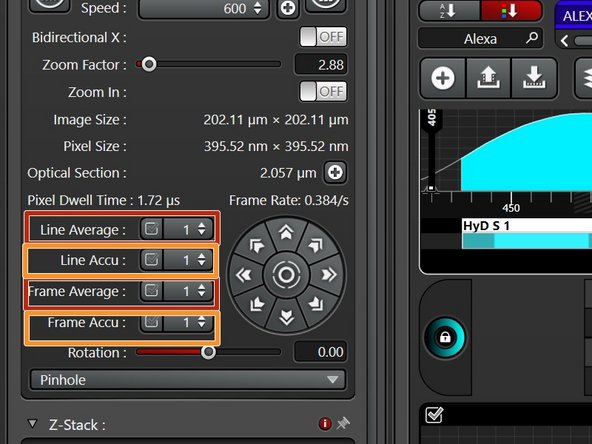
If you are limited by the laser power but still need to increase the signal (or reduce noise) use:
-
Accumulation (by line or by frame): Useful when using detectors in counting mode or for very weak signals.
-
Averaging (by line or by frame): may be used to remove noise.
-
If applied the acquisition time will increase.
-
In Frame sequential mode, number of Accum/Averaging can differ per phase. In Line sequential mode, the same setting applies to all.
-
-
-
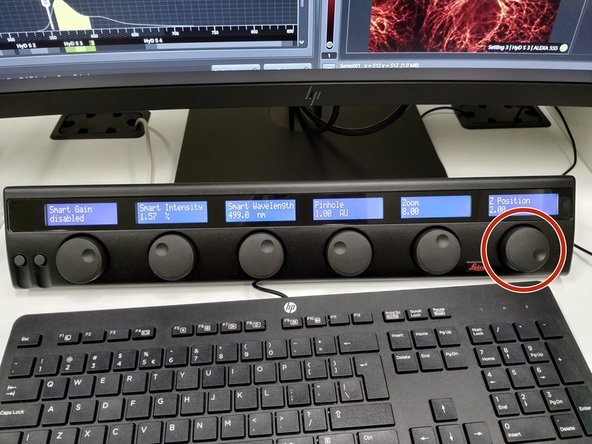
Use the z-drive controller ("Z-Position" on the "control panel" to define the limits with "Begin" and the "End" of your z-stack.
-
Define the appropriate "Z-Step size" or go for optimal z sampling by choosing "System Optimized". The "Number of Steps" will be automatically calculated.
-
You should refer to the SVI Nyquist Calculator if you plan to deconvolve your image as a post-processing step.
-
-
-
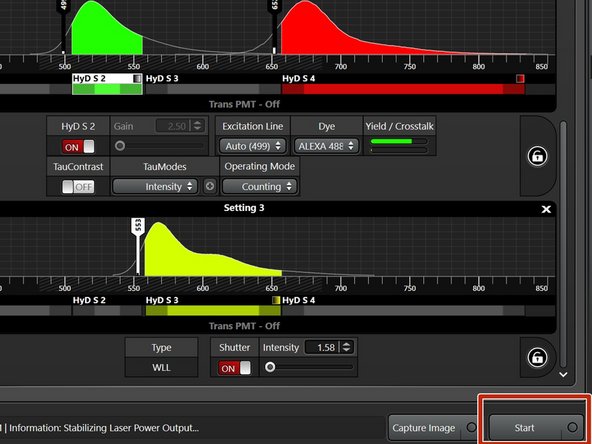
Press "Start" to begin acquisition.
-
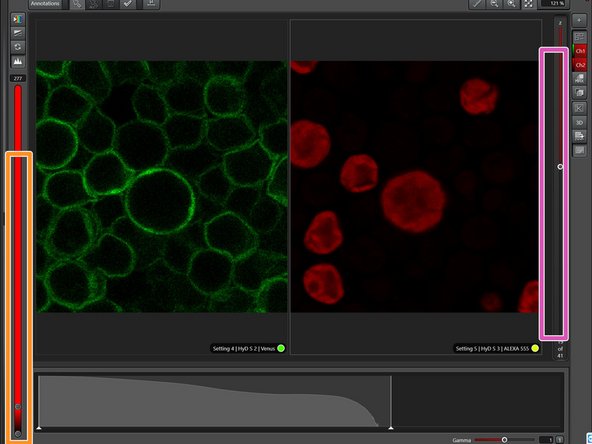
You can adjust contrast by using the slider.
-
Go through the different z planes here.
-
Use the orthogonal viewer to inspect your z stack.
-
You can also use the 3D viewer here.
-
-
-
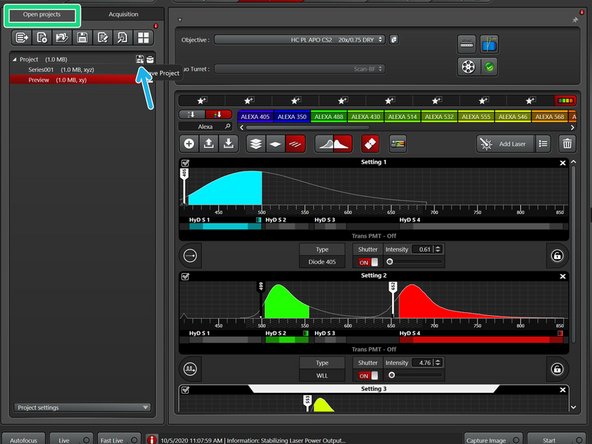
Go to the "Open projects" tab.
-
Click on your data file and give it a meaningful FAIR name.
-
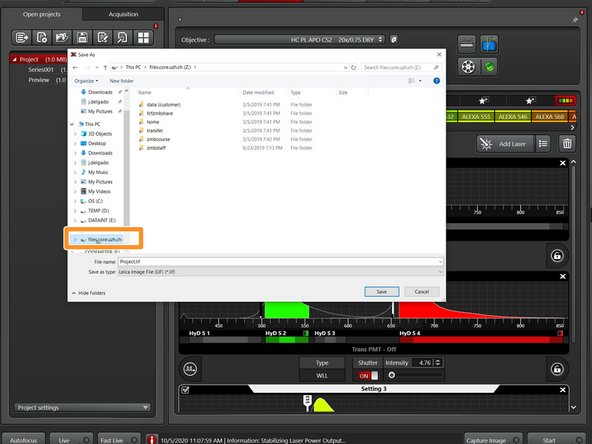
Click on the disk button to save the data. Alternatively right click and choose "Save as..." from the drop down menu.
-
During long sessions, save your data regularly to avoid losing everything in case of a crash or unexpected issue
-
Save the data to your zmb-data network folder.
-