-
-
Ocular: adjustments for viewing via the ocular and settings for DIC.
-
LSM Imaging: scan field, speed, galvano vs resonant scanner, scan size
-
Microscope: select objectives, select Z drift compensation controls
-
Series: adjustments of z stacks
-
Observation Method: Store individual observation methods
-
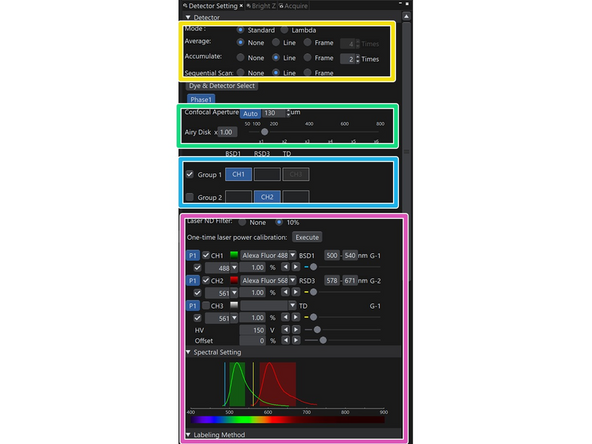
Detector Setting: Select lasers and detectors for fluorochromes / dyes and tags and specifically adjust settings
-
Bright Z: depth dependent adjustment of lasers and detectors
-
Acquire: acquisition of z stacks, timelapse or multi area detection
-
-
-
Galvano (slow) vs Resonant scanner selection
-
OneWay vs Roundtrip (bidirectional - faster, but lower resolution and quality) selection
-
Scan size: digital resolution
-
Area Settings: scan field area and zoom, rotation
-
-
-
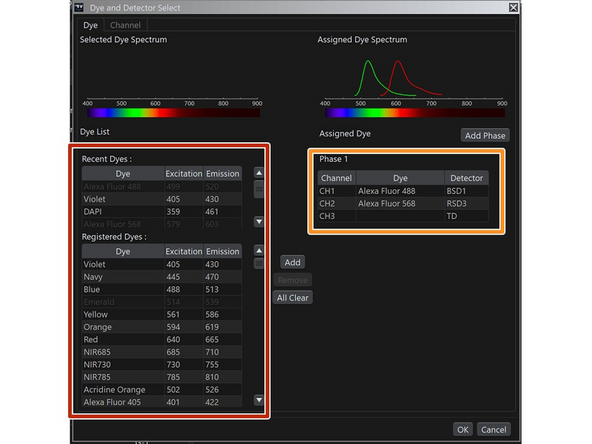
Dye and Detector Select
-
List of dyes to add.
-
TD -> Transmitted light channel
-
Phase: channels requiring hardware changes (e.g. filter wheels)
-
Selection for Averages, Accumulation or sequential settings (line, frame). In sequential scanning, groups represent the sequences
-
Pinhole
-
Groups of laser / detector settings
-
Adjustment of lasers and bandwith of the detector (nummerical values or by colored bands in the emission spectra that can be shifted)
-
-
-
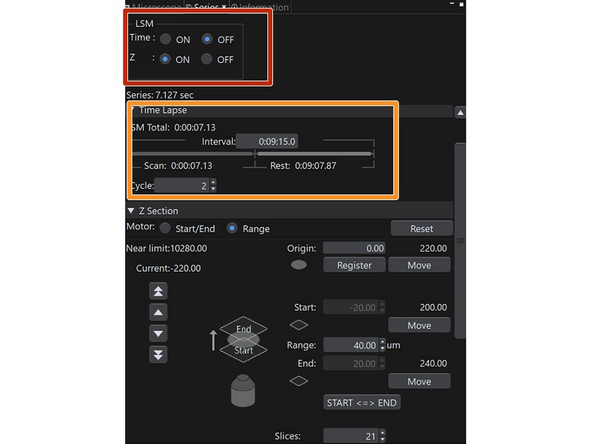
Selection for timelapse and / or z stacks.
-
Only if time or Z is on, a timelapse or stack is later acquired.
-
Settings for timelapse
-
Settings for z stacks.
-
Start/End: Definition via start and end position.
-
Range: Definition via a range. This option must be used, if multiple positions / areas will be acquired using MATL.
-
-
-
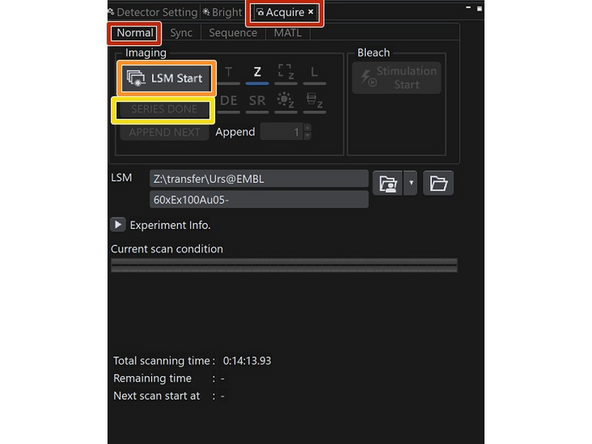
Acquire>Normal
-
Specify where your data is stored. Select a filename.
-
LSM Start: starts the acquistion.
-
Indicators (T, Z,...) show if a timeseries, z Stack are aquired
-
If a series is finished, press Series Done
-
-
-
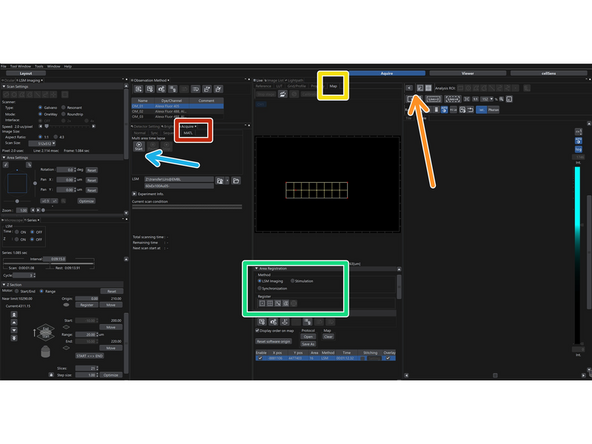
Select Acquire>MATL
-
Open the addition MATL panel via the '>' icon in the live tab
-
Select the tab 'MATL'
-
Make sure you select time and z stack configuration (series tab) for your multi area acquistion before continuing.
-
Place individual postions, tileset, areas as needed.
-
For each postion, tileset, do not forget to select the overlay checkmark for you position, tileset (only 3 channels allowed). If stitching is needed, select this checkmark too.
-
Positions, tilesets inherit the acquisiton / detection parameters which were active at the time of generation. Updating is possible. Using active focus control is possible by storing the active focus reference with each position or tileset. This must be done after the position or tileset is defined.
-
Acquire all position areas by pressing start. If necessary a loop over all position / tilesets can be defined.
-
-
-
Plates and carrier definition can be made via Tools>Configuration>Plate.
-
Apply settings from data: open data and select the load settings from the icons.
-
Tool Windows>Information shows all metadata of the scan currently adjusted.
-